Are you a doll enthusiast or a crafty parent looking to enhance your doll collection? If you want your dolls to have the perfect balance and stand with elegance, you’ve come to the right place! This guide will walk you through creating stable, realistic stuffed legs for your dolls that will not only improve their appearance but also add functionality. Let’s dive into the world of doll legs!
Why You Need Sturdy Legs for Your Dolls
Having dolls that can stand on their own opens up a world of play and display possibilities. Whether it’s for photography, crafting, or simply presenting your beloved dolls, having them remain upright adds a special touch. In addition to stability, these stuffed legs provide a realistic aesthetic that enhances your doll’s overall look.
Materials Needed
Before you get started, gather the following materials:
Felt or Cotton Fabric: Choose fabric that is durable enough to withstand play and looks great for your doll’s legs.
Polyester Stuffing: This will ensure the legs are soft yet sturdy.
Fabric Glue: Great for adding extra stability where needed.
Matching Thread and Needle: Essential for sewing the legs together.
Printed Leg Pattern: You can create or find a pattern online for the perfect leg shape.
Pins and Scissors: For cutting and holding fabric in place.
Step-by-Step Instructions
Creating your doll’s legs is a fun and straightforward project. Follow these steps for great results:
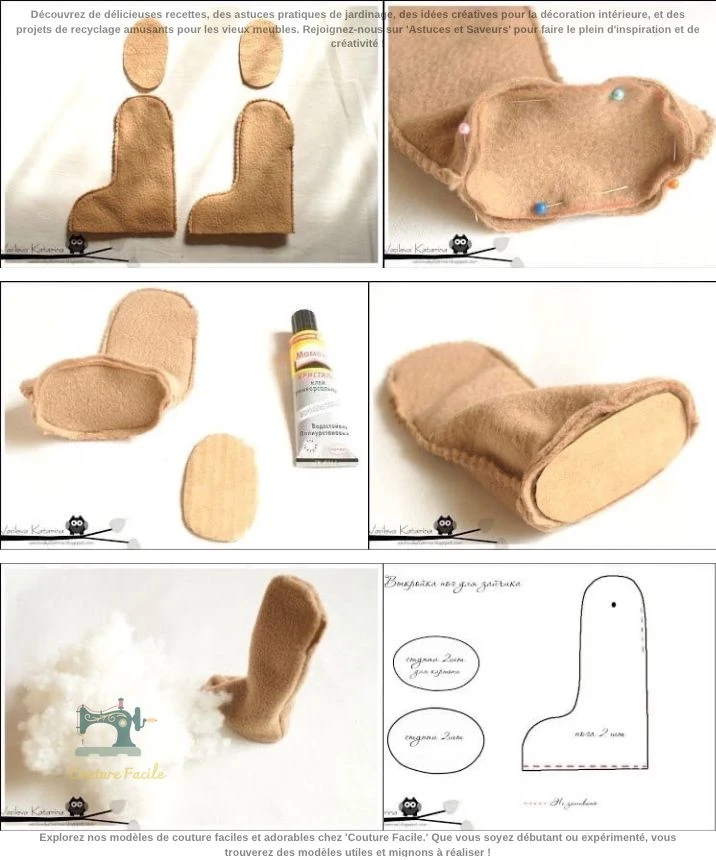
1. Cut the Fabric Pieces
Using your leg pattern, cut out two identical pieces of fabric for each leg. Aim for a height of about 10 cm and a width of approximately 3 cm for the feet.
2. Assemble the Legs
With the right sides of the fabric facing each other, pin the edges together, leaving an opening at the top to insert the stuffing later.
3. Sew the Contours
Carefully sew around the edges of the fabric, securing them together. Remember to leave that small opening at the top.
4. Attach the Sole
Cut an oval sole to fit the bottom of each leg and sew it securely. This step provides a solid foundation for your dolls to stand on.
5. Stuff the Legs
Fill each leg with polyester stuffing until they are firm yet soft. Adjust the amount according to your desired density. Once filled, gently sew the opening closed with discreet stitches.
Tips for Success
Choose a Thicker Fabric: For added stability, opt for slightly thicker fabric that can hold its shape.
Add Weights: To further enhance balance, consider adding small weights, like rice bags or plastic beads, into the legs.
Finish with a Press: After sewing, carefully press the seams with an iron, making the legs look neat and professional.
Final Thoughts
This simple sewing project guarantees sturdy, balanced legs for your dolls while being fun and easy to execute. With just a few materials and some creativity, you can create legs that not only look great but also provide your dolls with the support they need to stand tall and proud.
Are you ready to take your doll crafting to the next level? Gather your supplies and start sewing those beautiful, sturdy legs today! Happy crafting!