Are you ready to embark on a charming sewing adventure? Making your own fabric bunny is not only a fun and creative activity, but it also results in a huggable friend that can bring joy to children and adults alike. With straightforward instructions and easy-to-find materials, let’s dive into creating this adorable lapin!
Materials Needed
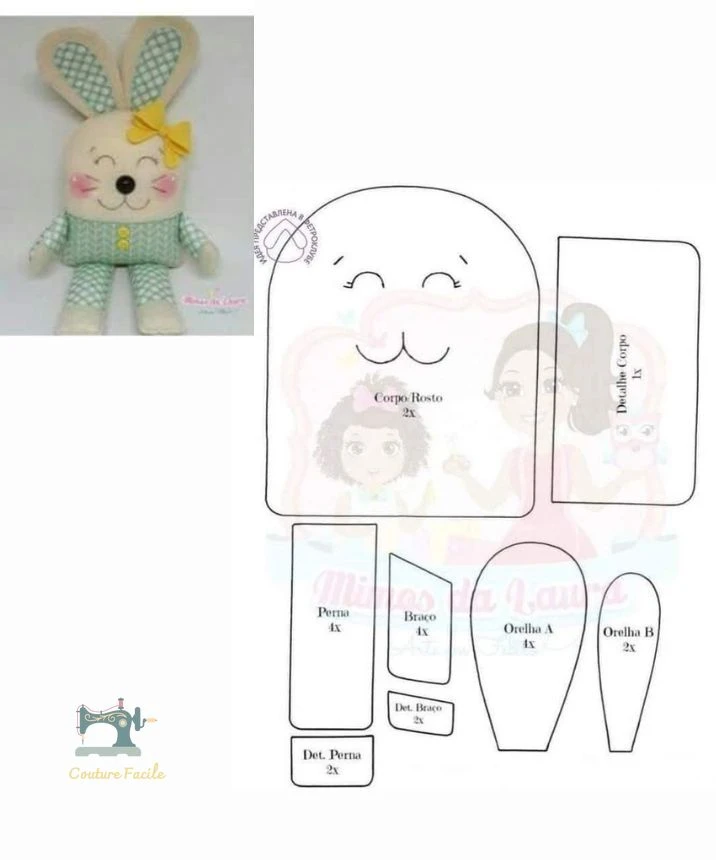
To get started, gather the following supplies:
Printed Cotton Fabric: This will be used for the body, arms, and legs of your bunny. Choose a fun pattern or color to suit your style!
Felt: Use felt for the inner ears to give your bunny a nice contrast.
Polyester Stuffing: This will be used to fill your bunny, making it fluffy and soft.
Coordinating Thread: Choose a thread color that complements your fabric.
Decorative Ribbon or Accessories: Add a cute touch, such as a bow, to personalize your bunny.
Sewing Supplies: Don’t forget your needles, pins, scissors, and optionally, a sewing machine for a quicker process.
Measuring and Cutting
Before you start sewing, you’ll need to measure and cut out all the necessary pieces according to the pattern. Here’s what you’ll cut:
Body/Face Pieces: 2 pieces
Body Detail Piece: 1 piece
Arms: 4 pieces- Arm Detail: 2 pieces
Legs: 4 pieces- Leg Detail: 2 pieces
Ears:- Outer Ears: 2 pieces
- Inner Ears: 2 pieces
Remember to cut each piece with a 0.5 cm seam allowance to ensure proper assembly.
Step-by-Step Instructions
Follow these easy steps to assemble your cute fabric bunny:
1. Prepare the Pieces
- Cut all fabric pieces according to the pattern.
- For the ears, sew the outer (A) and inner (B) pieces right sides together. Turn them inside out and press to flatten.
2. Assemble the Body
- Sew the two body pieces together, leaving an opening for stuffing.
- Fill the body with polyester stuffing, then close the opening using an invisible stitch for a clean finish.
3. Create the Arms and Legs
- Sew each arm and leg piece right sides together, then turn and fill with stuffing.
- Attach the details (Arm Detail and Leg Detail) to each limb for a polished look.
4. Attach Limbs
- Securely sew the arms and legs to the body using strong stitches to ensure they stay in place during play.
5. Add Final Touches
- Attach the ears to the head.
- Embroider the facial features (eyes, mouth) and add rosy cheeks using pink felt or fabric paint.
- Tie on a decorative ribbon for that extra flair!
Tips for Success
Fabric Choice: Opt for soft fabrics like cotton or linen to make your bunny pleasant to touch and cuddle with.
Stuffing: Be careful not to overstuff the bunny, as it may distend the seams.
Personalization: Get creative by adding custom designs or even embroidering a name on the bunny’s belly for a special gift.
Safety: If making this for a young child, avoid using detachable parts like buttons, which pose choking hazards.
Conclusion
Now that you have a roadmap to create your very own fabric bunny, it’s time to unleash your creativity! Whether you’re making it as a gift or a cozy companion, sewing your own adorable lapin is a fulfilling project that provides a sense of achievement. Grab your materials and start crafting—your new fluffy friend awaits! Happy sewing!