Are you looking for a fun and creative sewing project that will brighten up your home? Crafting your own adorable owl cushion is a perfect choice! It’s not only an enjoyable activity, but the end result will be a charming addition to your space or a thoughtful handmade gift. Let’s get started!
Materials Needed
Before diving into the sewing process, gather the following materials:
Main Fabric: Choose a soft fabric in gray or any color of your choice for the body of the owl.
Contrasting Fabric: Select a contrasting fabric for the wings that will complement your main color.
Felt: You’ll need white and black felt for the eyes, plus orange felt for the beak and feet.
Thread: Get matching thread to ensure all your stitches blend seamlessly.
Cushion Stuffing: This will give your owl cushion its plush and huggable quality.
Needle and Thread or Sewing Machine: Depending on your comfort level, you can hand stitch or use a sewing machine to assemble your cushion.
Pattern: A template for cutting the fabric pieces (you can create one or find a pre-made pattern).
Step-by-Step Instructions
1. Prepare the Pieces
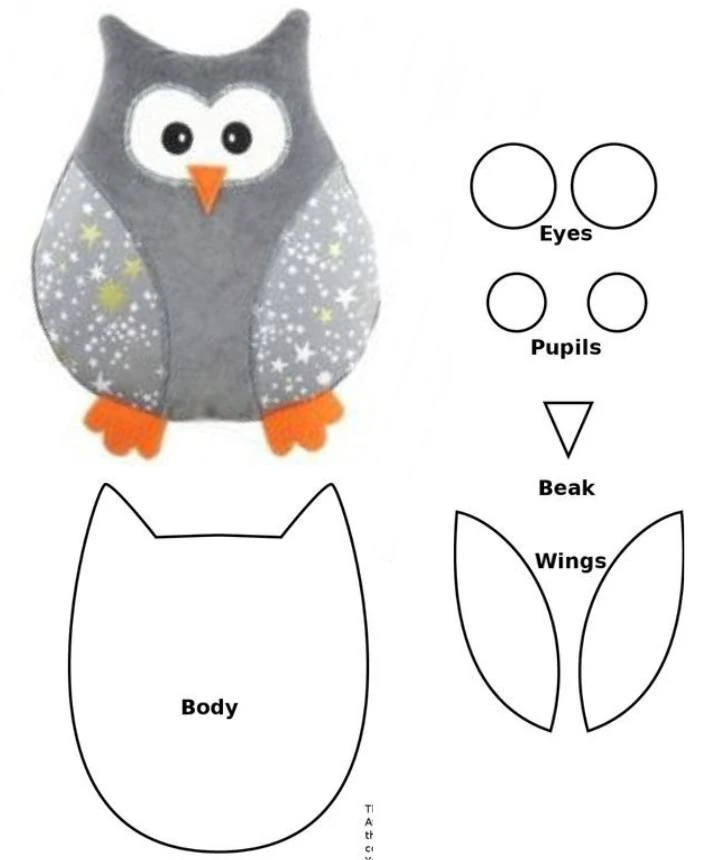
Start by cutting out the necessary shapes for your owl:
Body: Cut two pieces of the main fabric according to your body pattern.
Wings: Cut two pieces of contrasting fabric for the wings.
Eyes: Cut two large circles from white felt for the eyes, and two smaller circles from black felt for the pupils.
Beak: Cut a small triangle from the orange felt for the beak.
Feet: Cut two shapes from the orange felt for the feet.
2. Assemble the Features
Now it’s time to bring your owl to life:
Eyes and Beak: Attach the white felt circles to the front of the owl body using stitches or fabric glue. Next, place the black felt pupils in the center of the white circles. Position the orange beak between the eyes and secure it in place.
Wings: Pin the wings onto each side of the owl body and sew the outer edges to secure them.
3. Assemble the Body
With the features in place, you can start putting the body together:
- Place the two body pieces right sides together.
- Insert the orange felt feet between the fabric layers, allowing them to stick out slightly at the bottom.
- Sew around the edges of the body, leaving an opening at the bottom for turning and stuffing.
- Carefully turn the owl body right side out.
4. Stuff and Finish
It’s time to give your owl some fluff!
- Fill the cushion with your stuffing until it reaches your desired firmness.
- Once stuffed, neatly close the opening with a slip stitch to create a seamless finish.
Tips for Success
Fabric Choice: Opt for soft and plush fabrics for a cozy feel, or use cotton fabric for a more classic look.
Sewing Advice: Use tight stitches for durability, particularly on the wings and detailed features.
Personalization: Feel free to add embroidery or variations in color to create a unique collection of owl cushions.
Adjustments and Dimensions
You can easily adjust the dimensions of your owl cushion according to your preferences. The pattern can be enlarged or reduced by printing it at different scales.
Conclusion
Creating your own adorable owl cushion is a rewarding crafting adventure! It allows for creativity while resulting in a delightful item that can decorate your home or be given as a heartfelt gift. Happy sewing—get ready to cuddle with your charming new feathered friend!