If you’re looking for a delightful sewing project that’s perfect for both beginners and seasoned crafters alike, we have just the thing for you! This charming fabric whale is not only fun to make, but it also makes a wonderful gift for children or a lovely decorative piece in your home. Follow these easy steps to sew your very own cuddly whale!
Materials Needed
To get started, you will need the following materials:
- Colorful fabric (cotton or fleece works great)
- Matching thread
- Stuffing (polyester fiberfill or similar)
- Scissors
- Sewing machine or needle and thread
- Fabric markers (optional for embellishments)
- Sewing pins
- Pattern template (you can draw your own or download one online)
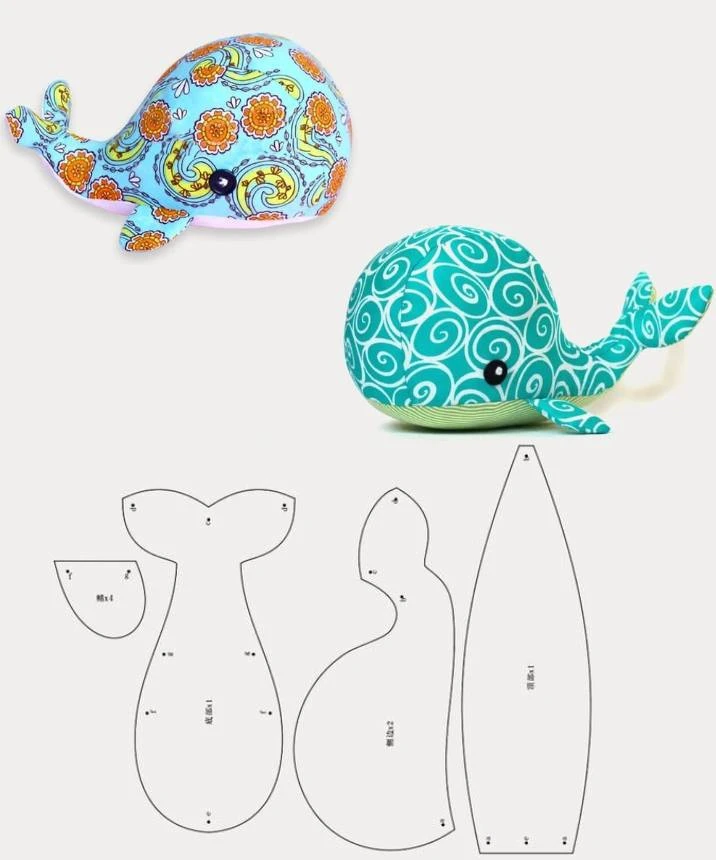
Whale Dimensions
Before you start cutting your fabric, here are the dimensions for the different parts of the whale:
Whale Body
- Total Length: 25 cm
- Widest Width: 12 cm
Whale Tail
- Total Length: 15 cm
- Widest Width: 10 cm
Fins (Ailerons)
- Length: 7 cm
- Width: 4 cm
Belly
- Length: 20 cm
- Widest Width: 8 cm
Step-by-Step Instructions
Step 1: Cut Your Pieces
Using the dimensions above, cut out two pieces for the whale’s body, two for the fins, one for the belly, and one for the tail from your fabric. Remember to pin the pattern to the fabric before cutting!
Step 2: Assemble the Whale Body
Pin the two pieces for the body together with the right sides facing each other. Leave an opening on one side for turning the whale inside out later. Sew around the edges, making sure to secure your stitches well.
Step 3: Attach the Tail
Sew the tail piece to the rear end of the whale’s body, ensuring it is attached securely. This gives your whale a fun, playful look!
Step 4: Add the Fins
Sew the fins to the sides of the whale body before you turn it inside out. This adds character and gives the whale a more realistic shape.
Step 5: Sew the Belly
Carefully attach the belly piece to the main body along the bottom curvature. Make sure your stitches are neat for a clean finish.
Step 6: Turn and Stuff
Once sewn, turn the whale right side out using the opening you left. Fill your whale with stuffing gradually, until it reaches a plump and rounded shape. Take care not to overstuff, which can lead to uneven bumps.
Step 7: Close the Whale
Using a slip stitch, close the opening in the whale. This technique allows for a seamless finish that looks professional.
Step 8: Add Final Touches
For a personal touch, sew on a button or embroider an eye on your whale. Feel free to use fabric markers to add some designs or patterns to make your whale truly unique!
Tips for Success
- Choose vibrant colors and fun patterns for your fabric to make your whale stand out.
- Use a zigzag stitch for rounded edges to prevent fraying.
- Add stuffing gradually to ensure your whale maintains a smooth, even shape.
Conclusion
And there you have it—a cute and adorable fabric whale that anyone can sew! Whether it’s a gift for a child, a cozy addition to your home décor, or simply a fun crafting project, this little whale is bound to bring smiles.
Now that you have your own cuddly creation, what other soft toys do you plan to make? Happy sewing! 🐋💖