Are you looking for a fun and engaging sewing project that will add a touch of whimsy to your home? Look no further! The Funny Cat Pillow is a delightful DIY creation that not only serves as a cuddly companion but also showcases your crafting skills. In this article, we’ll guide you through the steps to make your own unique pillow, all while emphasizing its easy-to-follow instructions and comforting benefits.
Dimensions and Design
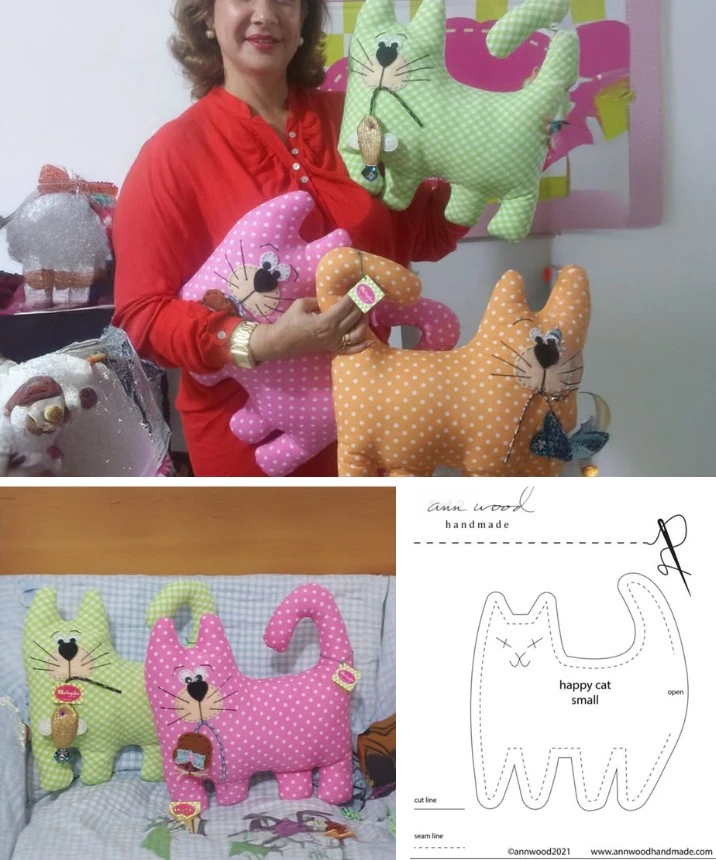
Before diving into your sewing project, let’s talk about the dimensions of your future feline friend. The Funny Cat Pillow has an approximate size of 35 cm in height and 30 cm in width. This charming cat design includes floppy ears that are part of the overall pattern, giving it a playful and inviting appearance.
Materials Needed
To get started on your Funny Cat Pillow, gather the following materials:
- Fabric: Choose a fun, colorful fabric that will bring joy to your pillow. You’ll need about 0.5 meters of fabric.
- Stuffing: Polyester stuffing or batting is perfect for making your pillow soft and plush.
- Accessories: Optional items like buttons or fabric scraps for the eyes and nose will help personalize your pillow. You can also use embroidery thread for a charming touch.
Step-by-Step Instructions
Step 1: Prepare Your Materials
Choose your fabric and prepare your chosen stuffing. The right fabric makes a world of difference, so let your creativity flourish with colorful prints or soft textures.
Step 2: Cut Out Your Pieces
Print and cut out the cat pattern. Place the pattern on the folded fabric and carefully cut along the edges to create two identical pieces. This will form the front and back of your pillow.
Step 3: Create the Face
Before sewing the pieces together, sketch the facial features on the fabric using textile chalk. Attach buttons or fabric pieces as the eyes and nose, and use black thread to add adorable whiskers.
Step 4: Assemble the Pillow
Place the two fabric pieces right sides together. Pin the edges to keep them in place and sew around, leaving an opening at the bottom for stuffing. Afterward, turn the pillow inside out so the right side is visible.
Step 5: Stuff It Up!
Fill your Funny Cat Pillow with the polyester stuffing until it reaches your desired firmness. Once filled, carefully hand-stitch the opening closed with invisible stitches.
Step 6: Personalize Your Pillow
Make your cat truly yours by adding accessories such as a ribbon around its neck or sewing little hearts or stars onto its body. This is where your creativity can shine!
Fabric Choices
Selecting the right fabric is crucial for your project. Here are some options to consider:
- Printed Cotton: Great for bright, colorful designs that are easy to sew.
- Fleece: Ideal for a soft and cozy texture, perfect for a snug pillow.
- Corduroy: Offers a chic, textured look while still being comfortable.
When using patterned fabric, ensure the design aligns nicely across the body of the cat for a polished final product.
Conclusion
With this guide, you can create a Funny Cat Pillow that is not only adorable but also a product of your creativity. It’s an excellent project for both beginners and experienced crafters looking to add a personal touch to their home. Plus, it’s a fantastic gift idea for kids and cat lovers alike!
Get ready to sew and let the fun begin! Your new furry friend awaits!