If you’re looking for a fun and rewarding sewing project, this DIY fabric wallet is the perfect choice! Simple yet elegant, it’s ideal for storing your coins and small essentials while showcasing your unique style. In this guide, we’ll walk you through the steps to create your very own fabric wallet, complete with tips and tricks to make the process enjoyable and rewarding.
Materials You’ll Need
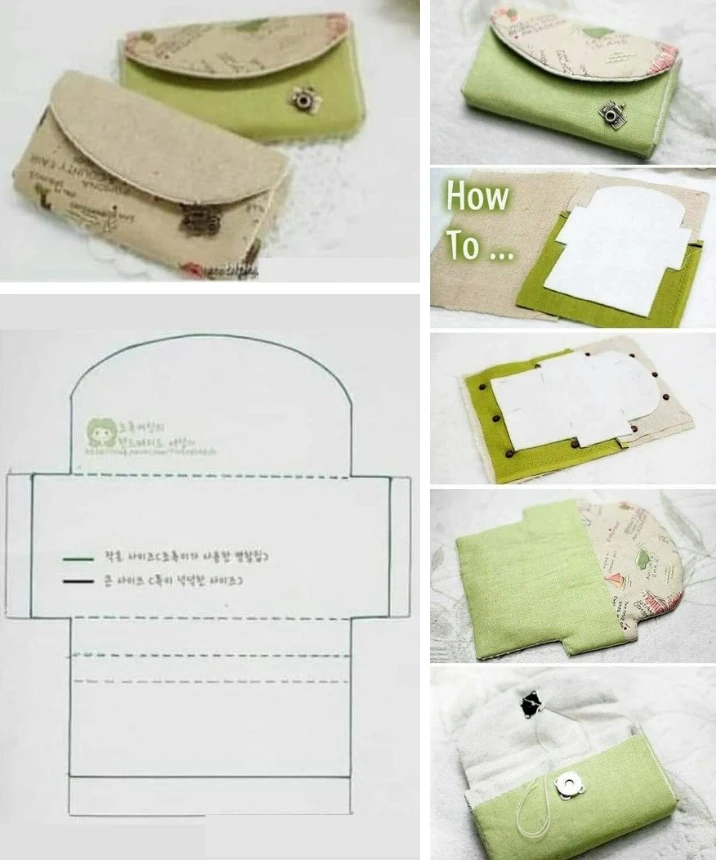
To get started, gather these materials:
Outer Fabric: 20 cm x 20 cm (choose a fabric that speaks to you!)
Lining Fabric: 20 cm x 20 cm (coordinate with your outer fabric for a chic look)
Interfacing (optional): 20 cm x 20 cm (helps with durability)
Snap Button or Metal Closure (for easy opening and closing)
Matching Thread, Needles, and Scissors
Printed Pattern (as a guide for the shape)
Step-by-Step Instructions
1. Cut Your Pieces
Begin by using the printed pattern to cut out two pieces of fabric: one for the outer layer and one for the lining. If you’re using interfacing, apply it to the back of your outer fabric according to the manufacturer’s instructions for added structure.
2. Pin and Sew the Fabrics Together
With the right sides of the fabric facing each other, pin the outer fabric and lining together. Make sure to align the edges neatly. Sew all around the edges, leaving a small opening on one side so you can turn the wallet right side out later.
3. Turn and Press
Once you’ve sewn the pieces together, turn the wallet inside out through the opening you left. Use a point turner or your fingers to push out the corners for a crisp look. Then, fold in the edges of the opening and press with an iron to create a neat finish.
4. Attach the Closure
Now it’s time to add your snap button or metal closure. Position it on the flap of your wallet, ensuring that the components align properly for easy closure. Secure it in place according to the instructions provided with your closure.
5. Final Touches
For extra durability, add a top stitch around the edge of the wallet about 0.5 cm from the edge. This not only strengthens the seams but also adds a polished finish to your creation.
Personalization Tips
Play with Fabrics: Don’t be afraid to mix and match different fabrics to create a wallet that’s uniquely yours. Consider using contrasting fabrics or even adding an applique for a personal touch!
Utilize Interfacing: If you want a sturdier wallet, using interfacing is highly recommended. It will give your wallet a crisp shape, making it more durable.
Easy Maintenance: Feel free to hand wash your wallet gently if needed, keeping it looking fresh and adorable.
Conclusion
Creating a DIY fabric wallet is a terrific way to express your creativity while crafting a practical accessory. With a few simple materials and steps, you’ll have a beautiful wallet that not only serves a purpose but also reflects your personal style. So what are you waiting for? Gather your supplies, put on your favorite music, and start sewing!
Happy crafting!