Are you ready to embark on a delightful sewing journey? If you love creating soft toys and enjoy a bit of whimsy in your home, this easy sewing project is just for you! In this article, we’ll guide you through the steps to make your very own adorable fabric cat. This cuddly companion will not only bring joy to any space but also make for a thoughtful handmade gift. So grab your materials and let’s get started!
What You’ll Need
Before diving into the project, make sure you have the following materials on hand:
Fabric for the Cat’s Body: Approximately 20 cm wide and 30 cm tall (checkered fabric works beautifully).
Fabric for the Arms and Legs: You’ll need each piece to be about 5 cm wide and 15 cm long (choose colorful fabrics like polka dots or stripes).
Felt for Details: A piece of blue felt for the heart and snout decoration.
Black Thread: For embroidering whiskers and other facial features.
Stuffing: For making your plush cat cuddly and soft.
Basic Sewing Tools: Needles, thread, and scissors.
Step-by-Step Instructions
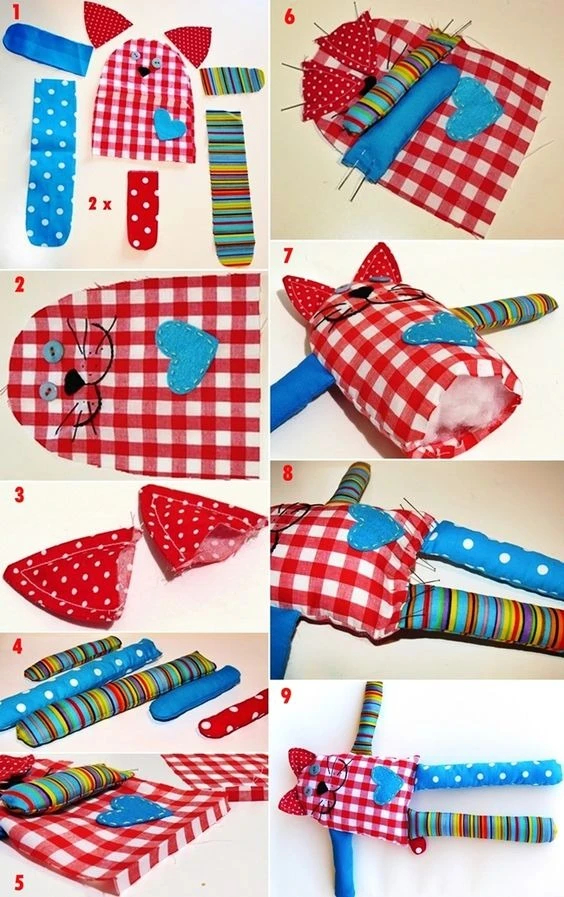
Step 1: Prepare Your Pieces
Start by cutting out all your fabric pieces according to the dimensions provided: the cat body, ears, arms, and legs, as well as the heart shape in felt for decoration. Remember, you’ll need two pieces for each leg and one for the tail.
Step 2: Assemble the Face
Take the heart felt piece and sew it onto the front of the cat’s body to create an adorable little decoration. Use black thread to embroider the nose, whiskers, and eyes on the checkered fabric.
Step 3: Sew the Ears
Fold the ear fabric pieces and sew the edges together. Lightly stuff them with the filling to give them a nice volume and shape.
Step 4: Sew the Arms and Tail
For the arms and tail, sew the fabric pieces together, then turn them inside out. Fill them with stuffing to make them plush and adorable.
Step 5: Assemble the Body
Place the stuffed arms and tail between two pieces of the checkered fabric that will form the body. Pin them in place to keep everything secure.
Step 6: Sew the Body
Sew around the edges of the body, leaving an opening for turning it right side out and for stuffing.
Step 7: Stuffing
Turn the body right side out and fill it with stuffing through the opening. Once filled to your satisfaction, stitch the opening closed with an invisible stitch.
Step 8: Finishing Touches
Attach the ears on top of the cat’s head and feel free to add buttons for eyes or any extra embellishments to give your cat even more character!
Step 9: Final Assembly
Make any last adjustments, like adding more stuffing if needed, and secure all details firmly. Your charming fabric cat is now ready to take its place in your home or to delight someone special!
Tips for Choosing Fabrics
- Mix and match different textures and colors to give your plush cat a unique personality.
- Soft fabrics like cotton or felt are perfect for a tactile experience.
- Fun patterns (stripes, polka dots) will add a whimsical touch to your creation.
Conclusion
Congratulations on completing your very own adorable fabric cat! This project is not just a wonderful crafting experience, but it also results in a lovely and huggable friend. Whether you choose to keep your creation or gift it to someone you love, the joy of handmade crafts will surely brighten your day.
Happy sewing! 🧵❤️