Crafting your own plush bunny can be a delightful way to express your creativity and make a cozy companion or gift. Follow this step-by-step guide to create a soft and huggable bunny, perfect for kids or as seasonal decor for Easter!
Materials Needed
Gather these materials before you start:
Soft Fabric: Choose materials like felt or flannel for the bunny’s body. These fabrics are not only soft but also easy to work with.
Contrasting Fabric: Use patterned or contrasting fabric for the insides of the ears to add a unique touch.
Stuffing: Get plush stuffing for the bunny’s body; this will give it a huggable feel.
Matching Thread: Ensure you have thread that matches your fabric colors for a professional finish.
Needle or Sewing Machine: Depending on your skill level, use a needle for hand sewing or a machine for quicker assembly.
Buttons or Beads: These will serve as your bunny’s eyes. You can pick any style you like!
Ribbon: For a decorative touch around the neck.
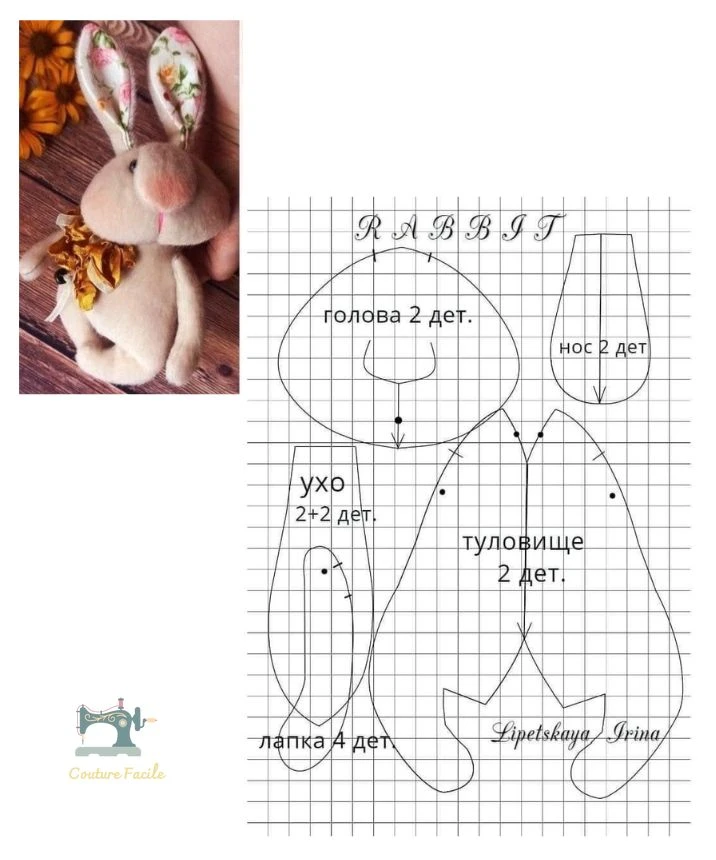
Printed Pattern: Prepare a pattern for cutting your fabric pieces (see below for measurements).
Measurements and Cutting
Using the printed pattern, you’ll need to cut out the following pieces:
Head: 2 pieces
Body: 2 pieces
Ears: 4 pieces (2 outer + 2 inner)
Legs: 4 pieces
Nose: 2 pieces
Steps to Create Your Bunny
Print and Cut the Pattern: Print the pattern on A4 paper, and carefully cut out each piece.
Transfer and Cut the Fabric:
- Lay the pattern shapes on your chosen fabric.
- Trace around the patterns, allowing for seam allowances.
- Cut out the fabric shapes.
Assemble the Bunny:
- Start by sewing the two head pieces together, leaving an opening for stuffing.
- For the ears, sew the outer and inner fabric together for each ear. Turn them inside out and press.
- Sew the legs and nose pieces, lightly stuff them, and secure the seams.
Combine the Parts:
- Attach the ears to the head.
- Sew the head onto the body, leaving an opening for inserting the legs.
- Fill the head and body with stuffing, making sure it’s plush but not overstuffed.
Finishing Touches:
- Close any openings with invisible stitches.
- Attach buttons or beads for eyes and add the ribbon around the neck for that charming finishing touch!
Tips for a Perfect Bunny
- Use pins to hold the fabric pieces in place before sewing to avoid slipping.
- Mix and match textures and fabrics to give your bunny a unique personality!
- This plush bunny makes a wonderful gift or a charming decoration for Easter celebrations!
Conclusion
Making your own plush bunny is not only fun but also a rewarding project that allows you to infuse your personality into something special. Whether you give it as a gift or keep it for yourself, every stitch is a step towards creating a cherished companion. So grab your fabric and sewing kit, and let’s get started! Happy sewing! 🧵💖