Creating your very own Tilda Frog can be a delightful and rewarding project! This charming stuffed toy is perfect for both beginners and experienced crafters. Whether you’re looking to create a unique gift or simply want to add a playful touch to your home, this DIY frog is a fun way to flex your sewing skills.
Materials Needed
Before you start your sewing journey, gather the following materials:
Cotton or Linen Fabric: You will need light green and white or beige fabric for the body of the frog. Choose fabrics that are soft and sturdy.
Polyester Stuffing: This will give your frog volume and make it huggable.
Matching Sewing Thread: Ensure you have thread that matches your chosen fabric colors.
Buttons (for optional clothing details): If you want to dress up your frog, buttons can add a nice touch.
Patterned Fabric (for optional clothing): Use this for creating adorable outfits.
Sewing Tools: Make sure to have needles, pins, scissors, and a sewing machine (optional but helpful).
Pattern Measurements
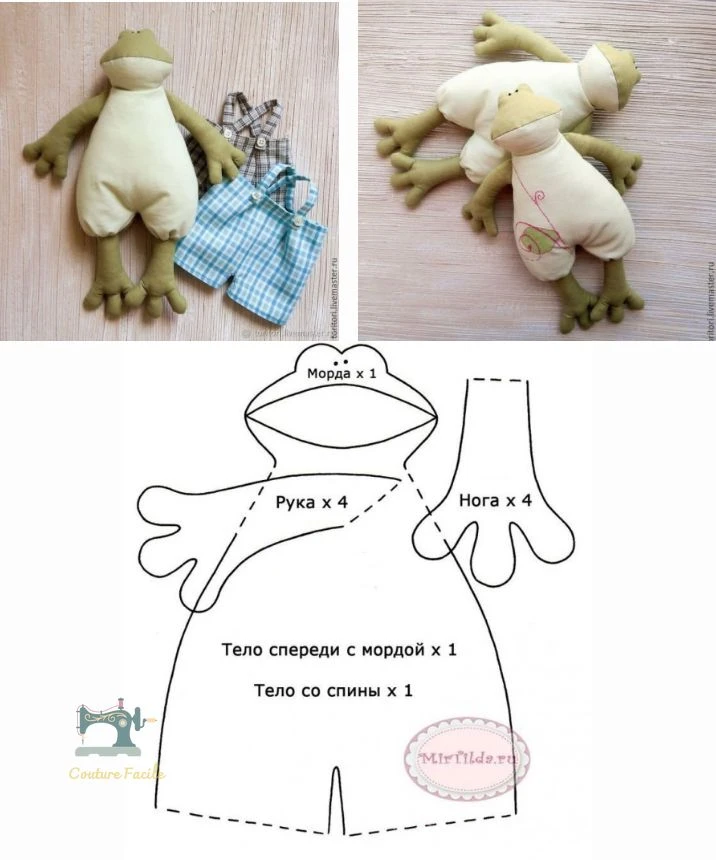
Here’s a basic layout for your Tilda frog pattern:
Mouth (Head/Snout): 1 piece
Front Body with Head: 1 piece
Back Body: 1 piece
Arms: 4 pieces
Legs: 4 pieces
Remember to add a 0.5 cm seam allowance around each piece to facilitate easier sewing.
Step-by-Step Instructions
1. Cutting the Pieces:
Start by tracing the pattern on your fabric and cutting each piece according to the shapes you’ve prepared.
2. Assembling the Arms and Legs:
- Take two pieces of fabric for each arm and sew them together with the right sides facing each other.
- Turn them inside out and stuff lightly with polyester stuffing. Repeat this process for all four arms and legs.
3. Assembling the Body:
- Sew the front body (with the head) to the back body with the right sides facing each other, ensuring you leave openings for the arms and legs, as well as for inserting stuffing.
- Position the arms and legs between the two layers of fabric before finishing the seam.
- Turn the body inside out and gently fill it with stuffing.
4. Adding Facial Features:
- Sew the mouth piece to the top of the front body to create the snout.
- Use embroidery or fabric markers to add eyes and a smile, giving your frog character!
5. Dressing Up Your Frog (Optional):
- If you want to make your frog even more special, create simple clothing patterns or use leftover patterned fabric to make outfits. Get creative!
Tips for Success
Stuffing: Lightly stuff the limbs and body to ensure it maintains a soft and flexible shape.
Strong Seams: Reinforce the seams of the arms and legs since they will experience more tension during play or hugging.
Customization: Play around with different colors and patterns for a truly unique Tilda frog that reflects your style!
Conclusion
Sewing your own Tilda frog can be a delightful experience filled with creativity and fun. With the right materials and a bit of patience, you’ll end up with a charming DIY project that’s perfect for cuddling or decorating your space.
So, gather your materials, follow the steps, and make your very own Tilda frog today! Happy sewing! 🐸💚