Are you looking for a fun and functional way to organize your accessories? Look no further than the charming Multi-Functional Cat Pouch! This adorable pouch is perfect for storing small items, from cosmetics to stationery, all while adding a touch of whimsy to your everyday carry. In this article, we’ll walk you through the measurements, materials, and steps to create this delightful project that’s ideal for sewists of all skill levels.
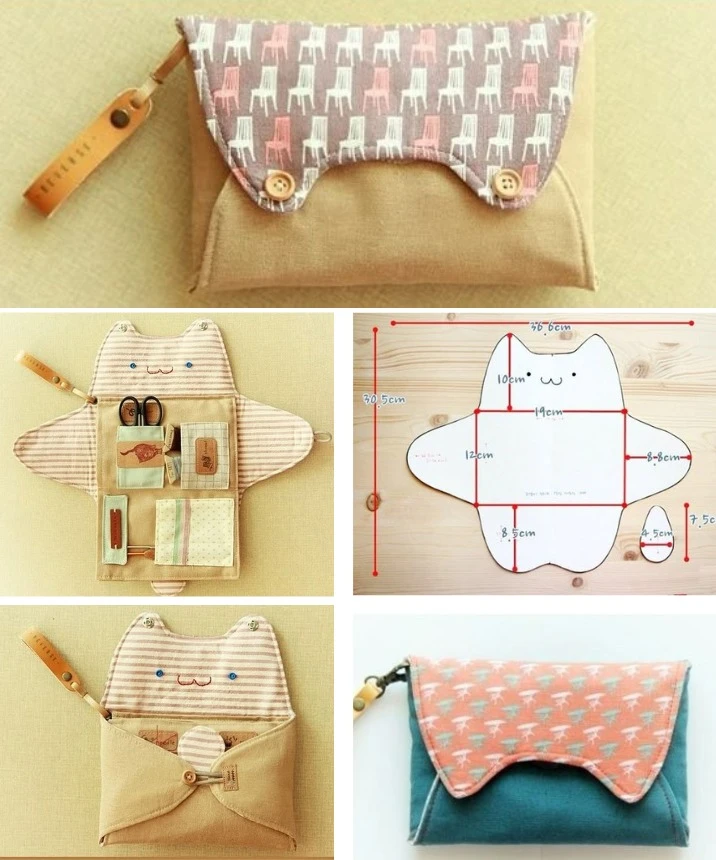
Measurements
Before diving into this fun sewing project, let’s take note of the dimensions:
Total height: 30.5 cm
Width at the top (ears): 16 cm
Width at the bottom: 19 cm
Height of the flap (from center): 10 cm
Width of the sides (each side): 8.5 cm
Front pocket dimensions: 12 cm x 19 cm
These measurements will help you accurately cut your fabric and assemble your pouch.
Materials Needed
Gather the following materials to get started on your adorable cat pouch:
Main fabric: 25 cm of printed cotton for the exterior
Contrasting fabric: 25 cm for the interior lining
Closure: Snap button or button for securing the pouch
Thread: Matching thread for construction
Interfacing: Fusible interfacing to add structure to your pouch
Accessories: Elastic and leather ribbon for personal touches
Having these materials on hand will make the sewing process smooth and enjoyable!
Step-by-Step Instructions
1. Prepare the Fabric
Start by cutting all the fabric pieces according to the measurements provided. Remember to add a 1 cm seam allowance around each piece for neat stitching.
2. Assemble the Interior
Fix the small pocket pieces to the interior fabric. Make sure to fold the edges of the pockets before sewing to achieve a clean finish. This step is crucial for keeping your items organized within the pouch.
3. Add the Cat Flap
This is where the charm comes in! Sew the ears onto the upper flap to shape the cat’s head. You can embroider eyes and a mouth with embroidery thread to give your cat pouch a delightful face that will make anyone smile.
4. Assemble the Pouch
Fold and pin the sides of the main fabric together. Insert the lining inside and sew around the edges, leaving an opening for turning the pouch right side out. This step is vital for achieving that perfect, finished look.
5. Finishing Touches
Turn the pouch right side out and press the seams for a polished finish. Close the opening with an invisible stitch and attach your snap button or closure for functionality. Don’t forget to add any additional personal touches with the elastic or leather ribbon for that extra flair!
Personalization Tips
When selecting your fabrics, choose a sturdy cotton or linen for the exterior with a charming print that showcases your love for cats. For the interior, opt for a lightweight fabric like cotton poplin in soft pastel colors to create a lovely contrast. Feel free to get creative and add a small leather strap or ribbon as a finishing touch to elevate the look of your pouch.
Conclusion
With this Multi-Functional Cat Pouch, not only will you have a unique and practical accessory, but you’ll also enjoy the satisfaction of creating something cute by hand! This project is ideal for beginners and a great way to hone your sewing skills.
Now that you have the steps and materials, it’s time to grab your sewing machine and start crafting! Enjoy the process, and let your creativity shine! 🐾✨