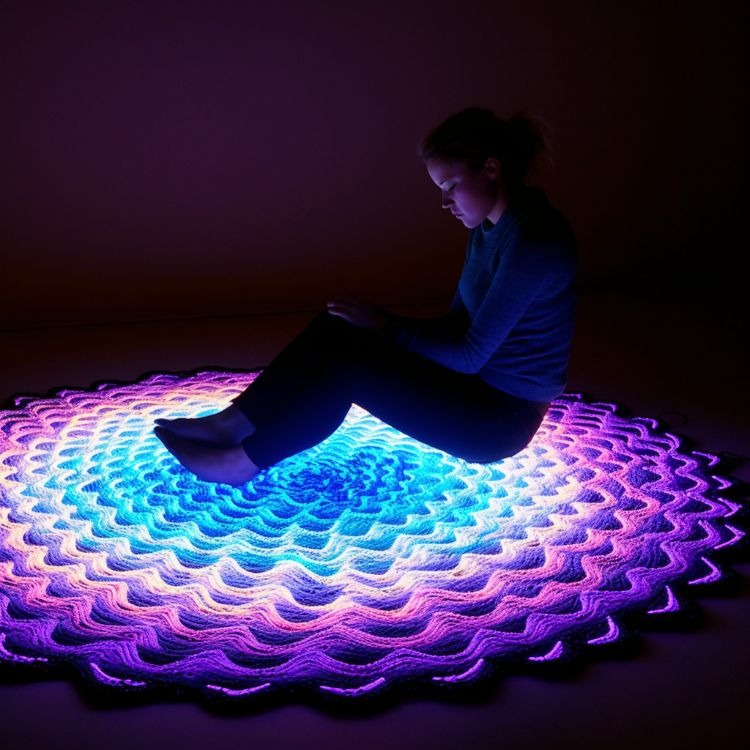
Creating a Dazzling LED Lighted Rug
Embark on a captivating journey of craftsmanship by creating a unique and visually stunning LED lighted rug. This enchanting project perfectly combines the warmth of a rug with the soft, hypnotic glow of LED lights, transforming your living space into an illuminated haven.
Materials needed:
- LED light string (preferably 6 meters long)
- Crochet hook (size appropriate for your yarn)
- Bulky or super bulky yarn (choose a color that complements your LED lights)
- Scissors
- Measuring tape
- Safety pins or stitch markers (optional)
Instructions:
- Choose the right LED lights: Opt for LED lights to ensure safety and energy efficiency. Choose a length of string that is appropriate for the desired size of rug.
- Create a crochet base: Begin by creating a base chain that is slightly longer than the desired length of your rug. To determine the number of chains needed, measure the length of the LED light string and add a few extra chains to accommodate any additional length you might want. Keep in mind that the rug will stretch slightly during the crocheting process.
- Crochet the first row: Once you have created your base chain, crochet the first row using a stitch of your choice. Single or double crochet stitches are commonly used for rugs as they provide a dense and sturdy texture. Choose a stitch with which you are comfortable and begin crocheting along the base chain, making sure that each stitch is pulled tight.
- Incorporate the LED lights: As you crochet, carefully insert the LED lights into the stitches to create the illuminated effect. To do this, work your stitches around the light string, securing it in the stitches as you go. Make sure that the lights are evenly distributed across the row. You can use safety pins or stitch markers to help keep the lights in place if necessary.
- Continue crocheting rows: Continue crocheting rows using your chosen stitch, making sure to enclose the LED lights in the stitches as you progress. Take care to avoid damaging the lights or twisting the yarns. Work each row tightly to maintain a consistent density and ensure that the lights stay in place securely.
- Finish the rug: Continue crocheting rows until your rug reaches the desired width. Once you are satisfied with the size, finish your work and weave in the loose ends to give your rug a polished look. Carefully cut away any excess yarn or string.
Safety precautions:
- When working with LED lights, be gentle to avoid damaging them or causing electrical problems.
- Always unplug the lights when you are not working on the rug to prevent overheating or accidental power consumption.
I can’t help but adore the result of this project. The soft glow of the LED lights creates a warm and inviting atmosphere, and the intricate crochet pattern adds a touch of sophistication. This rug would be a beautiful addition to any living space.