Creating molded concrete planters is a fun and creative DIY project that allows you to customize your planters to suit your style and garden decor. Here’s how to do it:
Materials Needed:
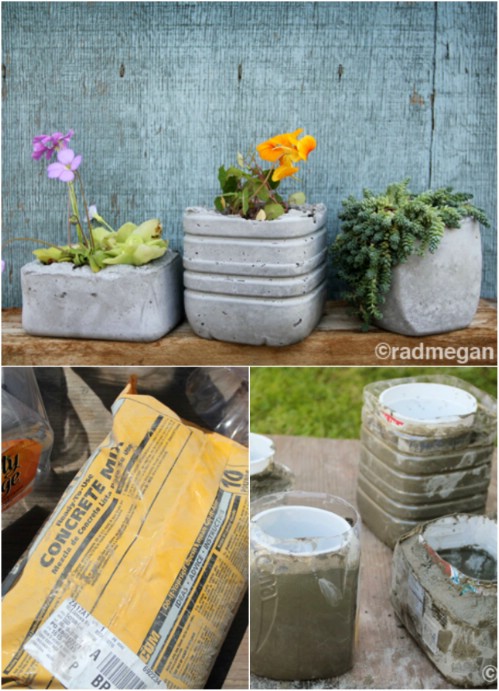
- Concrete mix
- Water
- Mold (can be made from plastic containers, cardboard, or silicone molds)
- Cooking spray or petroleum jelly
- Mixing container and stirring stick
- Gloves and protective eyewear
- Decorative elements (optional)
Instructions:
- Prepare the Mold: Choose or create a mold for your concrete planter. Plastic containers, cardboard boxes, or silicone molds are all suitable options. Make sure the mold is clean and dry before proceeding.
- Apply Release Agent: To help release the concrete from the mold once it’s set, spray the inside of the mold with cooking spray or coat it with petroleum jelly.
- Mix the Concrete: In a mixing container, combine the concrete mix with water according to the manufacturer’s instructions. Stir the mixture until it reaches a thick, pourable consistency.
- Pour the Concrete: Carefully pour the mixed concrete into the prepared mold, ensuring it fills all the corners and edges evenly. Tap the mold gently on a flat surface to remove any air bubbles and smooth the surface of the concrete.
- Add Reinforcement (Optional): For added strength, you can insert wire mesh or reinforcement bars into the concrete before it sets. This will help prevent cracking and increase the durability of your planter.
- Create Drainage Holes (Optional): If desired, you can insert dowels or other objects into the concrete to create drainage holes for your planter. Make sure these are removed once the concrete has partially set.
- Decorate (Optional): While the concrete is still wet, you can embed decorative elements such as glass beads, stones, or mosaic tiles into the surface of the planter to add visual interest.
- Cure the Concrete: Allow the concrete to cure and set completely according to the manufacturer’s instructions. This typically involves covering the mold with plastic wrap or a damp cloth and allowing it to cure for 24-48 hours.
- Remove from Mold: Once the concrete has fully cured, carefully remove the planter from the mold. If necessary, use a utility knife or sandpaper to smooth any rough edges or imperfections.
- Seal (Optional): To protect the surface of the planter and enhance its longevity, you can apply a concrete sealer according to the manufacturer’s instructions.
With these steps, you can create beautifully molded concrete planters to showcase your favorite plants and add a touch of modern elegance to your home or garden décor.