If you’re looking for a fun and rewarding sewing project, this adorable plush frog might be just what you need! It’s easy to make, and perfect for both beginners and seasoned crafters alike. Not only will this cute little frog make a great cuddly companion, but it can also serve as a charming decoration in your home. So, let’s hop right into the world of sewing and create this delightful plush friend!
Materials Needed
Before you start, gather the following materials:
Green fleece or felt: This will be the main fabric for the frog’s body.
Black and white felt: For the eyes and facial details.
Matching thread: To sew everything together.
Stuffing: Polyester fiberfill or batting works great for filling the frog.
Buttons: For decorating the belly of the frog.
Ribbon: To create a cute little bow tie.
Frog template: You can either print one or draw your own.
Scissors, pins, textile pencil, and sewing machine (or needle): Basic sewing tools to help you along the way.
Step-by-Step Instructions
Now that you have your materials ready, let’s dive into the steps to create your plush frog!
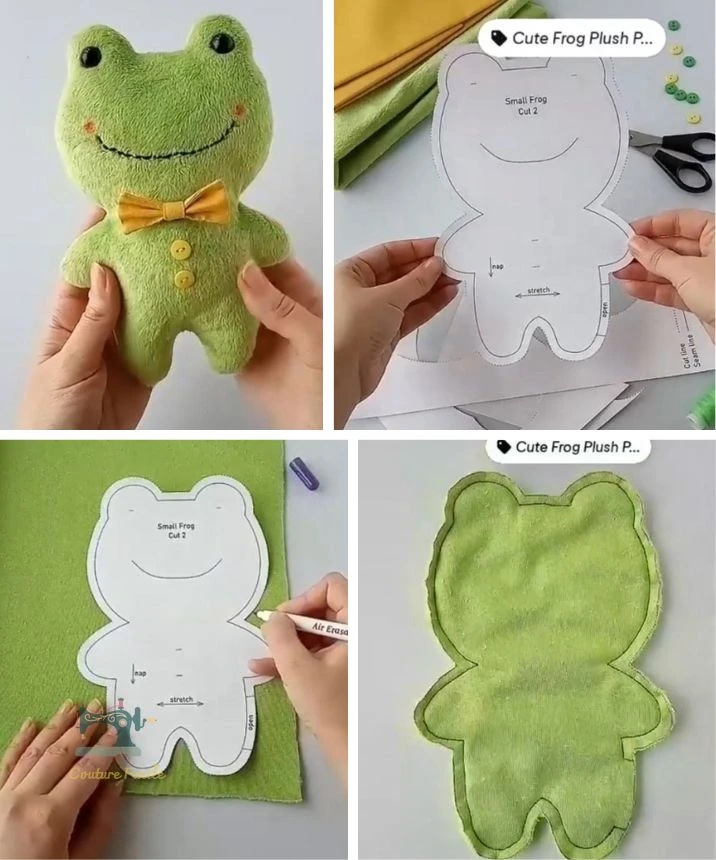
1. Prepare the Template
First, you need to create or print the frog template. Once you have it, cut out the template pieces and transfer them onto the green fabric using a textile pencil.
2. Cut the Pieces
Cut out two identical pieces for the body of the frog. Additionally, cut out the smaller details such as the eyes and mouth from the black and white felt.
3. Assemble the Face
Sew or glue the eyes onto the frog’s body where appropriate. Use black thread to embroider the mouth, and add rosy cheeks with pink thread or fabric paint for extra charm.
4. Sew the Body
Place the two green fabric pieces right sides together. Pin the edges to keep everything in place, then sew around the edges while leaving an opening at the bottom for stuffing.
5. Fill and Close
Turn the fabric right side out. Gently fill the frog with stuffing until it’s firm yet cuddly. Once you’re satisfied, carefully sew the opening closed using invisible stitches.
6. Add the Details
Sew buttons onto the belly for decoration and tie a cute ribbon around the neck to finish off your plush frog.
Tips for Personalization
- You can use a washable fabric marker for precise lines while tracing out your template.
- Feel free to customize your plush frog by using different colors or adding unique accessories!
Conclusion
This plush frog is not only a fun sewing project, but it also makes an adorable gift or lovely decor item. Whether for a child’s room or as a handmade gift, your new froggy friend is sure to bring smiles and joy!
Happy sewing! 🧵✨