Creating a snuggly and adorable plush giraffe has never been easier! This charming DIY project is perfect for anyone looking to add a handmade touch to their home or to give a thoughtful gift that’s made with love. With just a few simple materials and steps, you can sew your very own fluffy friend.
Measurements
Total Height: Approximately 25-30 cm (depending on your preference)
Width of Head and Body: Proportioned to create an elongated and elegant silhouette
Materials Needed
- Soft cotton fabric (preferably with fun patterns, like polka dots for those iconic giraffe spots)
- Fabric scissors
- Sewing machine or needle and thread
- Stuffing (fiberfill or washable stuffing)
- Embroidery thread (optional for eyes and mouth)
- Pins
- Fabric pattern (downloadable)
Step-by-Step Instructions
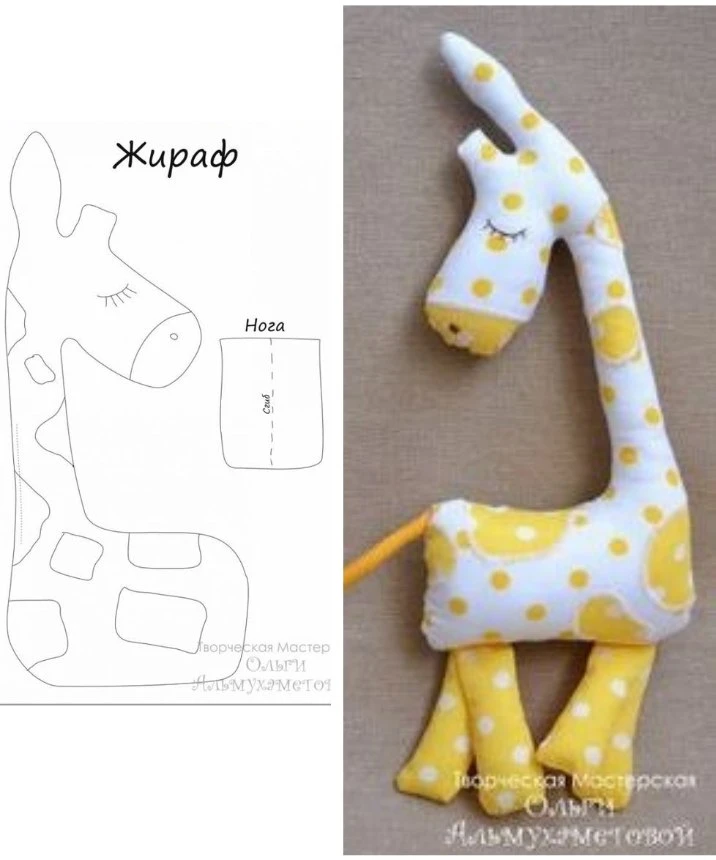
1. Preparing the Pieces
Start by printing out the pattern and cutting it out. You will need:
- Two pieces for the body
- Four pieces for the legs
Carefully cut these pieces from your chosen fabric. Aim for a cheerful and soft cotton blend to make your giraffe cuddly!
2. Assemble the Head and Body
To give your giraffe character, you can embroider or draw eyes on one of the body pieces. Next, place the two body pieces right sides together and sew all around, leaving an opening for stuffing. After sewing, turn the piece right side out.
3. Sew the Legs
Pick two leg pieces, place them right sides together, and sew them, leaving the top open for stuffing. Repeat this process for the remaining leg pieces. Once sewn, turn each leg right side out and gently stuff them.
4. Attach the Legs
Insert the legs into the bottom opening of the body and pin them in place. Sew carefully to attach the legs securely to the body.
5. Stuff and Close
Fill the body of the giraffe with stuffing until it has a lovely plump shape. Once done, close the opening with an invisible stitch, ensuring it looks tidy.
6. Finishing Touches
For a delightful detail, you can add a small ribbon or cord tail at the back of the giraffe. Give your creation a light press with an iron to make sure all seams are positioned nicely.
Tips for Personalization
Fabric Choice: Select soft cotton for a plush feel. You can also choose contrasting colors for the ears and feet to make your giraffe stand out even more!
Enhancements: Consider using felt to create additional accessories, like a little bow or a hat, to make your giraffe unique.
Safety: If this plush giraffe is intended for a child, ensure all seams are securely reinforced to withstand playtime adventures.
Care Instructions
Opt for washable stuffing to make cleaning easy. Your little giraffe will encounter spills and messes, so having materials that can be easily cleaned will extend its lifespan and maintain its cuddly quality.
Conclusion
This DIY plush giraffe project is not only a fun way to spend an afternoon, but it also results in a soft companion that can bring joy to children and adults alike! Whether you keep it for yourself or gift it to someone special, this handcrafted delight is sure to make hearts smile.
So, what are you waiting for? Gather your materials and let your creativity roam free to bring this charming giraffe to life! Happy sewing! 🦒💛