Are you looking for a fun and creative project to bring some cuddly cuteness into your home? Making plush animal toys is a fantastic way to unleash your creativity while having a blast! In this article, we’ll guide you through the process of creating three adorable plushies: a cow, a pig, and a sheep. Perfect for beginners, these easy sewing patterns will have you creating lovable companions in no time. Let’s get started!
Materials You’ll Need
Before we dive into the sewing process, gather the following materials:
- Soft fabric (felt or cotton for a cozy feel)
- Fabric scissors
- Needle and thread (or a sewing machine)
- Stuffing (cotton or polyester fiberfill)
- Fabric markers or embroidery thread for facial details
- Measuring tape
- Pins
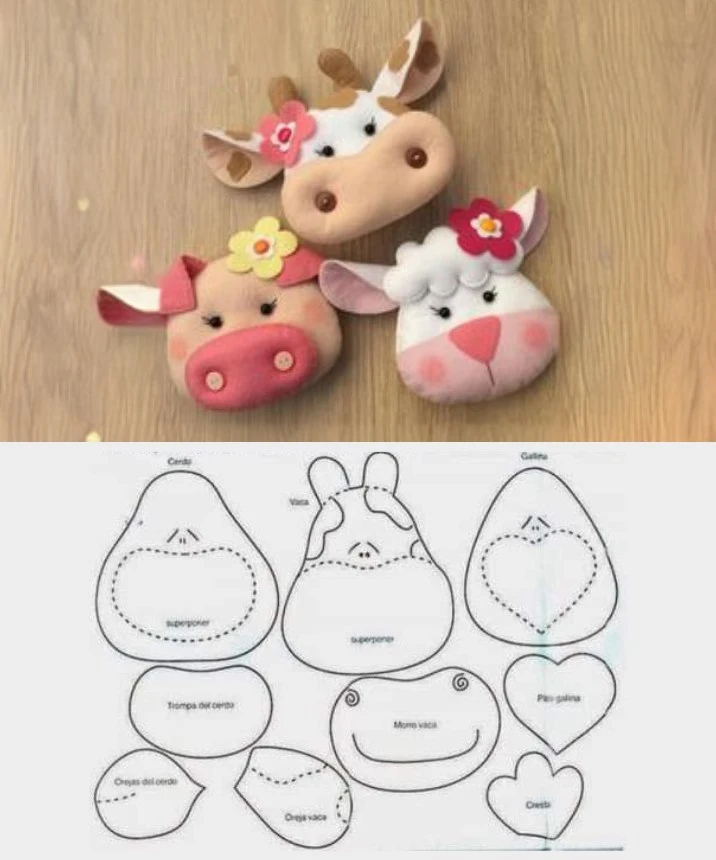
Plushie Patterns and Measurements
Here are the measurements for each plushie to help you cut your fabric accurately.
1. Cow
Body: 16 cm tall, 12 cm wide
Head: 9 cm wide, 7 cm tall
Ears: 5 cm tall, 3 cm wide
Muzzle: 6 cm wide, 3.5 cm tall
Horns: 4 cm tall, 1.5 cm wide
2. Pig
Body: 15 cm tall, 11 cm wide
Head: 8 cm wide, 6.5 cm tall
Ears: 4.5 cm tall, 3 cm wide
Muzzle: 5 cm wide, 3 cm tall
3. Sheep
Body: 14 cm tall, 10 cm wide
Head: 7.5 cm wide, 6 cm tall
Ears: 4 cm tall, 3 cm wide
Muzzle: 5 cm wide, 3 cm tall
Step-by-Step Instructions
Step 1: Cutting the Fabric
Start by cutting out all the pieces of fabric according to the measurements above. Be sure to cut out two pieces for symmetrical parts, such as the ears and muzzle. Using soft fabric will make your plushies feel extra cuddly!
Step 2: Assemble the Facial Features
Begin by sewing the details of each animal’s face. Attach the muzzle and eyes onto the head piece. For the cow, you might add cute spots. For added charm, use contrasting colors for the ears and muzzles.
Step 3: Pin the Pieces Together
Take the body and place the face piece on top, right sides together. Pin all the pieces securely, ensuring that you also place the ears between the layers. This will secure them into the final plushie!
Step 4: Stitch the Main Body
Using a sewing machine or a needle and thread, stitch around the edges, leaving a small opening at the bottom. This opening will allow you to turn the plushie inside out.
Step 5: Turn and Stuff
Carefully turn the plushie right side out through the opening. Gently push out any corners and shapes. Once it’s all smooth, begin stuffing the plushie with cotton or fiberfill until it reaches your desired softness.
Step 6: Closing the Opening
After stuffing, sew the opening closed using an invisible stitch to give it a neat finish.
Step 7: Add Final Touches
Finally, use fabric markers or embroidery to add any additional facial features or decorations. Personalize your plushie by adding details that reflect your style!
Conclusion
There you have it! With just a few easy steps, you’ve created your very own adorable animal plushies. These cuddly toys make great gifts for loved ones or delightful decorations for your home. So, gather your materials, follow the steps, and start sewing these charming companions today!
Happy sewing! If you have any questions or would like to share photos of your creations, feel free to drop a comment below!