Are you ready to add a dash of style to your cooking adventures? Crafting your own elegant chef’s apron is a fun and rewarding project that anyone, from adults to young food enthusiasts, can enjoy! With just a few simple measurements and some durable fabric, you can create a functional yet chic apron that’s perfect for cooking, crafting, or entertaining.
Measurements:
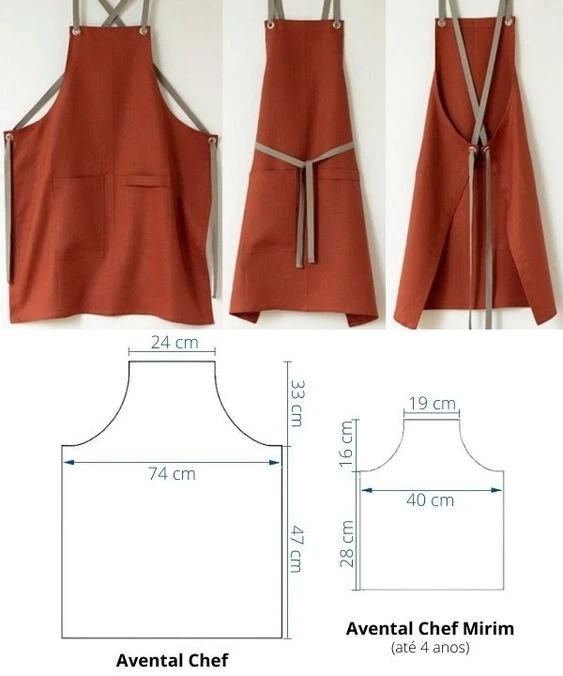
Adult Chef’s Apron:
Width: 74 cm (29 inches)
Height: 80 cm (31 inches from waist to hem, with 19 inches above the waist)
Upper Part Width: 24 cm (9.5 inches)
Kids’ Chef Apron (for ages up to 4 years):
Width: 40 cm (15.7 inches)
Height: 44 cm (11 inches from waist to hem, with 6.3 inches above the waist)
Upper Part Width: 19 cm (7.5 inches)
Why Make Your Own Apron?
Customization: Making your own apron allows you to choose the fabric, color, and pattern that reflects your personality or that of the little chef you’re dressing.
Skill Development: This project is beginner-friendly, making it a great way to hone your sewing skills or teach kids the basics of sewing in a fun and creative way.
Practicality: An apron is essential for keeping clothes clean while cooking. Personalize it with pockets to hold utensils, recipe cards, or even artistic supplies for craft projects.
Materials Needed:
Fabric: Choose a sturdy fabric such as cotton or canvas for durability. Opt for warm colors or neutrals to create a timeless style.
Sewing Tools: Scissors, a sewing machine, pins, and thread that matches your fabric.
Additional Elements: Consider adding eyelets and straps for an adjustable neck and waist for a polished look.
Basic Steps to Sew Your Apron:
Step 1: Prepare Your Pieces
- Start by cutting out your fabric according to the measurements suitable for adults or children. Don’t forget to cut long strips for the neck and waist ties.
Step 2: Sew the Pockets
- Decide how many pockets you’d like on the front and cut suitable fabric pieces. Fold and sew the edges to prevent fraying. Attach them to the main body of the apron based on your design preference.
Step 3: Assemble the Apron
- Fold and sew all edges for a neat finish. Attach the strips for the neck ties at the top of each side, either by sewing directly or by using eyelets for an adjustable fit.
Step 4: Attach the Waist Ties
- Sew or loop the ties around the waist, ensuring they’re secure and easy to adjust.
Tips for Success:
Fabric Choice: Select a washable fabric for easy maintenance, perfect for a frequently used kitchen apron.
Professional Touch: Eyelets and metal rings can elevate the look of your apron while making the ties adjustable.
Personalization: Add a personal touch by monogramming or embroidering a fun design.
Conclusion
Creating your own elegant chef’s apron is not just about sewing; it’s about crafting something unique that brings joy and practicality into the kitchen. Whether you decide to make one for yourself or a little chef in your life, this project serves as a delightful introduction to sewing that can ignite a lifelong passion.
So, grab your fabric and sewing supplies, and let’s get started on this fun and stylish apron adventure! 🧵💖