Are you ready to dive into a delightful sewing project that will bring a smile to your face? These fabric bunnies are not only charming but also incredibly easy to make! Perfect for decorating a child’s room or as a thoughtful handmade gift, they’re a fantastic way to explore your creativity. In this article, we’ll guide you through the materials and steps needed to create your very own fabric bunnies.
Materials Needed
To get started on this fun sewing project, gather the following materials:
Soft Cotton Fabric: It’s best to choose lightweight and soft cotton, as it will give your bunnies a cuddly feel.
Matching Sewing Thread: Pick a thread color that complements your fabric choices.
Stuffing or Polyester Fiberfill: This will give your bunnies their adorable, plush shape.
A Small Piece of Fabric or Ribbon: This is for creating the cute little bows.
Needle and Embroidery Thread: Use this to stitch on the bunny’s eyes, nose, and other lovely details.
Pins: These will help hold your fabric pieces together before sewing.
Bunny Body Dimensions
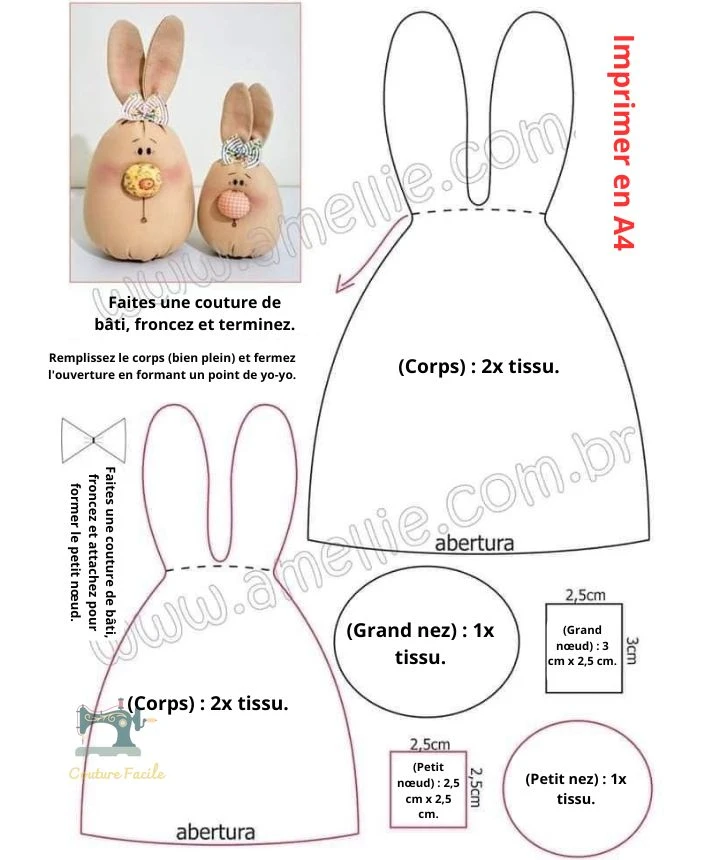
Before you start cutting your fabric, here are the measurements for the pieces you’ll need:
Body: Cut 2 pieces measuring 25 cm high x 17 cm wide.
Large Nose: Cut 1 circle with a diameter of 5 cm.
Small Nose: Cut 1 circle with a diameter of 2.5 cm.
Large Bow: Cut a piece measuring 3 cm x 2.5 cm.
Small Bow: Cut a piece measuring 2.5 cm x 2.5 cm.
Step-by-Step Instructions
1. Cutting the Fabric
Carefully cut out all the fabric pieces using the measurements above. Make sure to cut two body pieces, as they will form the front and back of your bunny.
2. Assembling the Bunny
Take the two body pieces and place them right sides together. Using your sewing machine or needle and thread, sew around the edges, leaving an opening at the bottom for turning and stuffing.
3. Turning and Stuffing
Turn the fabric inside out so that the right side is facing out. Gently push out the corners to get a nice shape. Then, fill the bunny with stuffing until it’s plump and huggable. Once stuffed, close the opening with an invisible stitch.
4. Creating the Nose
For the nose, use the larger circle. Make a gathering stitch around the edges of the circle, pull the thread tight, and add a bit of stuffing before securing it. Attach the nose to the bunny’s face with a stitch or fabric glue.
5. Adding Details
Get creative with the bunny’s features! Use embroidery thread to stitch on the eyes and mouth.
6. Making the Bows
Take your fabric or ribbon pieces, fold them into a bow shape, and secure them in the center with a stitch. Attach the bows to your bunny’s ears or neck for a lovely finishing touch.
7. Final Touches
Adjust the ears for a playful look, whether you prefer them upright or floppy. Consider using printed fabrics or adding small accessories like flowers or buttons for extra charm!
Conclusion
And there you have it—your very own adorable fabric bunnies! This project is not only simple and quick but also allows for endless customization. Feel free to experiment with different fabrics, patterns, and personal touches. These whimsical bunnies are sure to brighten up any space and make wonderful gifts for friends and family.
Happy sewing! 🧡