Are you looking for a charming and cozy way to add some flair to your child’s room, or perhaps you’re on the hunt for the perfect homemade gift? Look no further! In this guide, we will take you through the simple steps to create a delightful animal pouf. It’s easy to make, practical, and a lot of fun for both kids and adults alike!
Materials Needed
To get started, gather the following materials:
Main Body Fabric: A sturdy fabric for the main rectangular part
Filling: Soft stuffing (like polyester fiberfill or polystyrene beads)
Sewing Essentials: Thread, scissors, pins, and a sewing machine (or needle if you prefer hand-sewing)
Optional: Fabric for details like eyes or nose, and any decorative elements you want to add
Measurements
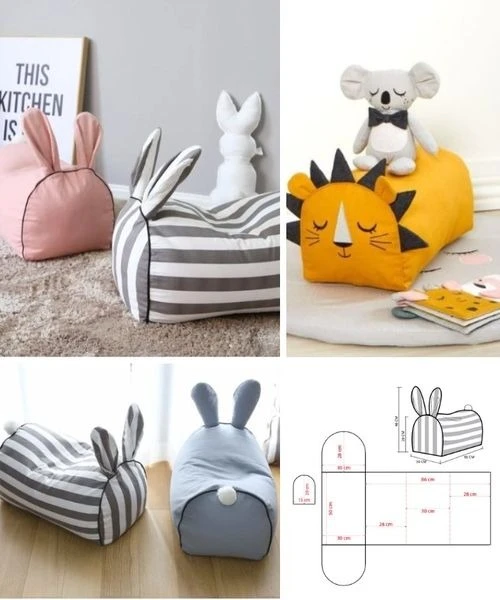
Before you dive into your sewing journey, let’s take a look at the specific measurements needed for your pouf:
Main Rectangular Part: 70 cm long x 35 cm wide
Round Sides (Ends): Diameter of 35 cm each
Ear Strips: 30 cm long x 10 cm wide (you’ll need two)
Optional Tail: A round piece with an 8 cm diameter
Step-by-Step Instructions
1. Cutting the Pieces
Begin by cutting out the pieces for your pouf:
- Cut a large rectangle measuring 70 cm x 35 cm for the main body.
- Cut two circles with a diameter of 35 cm for the ends.
- Cut the ear strips, making sure to get two pieces measuring 30 cm x 10 cm.
- If you want to add a tail, cut a circle with an 8 cm diameter.
2. Assembling the Ears
To create cute ears:
- Fold each ear strip in half lengthwise, so it’s 5 cm wide once folded.
- Sew the edges, leaving an opening to turn it right-side out.
- Once turned, fill them slightly to give some volume, then attach them to the top of the main rectangle, about 5 cm from the top edge.
3. Attaching the Ends
Next, attach the round ends:
- Pin the circles to each end of the rectangular body, ensuring the seams of the ears are included.
- Sew around the edges to secure the ends.
4. Constructing the Body
Now to shape your pouf’s body:
- Fold the main rectangle in half widthwise and sew the sides to form a tube, leaving a 15 cm opening to turn it and fill it later.
5. Filling and Final Touches
After turning the pouf right-side out:
- Fill it with your chosen stuffing until it reaches your desired density.
- Securely close the opening with an invisible stitch.
- If you have chosen to make a tail, sew it onto the back of the pouf for extra charm!
Choosing Your Fabric
Selecting the right fabric will make your pouf extra special:
Outer Fabric: Opt for a durable fabric like thick cotton, linen, or even velvet for a soft touch.
Inner Lining: A lightweight cotton is great for a neat finish.
Colors: Play around with soft colors for a sweet look or go for whimsical patterns for a more playful vibe.
Bonus Decoration Tips
For a personal touch, consider adding embroidered eyes or a nose to give your animal pouf personality!
Conclusion
With this easy step-by-step guide, you can create a charming and cozy animal pouf that will not only brighten up a child’s room but also serve as a loving handmade gift. So grab your materials, unleash your creativity, and start sewing!
Happy crafting! 🌟🧵