Are you ready to embark on a delightful sewing adventure? Whether you’re an experienced crafter or a beginner looking to try something new, making a plush capybara is a fun and rewarding project! This cute and cuddly creation can bring a smile to anyone’s face while serving as a perfect gift for loved ones or a charming addition to your home décor. Let’s dive into the materials you’ll need and the steps to make your very own plush friend!
Necessary Materials
Before you get started, gather the following materials:
Soft Fabric: Choose a plush fabric like velour or fleece in beige or light brown to give your capybara that warm and cozy look.
Matching Sewing Thread: Get some thread that matches your fabric to ensure a polished finish.
Stuffing: Use polyester filling or cotton stuffing to give your capybara a cuddly shape.
Needles, Pins, and Scissors: These basic sewing tools will help you put your plush capybara together.
Sewing Machine (optional): While you can hand-sew your plushie, a sewing machine can speed up the process.
Textile Marker or Chalk: This is useful for tracing your pattern on the fabric.
Safety Eyes or Embroidery Thread: Choose either safety eyes for a cute look or embroider the eyes for a plushie that’s safe for younger children.
Pattern and Preparation
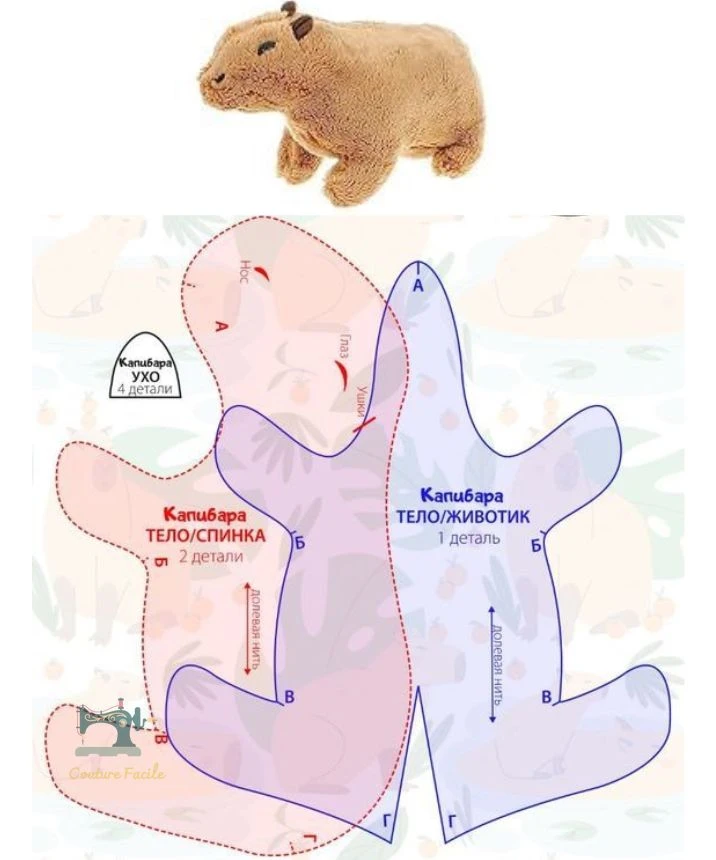
Download and Print the Pattern: Find a capybara plush pattern online or draw your own. Make sure to include all necessary pieces: the body, tummy, and ears.
Cut the Fabric: Trace the pattern onto your chosen fabric using the textile marker or chalk. Carefully cut out the pieces. You will need:- 2 pieces for the body/back
- 1 piece for the tummy
- 4 small pieces for the ears
Add Seam Allowances: Remember to add a seam allowance of about 0.5 to 0.7 cm around each piece to ensure you have enough fabric to sew.
Sewing Instructions
Assemble the Body
Pin the Back Together: Take the two pieces for the back of the body and pin them together, right sides facing each other.
Sew the Edges: Stitch along the edges, leaving an opening for the belly.
Attach the Tummy: Take the tummy piece and pin it to the back piece. Sew around, again leaving an opening to insert the stuffing.
Create the Ears
Pin and Sew the Ears: Take the ear pieces (four in total), pin them together in pairs, and sew along the edges.
Turn the Ears Right Side Out: Flip them right side out and sew them to the top of the body of the capybara.
Finishing Touches
Add Features: Attach safety eyes or use embroidery to create the capybara’s eyes and face details. This is where you can get creative!
Stuff the Plushie: Turn the capybara right side out and fill it with stuffing until it’s soft and cuddly.
Close the Opening: Hand sew the opening shut using an invisible stitch for a clean look.
Adjust the Ears: Make sure the ears are positioned how you like them and reinforce any loose stitches if needed.
Personalization Tips
Fabric Choices: Dive into your fabric stash! You can use patterned fabric or even dye plain fabric for a unique touch.
Size Adjustments: Feel free to enlarge or shrink the pattern according to your needs. Want a small keychain plush? Go for it!
Safety First: If you’re creating this plushie for small children, opt for embroidered features instead of plastic ones.
Conclusion
And voilà! Your adorable capybara plush is ready to spread joy and coziness! 🥰 Not only is this project a great way to hone your sewing skills, but it also provides the opportunity for creativity and customization. Share your creation with friends or gift it to someone special!
Ready to start sewing? Gather your materials and get crafting! Happy sewing! ✨