Are you tired of your sewing tools scattered all over the place? Do you want to combine functionality with a touch of elegance? If so, this felt sewing organizer is just what you need! Not only is it practical for keeping your essentials in order, but it’s also a delightful addition to your sewing space. In this article, we’ll guide you through the steps to create your very own sewing organizer, perfect for both beginners and seasoned sewists alike.
Measurements You’ll Need
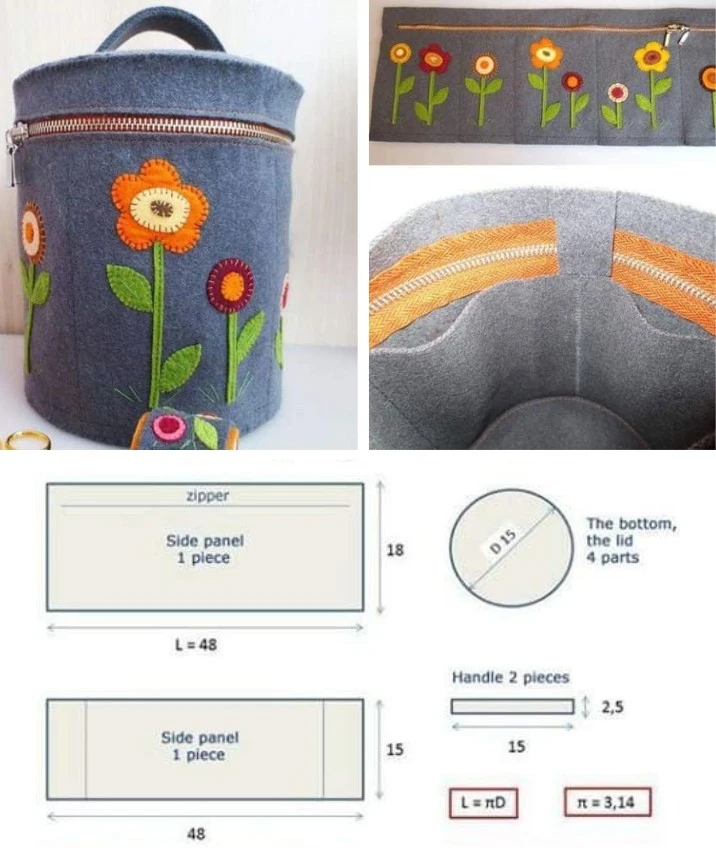
Before you get started, make sure you have the following measurements for your project:
Side Panel: 48 cm long, 18 cm high
Base and Lid: Diameter of 15 cm
Handles: 2 pieces measuring 15 cm long and 2.5 cm wide
Zipper: Length of 48 cm
Materials Required
To bring your sewing organizer to life, gather the following materials:
- Thick felt (in a color of your choice for structure)
- Colorful felt for decorative flowers
- A sturdy zipper (48 cm)
- Sewing thread that matches your felt
- Scissors
- Fabric markers (optional for decorating)
Step-by-Step Instructions
1. Cut the Pieces
Start by cutting your felt according to the measurements provided. You’ll need:
- One main side panel (48 cm x 18 cm)
- Two circular pieces for the base and lid (15 cm in diameter)
- Two pieces for the handles (15 cm x 2.5 cm)
2. Prepare the Decorations
Now it’s time to unleash your creativity! Cut out flower shapes from the colorful felt and sew them onto the side panel. You can create stems, leaves, and petals for a beautiful 3D effect. Use embroidery or simple stitching techniques to add details and make your flowers pop!
3. Assemble the Pieces
Sew the side panel to the circular base piece. Next, attach the zipper to the top edge of the side panel, and finally, sew the lid piece on top of the zipper. This step is crucial, so ensure everything is aligned neatly for a polished finish.
4. Add the Handles
Take the two pieces you cut for the handles, stitch them together, and then attach them to the top of the lid. This will not only add convenience but also enhance the overall design of the organizer.
5. Finishing Touches
Consider creating additional compartments inside your organizer for storing threads, scissors, and other sewing tools. You can cut and sew extra pockets from felt to keep your tools even more organized!
Tips for Choosing Fabrics
Thick Felt: Use thick felt to ensure that your organizer has enough structure to hold all your tools securely.
Colorful Felt: Opt for vibrant colors for the flowers to make your organizer not only functional but also a visual delight.
Sturdy Zipper: Choose a robust zipper to facilitate easy opening and closing, especially if you use your organizer regularly.
Conclusion
Creating a sewing organizer from felt is a fantastic way to combine practicality with personalized flair. You’ll not only finish a sewing project but also have a lovely piece to showcase in your craft space. With this organizer, you can keep your tools organized and accessible while adding a pop of color to your creative nook.
Now, it’s time to gather your materials and start sewing! Happy crafting! 🌼🧶