Are you looking for a whimsical and charming DIY project that adds a touch of sweetness and originality to your home? Look no further! These delightful flower pot dolls are not only fun to make but also serve as lovely decorations that bring joy and personality to any space. Let’s dive into how you can create these unique pieces of art!
Materials You’ll Need
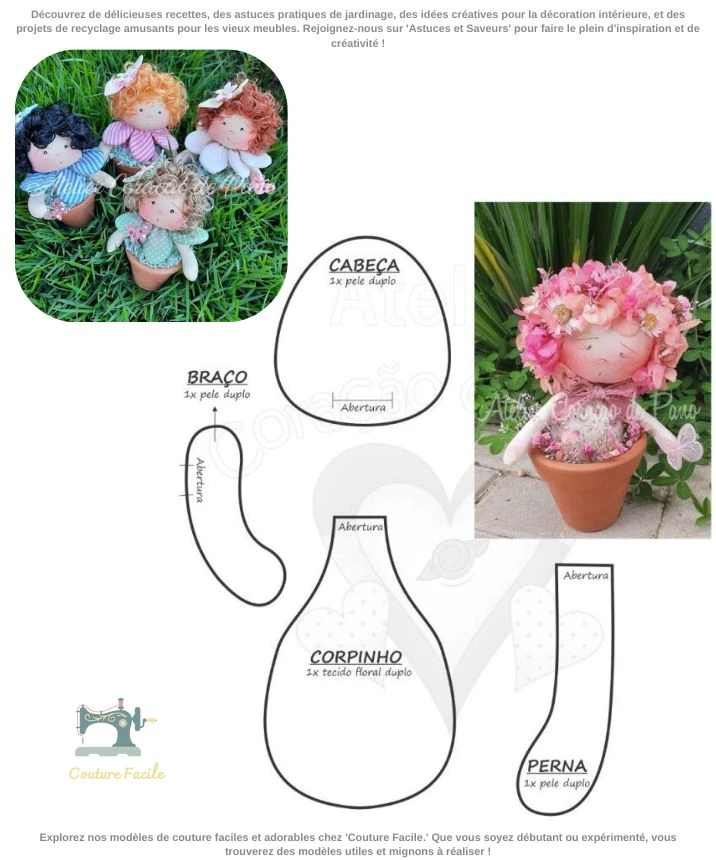
Before you get started, gather the following supplies:
Skin-tone Fabric: Choose a light beige or pastel pink for the head and limbs.
Floral or Patterned Fabric: Select vibrant fabrics for the dolls’ bodies that reflect your style.
Polyester Stuffing: You’ll need this for a soft and cuddly feel for the arms, legs, and head.
Matching Thread: To sew everything together seamlessly.
Terracotta Pots: These will serve as the base for your dolls.
Yarn or Cotton Thread: For creating hair that adds character.
Accessories: Get creative with beads, artificial flowers, or other fun embellishments for the dolls.
Sewing Tools: Don’t forget needles, scissors, and pins for a smooth sewing process.
Step-by-Step Instructions
1. Cut the Pieces
Using your chosen fabric, cut out the required pieces for each doll:
Head: 1 piece (doubled) about 10 cm tall.
Arms: 2 pieces (doubled), approximately 12 cm long each.
Body: 1 piece (doubled), about 15 cm tall.
Legs: 2 pieces (doubled), around 10 cm long each.
2. Sew the Arms and Legs
Place the fabric pieces right sides together. Leave a small opening for turning them inside out, then sew around the edges. Once sewn, turn the fabric right side out and fill them with the polyester stuffing.
3. Form the Body
Sew the body pieces together in the same manner, filling them with stuffing and closing the opening tightly.
4. Add the Head
Sew and stuff the head in the same way, and then securely attach it to the body.
5. Attach the Limbs
Carefully sew the arms and legs to the body, ensuring they are firmly in place.
6. Create the Hair
Using yarn or cotton thread, form loops or strands for hair, and attach them to the head, giving your dolls their personality and flair.
7. Decorate with Accessories
Now comes the fun part! Add beads, ribbons, or artificial flowers to embellish your dolls and make them uniquely yours.
8. Secure in the Pot
Position your finished doll inside the terracotta pot. If needed, use hot glue or additional stuffing to secure it in place.
Why Adopting These Dolls?
These charming flower pot dolls beautifully blend the art of sewing with creativity, making them an excellent project for crafters of all levels. They provide a perfect opportunity to express your artistic side while creating something functional and aesthetically pleasing that can enhance your living space.
Additionally, these dolls make for thoughtful gifts, party decorations, or even special keepsakes that carry sentimental value. Plus, they are an ideal way to reuse fabric scraps and unleash your inner designer!
Final Thoughts
So, what do you think? Are you ready to dive into this delightful DIY project? Transform your space with these lovely flower pot dolls and let your creativity bloom! 🌼✨
Whether for personal enjoyment or as heartfelt gifts, these little treasures will surely bring smiles and warmth wherever they are displayed. Happy sewing!