Are you looking to add a splash of personality to your kitchen while also crafting something practical? Look no further! This delightful chicken oven mitt not only protects your hands from the heat but also serves as a charming décor piece that will brighten up any cooking space. Let’s dive into this fun sewing project that is perfect for both beginners and seasoned crafters alike!
Materials Needed
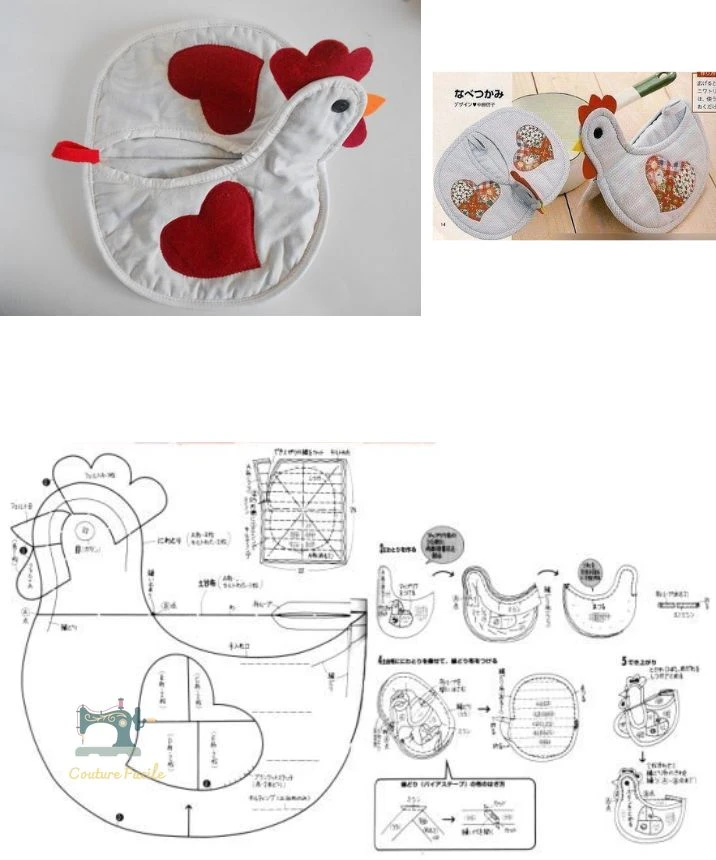
Before you start, you’ll need a few essential materials to create your cute chicken oven mitt:
Main Fabric (Cotton or Linen): 50×50 cm
Felt (Red and Orange): For the comb and beak details
Batting or Insulation Material: 50×50 cm for heat protection
Decorative Fabric Scraps: For the heart and wings
Matching Sewing Thread
Black Buttons or Beads: For the eyes
Getting Started
Step 1: Preparation
Begin by cutting out the various pieces using a pattern template. Don’t forget to include a 1 cm seam allowance for sewing. This planning step will ensure all your pieces fit together perfectly.
Step 2: Adding Details
Now, it’s time to assemble the fun embellishments! Sew the hearts and wings onto the sides of your mitt. Next, add the felt pieces for the comb and beak to the top of the mitt. This is where your creativity can shine; feel free to play around with colors and patterns!
Step 3: Insulation Layer
For safety against burns, layer your main fabric, batting, and lining fabric together. Think of this as making a sandwich—keeping the insulation in the middle, ensuring the outer layers look fabulous.
Step 4: Assembly
Sew the two sides of the mitt together, leaving an opening for your hand. Once sewn, carefully turn the mitt inside out so that the seams are hidden. Voilà! You’re already seeing the shape of your adorable chicken oven mitt coming to life.
Step 5: Finishing Touches
To give your mitt its personality, attach the black buttons or beads for the eyes. You can also add a small ribbon if you wish to hang it up as part of your kitchen décor. This final touch not only enhances its charm but also makes it easy to store.
Tips for Success
Choose a Thick Fabric: To avoid burns while using the mitt, select a thicker cotton or linen fabric.
Double Up on Felt: If possible, use double layers of felt for the comb to make it sturdier.
Play with Patterns: Consider mixing and matching fabric patterns to create a unique set that reflects your personal style.
Conclusion
This adorable chicken oven mitt is not just a practical kitchen tool but also a great conversation starter and an enriching craft project. Whether you’re making it for yourself or as a gift for a fellow cooking enthusiast, the fun and satisfaction from creating this charming piece is sure to delight.
So, what are you waiting for? Gather your materials and get sewing! It’s time to bring some whimsy to your kitchen with your very own chicken oven mitt! Happy crafting! 🎉✨