Looking for a cozy and adorable addition to your home or a thoughtful gift for a loved one? Why not create your very own plush cat? This delightful sewing project is not only fun, but it’s also a great way to showcase your creativity and sewing skills! In this article, we’ll guide you through the materials needed, the steps to creating your fluffy friend, and some tips to personalize it. Let’s get started!
Materials Needed
Before diving into the sewing process, gather the following materials:
Soft Fabric: You can use fleece, felt, or minky in colors like gray and red to bring your plush cat to life.
Coordinating Thread: Choose thread that matches or complements your fabric.
Polyester Stuffing: This will help give your cat its delightful shape and fluffiness.
Small Pieces of Black Felt: These will be used for facial details and accessories.
Needle, Pins, and Scissors: Essential tools to help you assemble your plushie.
Sewing Machine (optional): While you can sew by hand, a machine will speed up the process for those who are comfortable with it.
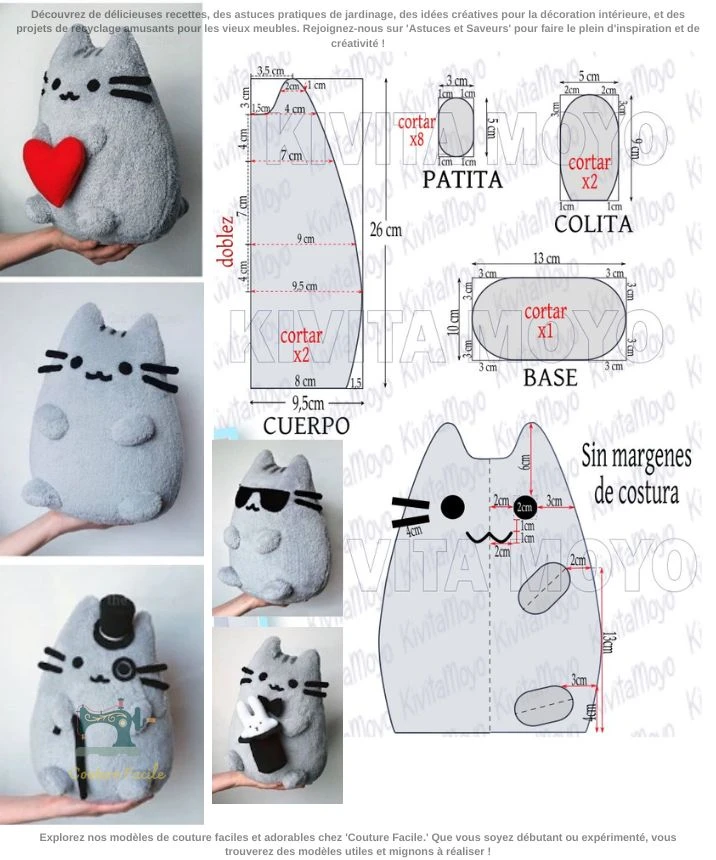
Measurements
To create your plush cat, you’ll need to cut the following pieces:
Body: 26 cm tall, 9.5 cm wide at the base.
Paws: 8 pieces, each measuring 4 cm x 7 cm.
Tail: 2 pieces, each measuring 4 cm x 8 cm.
Base: 1 oval piece measuring 9.5 cm x 13 cm.
Note: Remember to add approximately 0.5 cm for seam allowances!
Step-by-Step Instructions
1. Prepare the Pieces
Start by cutting out all the fabric pieces according to the measurements provided. This meticulous preparation is crucial for a successful sewing project.
2. Assemble the Legs and Tail
Sew the legs and tail: Join the corresponding pieces together, leaving a small opening to turn them inside out later.
Stuff the pieces: Fill them with polyester stuffing to make them plump and squishy.
Close the openings: Use an invisible stitch to secure the openings neatly after stuffing.
3. Create the Body
Sew the body sides together: Connect the two sides of the body, then attach the base while leaving an opening for stuffing.
Fill the body: Gently add stuffing to give your plush cat its cute, cuddly shape.
4. Add Facial Details
Now comes the fun part! Use the black felt to create the eyes, nose, and mouth for your cat. Feel free to get creative by adding accessories like a little heart or glasses, making your plush cat truly unique!
5. Final Assembly and Finish
Close the body: After stuffing the body, sew up the opening using an invisible stitch for a seamless look.
Attach the legs and tail: Securely sew the legs and tail onto the body, positioning them for a charming pose.
Personalization Tips
Use Different Colors: Experiment with different fabric colors and patterns to create a plush cat that reflects your personal style.
Accessorize: Add playful hats, scarves, or glasses made from felt to give your plush cat a trendy look.
Care Instructions: If your plush cat needs a wash, be gentle! Hand wash in cool water to preserve its softness.
Conclusion
Creating your own plush cat is a rewarding project that’s perfect for both beginners and seasoned sewists. Not only do you end up with a lovely piece for your home or as a gift, but you also get to express your creativity! So gather your materials, follow the steps, and enjoy the process of crafting your very own irresistible plush friend. Happy sewing! 🧵✨