Are you looking for a fun and heartwarming sewing project? This adorable plush bunny with a carrot is perfect for crafters of all skill levels! Whether you’re a seasoned seamstress or just starting, this project will bring joy and creativity to your crafting experience. Let’s hop into the details!
Why Sew a Plush Bunny?
Creating your own plush bunny offers plenty of benefits:
Personalized Gift: Handmade items carry a special sentiment, making them wonderful gifts for children or loved ones.
Fun & Engaging: This project allows you to express your creativity while enjoying the therapeutic benefits of sewing.
Skill Development: It’s a fantastic way to practice and develop your sewing skills, especially if you’re a beginner.
Materials Needed
To get started on your plush bunny, you’ll need the following materials:
Soft Fabric: Choose materials like minky, felt, or cotton for the body, ears, and head.
Contrasting Fabric: Use a different fabric for the details on the ears and the carrot to create visual interest.
Thread: Select a matching thread for your chosen fabrics.
Stuffing: Polyfill or cotton batting works great for stuffing your bunny.
Sewing Tools: Have needles, scissors, and pins handy. You can use a sewing machine or hand stitch if you prefer.
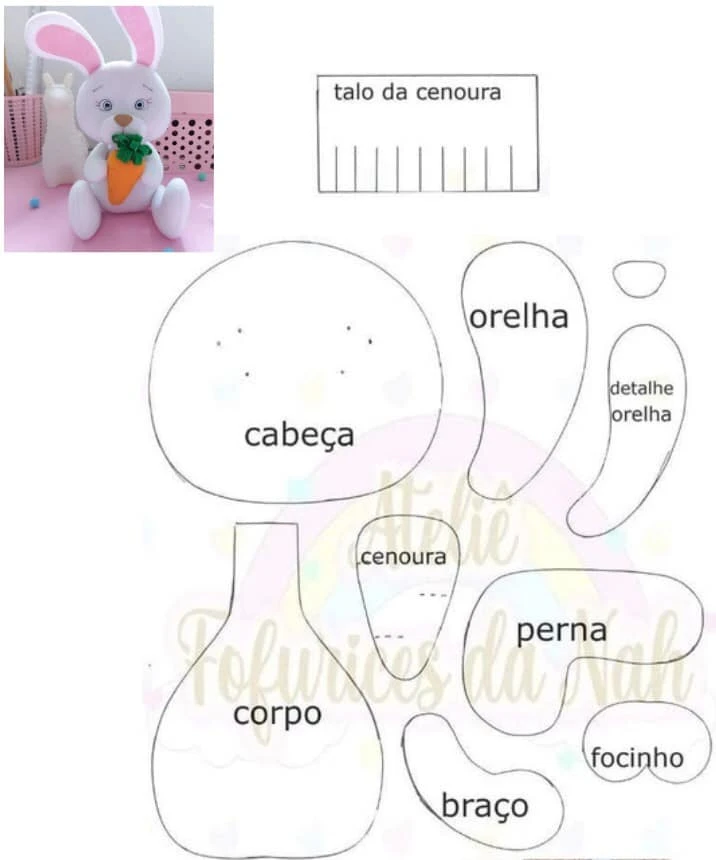
Cutting the Pieces
Here’s a quick rundown of how to cut the necessary pieces for your plush bunny:
Head: Cut 2 pieces from the main fabric.
Body: Cut 2 pieces from the main fabric.
Arms: Cut 4 total pieces from the main fabric (2 pieces for each arm).
Legs: Cut 4 total pieces (2 pieces for each leg).
Ears: Cut 4 pieces from the main fabric and 2 from the contrasting fabric.
Carrot: Cut 2 orange pieces for the carrot and 1 green piece for the top.
Muzzle: Cut 1 piece from the contrasting fabric.
Steps to Sew Your Plush Bunny
Follow these simple steps to assemble your plush bunny:
1. Prepare the Pieces
- Cut out all the pieces from your chosen fabrics.
- Attach the contrasting fabric details to the ears by sewing them right sides together.
2. Create the Body
- Sew the two pieces of the body together, leaving an opening at the bottom for stuffing.
- Fill the body with your chosen stuffing and close the opening with an invisible stitch.
3. Sew the Arms and Legs
- Stitch each arm and leg right sides together, turn them inside out, and lightly stuff them.
- Attach the ears to the head.
4. Assemble the Head
- Sew the head pieces together, adding the ears in place.
- Once stuffed, sew the muzzle onto the face.
5. Final Assembly
- Attach the head to the body, and securely stitch on the arms and legs. For added articulation, you can use buttons.
6. Make the Carrot
- Assemble the carrot pieces, stuff them, and attach the green top. Place it between the bunny’s hands for a charming touch.
Customizations and Tips
Feel free to customize your bunny! Use washable fabrics to make it child-friendly and durable. Add embroidery for facial features or embellishments like ribbons around the neck to create your unique design.
Conclusion
With just a bit of fabric and creativity, you’ll have a delightful plush bunny to cherish forever! So, gather your materials, follow the steps, and enjoy this fun-filled project. It’s not just about sewing; it’s about creating something special with your hands. Happy crafting!
Now that you have everything you need to get started, are you excited to make your own plush bunny? Let us know your thoughts and any creative ideas you have in the comments!