Are you looking for a stylish yet practical solution to declutter your space? This versatile organizing bag is the answer! Perfect for beginners and sewing enthusiasts alike, this project will help you create a functional and elegant bag to store everything from sewing tools to skincare products. Let’s dive into the details!
Measurements
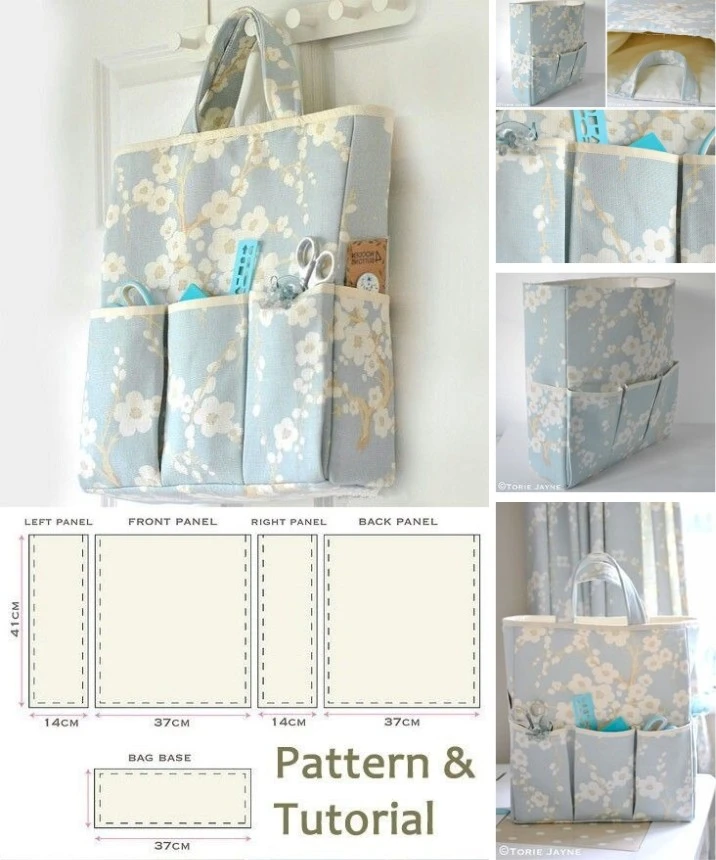
To get started, here are the necessary measurements for your bag components:
Front/Back Panel: 37 cm (width) x 41 cm (height)
Side Panels: 14 cm (width) x 41 cm (height)
Base of the Bag: 37 cm (width) x 14 cm (height)
Materials Needed
Before you begin, gather your materials:
- Sturdy fabric (canvas or quilted cotton works great for structure)
- Lining fabric (lightweight cotton or waterproof material if desired)
- Fusible interfacing (optional, for added rigidity)
- Sewing machine, thread, scissors, and pins
- Measuring tape
- Iron
Step-by-Step Instructions
1. Cutting the Fabric
Carefully cut your fabric pieces according to the measurements provided above. For a more durable bag, choose a thick fabric that can hold its shape well.
2. Creating Front Pockets
To add functionality to your bag, create front pockets:
- Cut a piece of fabric measuring 37 cm wide x 20 cm tall.
- Fold this piece in half to create a pocket.
- Sew vertical lines within the pocket to make divisions, allowing you to organize smaller items easily.
3. Assembling the Bag Panels
- Begin by sewing the side panels to the front and back panels using a straight stitch. Make sure to align the edges properly.
- Next, attach the base of the bag, ensuring all edges are lined up seamlessly.
4. Adding Handles
For handles that are comfortable and stylish, cut two strips of fabric measuring 6 cm wide x 40 cm long.
- Fold each strip in half lengthwise and sew down the long edge.
- Attach the handles to the top edges of the bag to ensure they are securely fixed.
5. Finishing Touches
For a polished look, consider adding bias binding along the top edge of the bag and the pockets to strengthen the seams. This step not only enhances the bag’s appearance but also keeps it durable.
Tips for Choosing Fabric
When selecting fabrics, keep the following in mind:
Outer Fabric: Choose a sturdy material like heavy cotton or canvas to maintain the bag’s shape.
Lining: If you plan on storing wet items, opt for a lightweight or waterproof fabric for the lining.
Reinforcement: For added structure, use interfacing or batting between the outer fabric and lining.
Conclusion
With this simple and quick sewing pattern, you’ll have a chic and practical organizing bag in no time! It’s a wonderful way to keep your essentials tidy while showcasing your sewing skills. Whether you use it for your crafting supplies or as a stylish handbag, this project will surely add a touch of elegance to your daily life.
Ready to Sew?
Now that you’re inspired to create your own versatile organizing bag, grab your materials, follow the steps, and enjoy the satisfaction of making something beautiful and functional! Happy sewing!