Are you looking to add a stylish yet functional accessory to your wardrobe? A hooded scarf is the perfect blend of comfort and elegance, and it’s surprisingly easy to make! This unique piece not only keeps you warm but also adds a fashionable flair to any outfit. Whether you’re heading out for a brisk walk or just lounging at home, this versatile hooded scarf is bound to become your favorite accessory. Let’s dive into how you can create your very own!
Materials Needed
To get started on your hooded scarf, gather the following materials:
Main Fabric: 1 meter of wool or stretchy jersey fabric for added comfort.
Lining Fabric: 1 meter of soft cotton or flannel for warmth and coziness.
Matching Thread: Make sure to have a quality thread that complements your fabric.
Sewing Scissors: A sharp pair of scissors for clean cuts.
Sewing Machine: Essential for stitching your scarf together.
Pins or Clips: To keep your fabrics secure while sewing.
Dimensions and Cutting
Before you start sewing, it’s important to prepare your materials:
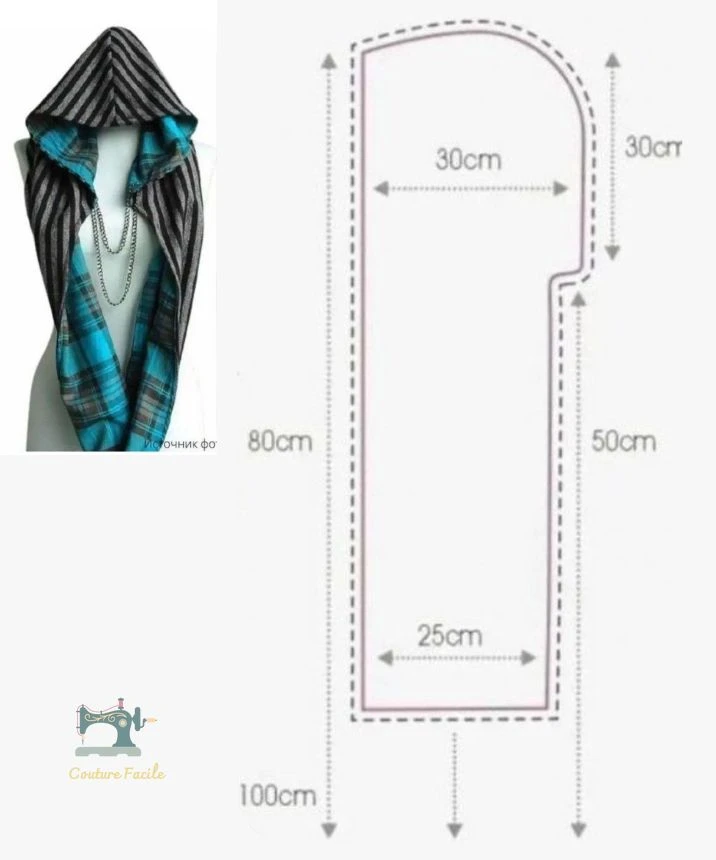
Scarf Dimensions: The total length of the scarf should be 100 cm.
Hood Height: The hood should stand tall at 30 cm.
Neck Opening Width: Measure out 25 cm for a comfortable fit.
Front Hood Piece: The front part of the hood should measure 50 cm.
Full Width: When unfolded, the total width should be 80 cm.
Cut out two identical pieces based on these dimensions—one for the exterior and one for the lining.
Step-by-Step Instructions
1. Prepare the Fabrics
Begin by placing the two fabric pieces right sides together. Use pins or clips to secure the edges, ensuring they stay in place while you sew.
2. Sew the Hood
- With your sewing machine, stitch along the rounded edges of the hood, leaving an opening to turn the fabric right side out.
- After sewing, carefully turn the hood inside out and press the seams for a clean finish.
3. Assemble the Scarf
- Pin the long sides of the scarf together, aligning the edges.
- Sew along the sides, again leaving an opening to flip the scarf right side out.
4. Finish Up
- Hand-stitch the remaining opening using an invisible stitch to create a seamless look.
- Give the entire scarf a good press with your iron to achieve a polished finish.
Personalization Tips
Now that you’ve mastered the basic hooded scarf, let your creativity shine! Here are a few ways to customize your project:
Add a Button or Snap: Secure the scarf in place with a decorative button or snap closure.
Embellishments: Consider embroidering a unique design or adding contrast fabric panels to make it stand out.
Reversible Fabric: Use reversible fabric to give you two stylish options in one accessory!
Conclusion
The hooded scarf is not just another accessory; it’s a statement piece that marries function with fashion. Ideal for those chilly days, it offers warmth while ensuring you look stylish. With simple steps and a little imagination, you’ll have a gorgeous, handmade piece that showcases your sewing skills and keeps you cozy.
Embrace the joy of sewing, and make your very own versatile hooded scarf today! Happy sewing!