Cutting fabric is one of the most important steps in sewing, as it determines the shape, size, and fit of your final project. However, cutting fabric can also be tricky and prone to errors, especially if you are a beginner or working with unfamiliar fabrics. To help you avoid some common pitfalls and achieve accurate and precise cuts, here are the top 5 mistakes to avoid when cutting fabric.
1. Not washing the fabric before cutting
One of the questions that many sewers ask is whether they need to prewash their fabric before cutting. The answer is: it depends. If your final project will never be washed, then you don’t have to. But if your final project will be washed, then you should wash your fabric before cutting. Why? Because natural fibers, such as cotton, linen, wool, and silk, tend to shrink when they come in contact with water and heat. This means that if you cut your fabric before washing, your final project may end up being too small or distorted after washing. To prevent this, you should wash your fabric in the same way that you will wash your final project, and then iron it before cutting
2. Not squaring and truing the fabric
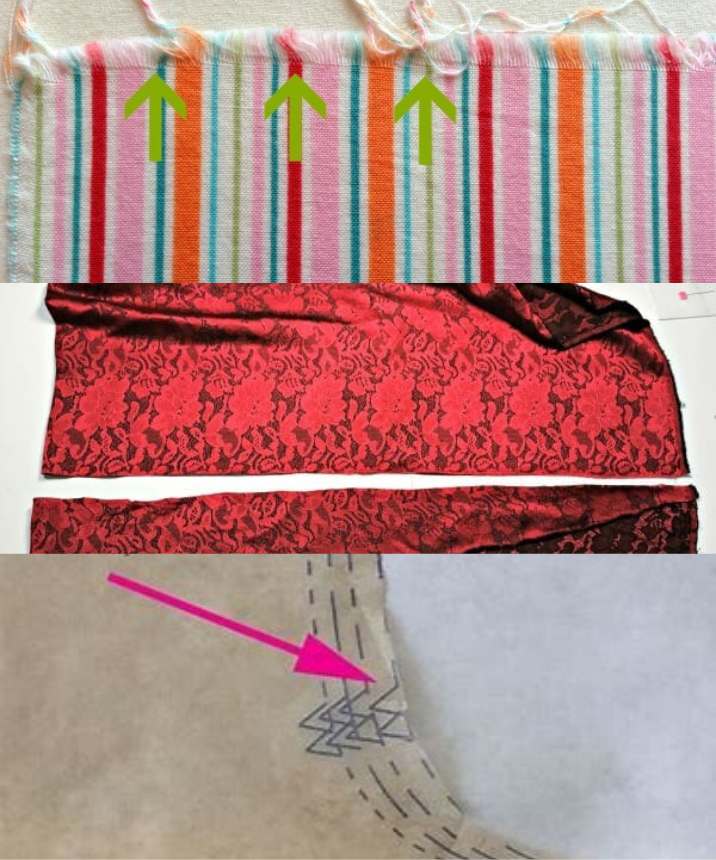
Another mistake that many sewers make is not squaring and truing the fabric before cutting. Squaring and truing the fabric means aligning the edges of the fabric with the grain lines, which are the direction of the threads that make up the fabric. The grain lines are important because they affect the way the fabric drapes, stretches, and behaves. To square and true the fabric, you need to cut away the selvages, which are the finished edges of the fabric that run along the length of the fabric, and then pull a thread along the width of the fabric and cut along the gap that is left by the thread. This will ensure that your fabric is straight and even, and that your cuts are on the grain.
3. Not using the right tools and techniques
Cutting fabric requires the right tools and techniques to achieve clean and accurate cuts. Some of the tools that you will need are a rotary cutter, a cutting mat, a ruler, a pair of scissors, and some pins or weights. A rotary cutter is a circular blade that can cut through multiple layers of fabric with ease and precision. A cutting mat is a flat surface that protects your table and your blade from damage. A ruler is a measuring tool that helps you mark and cut straight lines. A pair of scissors is a cutting tool that can be used for curved or detailed cuts. Pins or weights are used to hold the fabric in place while cutting. To use these tools effectively, you should follow these tips:
- Cut on a hard and flat surface, not on a soft or uneven surface, such as a carpet or a bed.
- Cut on a single layer of fabric, unless you are using the same type and weight of fabric.
- Cut with the grain, not against it, unless the pattern instructs otherwise.
- Cut with the right side of the fabric facing up, unless the pattern instructs otherwise.
- Cut with the blade perpendicular to the fabric, not at an angle, to avoid jagged or distorted cuts.
- Cut with smooth and steady motions, not with jerky or rushed motions, to avoid skipping or slipping.
- Cut with sharp and clean tools, not with dull or dirty tools, to avoid snagging or tearing.
4. Not following the pattern layout and markings
Another mistake that many sewers make is not following the pattern layout and markings when cutting fabric. The pattern layout is a diagram that shows how to arrange the pattern pieces on the fabric to optimize the fabric usage and the grain alignment. The pattern markings are symbols that indicate important information, such as the seam allowance, the notches, the darts, the pleats, the buttonholes, and the grain line. To follow the pattern layout and markings, you should do the following:
- Fold the fabric according to the pattern layout, either right sides together or wrong sides together, depending on the pattern.
- Place the pattern pieces on the fabric according to the pattern layout, making sure that the grain line on the pattern is parallel to the selvage or the folded edge of the fabric.
- Pin or weigh down the pattern pieces to the fabric, making sure that they are flat and smooth, without any wrinkles or bubbles.
- Transfer the pattern markings to the fabric, using a tailor’s chalk, a fabric pen, or a tracing wheel and paper, depending on the fabric and the pattern.
- Cut the fabric along the edges of the pattern pieces, following the cutting line, not the stitching line.
5. Not labeling and organizing the cut pieces
The last mistake that many sewers make is not labeling and organizing the cut pieces after cutting fabric. Labeling and organizing the cut pieces is important because it helps you identify and match the pieces when sewing, especially if you are working with a complex or symmetrical pattern. To label and organize the cut pieces, you should do the following:
- Label the cut pieces with the pattern number, the size, the piece name, and the fabric side, using a piece of masking tape, a safety pin, or a thread loop, depending on the fabric and the pattern.
- Organize the cut pieces by grouping them according to the pattern instructions, such as the front, the back, the sleeves, the collar, etc.
- Store the cut pieces in a safe and dry place, such as a plastic bag, a cardboard box, or a basket, until you are ready to sew
I hope you liked this article. Please note that this is not a professional or sewing advice, and you should always follow the instructions and recommendations of your pattern and fabric manufacturer.