Knitting is not just a craft; it’s a form of expression that allows you to create beautiful and functional pieces for your wardrobe. One such piece that every knitting enthusiast should try is the versatile neck warmer. This elegant accessory can elevate any outfit while keeping you cozy and stylish, making it a perfect addition to your knitting repertoire.
Recommended Measurements
To craft this chic neck warmer, here are the recommended dimensions:
Total Width of the Neck Warmer: 30 cm
Total Length of the Neck Warmer: 100 cm
Opening for the Arm or Head: 15 cm wide and 20 cm high
These dimensions will help you create a neck warmer that fits comfortably and drapes beautifully.
Materials Needed
Before you dive into the knitting process, gather your materials. Here’s what you’ll need:
Yarn: Opt for a soft and warm yarn like merino wool or a cotton-acrylic blend for enhanced comfort. These materials are ideal for creating a cozy feel against the skin.
Knitting Needles: Size 5 mm needles will work best to achieve a defined stitch.
Stitch Markers: These will help you mark the sections of your opening for easy reference.
Yarn Needle: To weave in the ends and finish your project neatly.
Step-by-Step Knitting Instructions
Follow these steps to create your versatile neck warmer:
1. Casting On
Begin by casting on 60 stitches to achieve the desired width of the neck warmer.
2. Knit the Body
Using either stockinette stitch or garter stitch, knit until the piece measures approximately 40 cm in length. This choice of stitch will depend on the texture you prefer; stockinette provides a smooth look, while garter stitch offers a textured feel.
3. Create the Opening
To make the arm or head opening, find the center of your knitting piece (approximately 20 cm from the beginning) and mark it. Continue to knit on only half of the stitches (30 stitches) for the next 10 cm, placing the remaining stitches on hold.
4. Complete the Neck Warmer
After working the opening, resume knitting by combining all stitches again and continue until you reach the full length of 100 cm.
5. Finishing Touches
To finish, bind off the stitches loosely to avoid making the edges too tight. Use your yarn needle to weave in any loose ends, keeping your neck warmer looking polished. For the final touch, lightly block your neck warmer to achieve its perfect shape and smooth out the stitches.
Tips for Yarn Selection
Choosing the right yarn can greatly influence the overall look of your neck warmer:
For a Cozy Winter Look: Use thick wool in warm shades like burgundy or chocolate brown. These colors not only look stunning but also add warmth during the colder months.
For a Light, Spring Feel: Choose cotton or bamboo yarn in pastel tones, which is perfect for transitional layering.
Caring for Your Neck Warmer
Maintain the quality of your knitted creation by hand washing it, especially if you’ve chosen natural wool. This care will help retain its shape and softness for years to come.
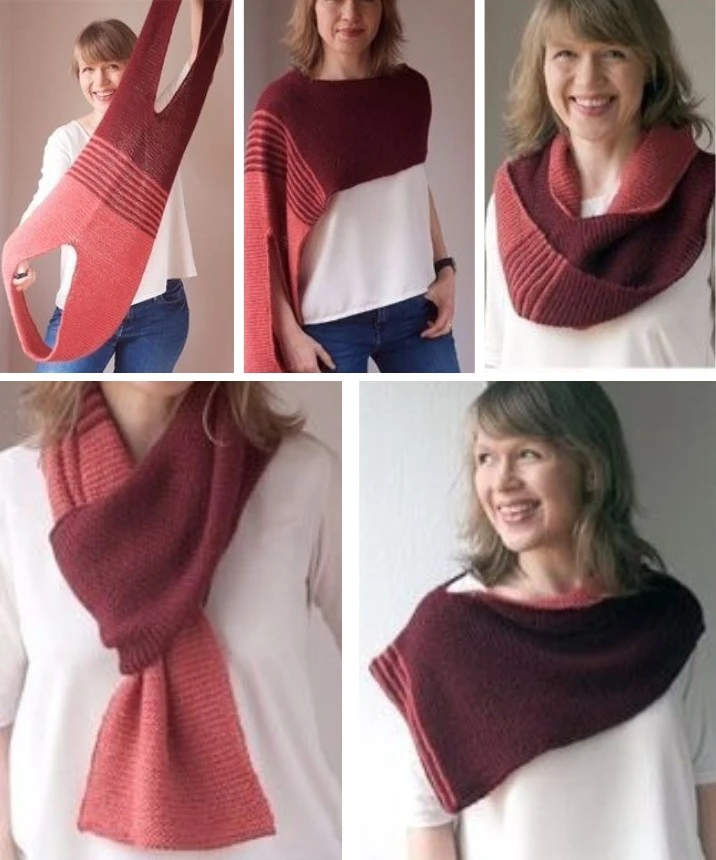
Versatility in Styling
One of the best features of this knitted neck warmer is its versatility! You can wear it in various styles – as a poncho, a scarf, or simply wrapped around your neck for a casual yet elegant look. Don’t be afraid to experiment with contrasting colors to add a unique flair!
Conclusion
The versatile knitted neck warmer is not only a fun and rewarding project but also a practical accessory that you can enjoy wearing or gifting. With its elegant design and adaptability, it’s a great addition to any wardrobe. So, gather your materials, pick your favorite yarn, and let your creativity flow!
Happy knitting! 🧵✨