Are you looking for a delightful sewing project that combines creativity and cuddles? Look no further! Making a handmade plush fox is an enjoyable and rewarding experience that can brighten your space and bring joy to those around you. This comprehensive guide will walk you through the process of creating your very own plush fox, complete with all the measurements and instructions you need to bring this charming creature to life.
Project Overview
Creating a plush fox can be an ideal project for sewists of all skill levels. Whether you are a beginner or have experience under your belt, this project is easy to follow and offers a medley of benefits:
Quick and Enjoyable: This project can be completed in just a few hours, making it a perfect afternoon activity.
Customizable: Select your preferred fabric colors to make your fox unique!
Perfect for All Ages: It can serve as a fun craft with children or a thoughtful homemade gift.
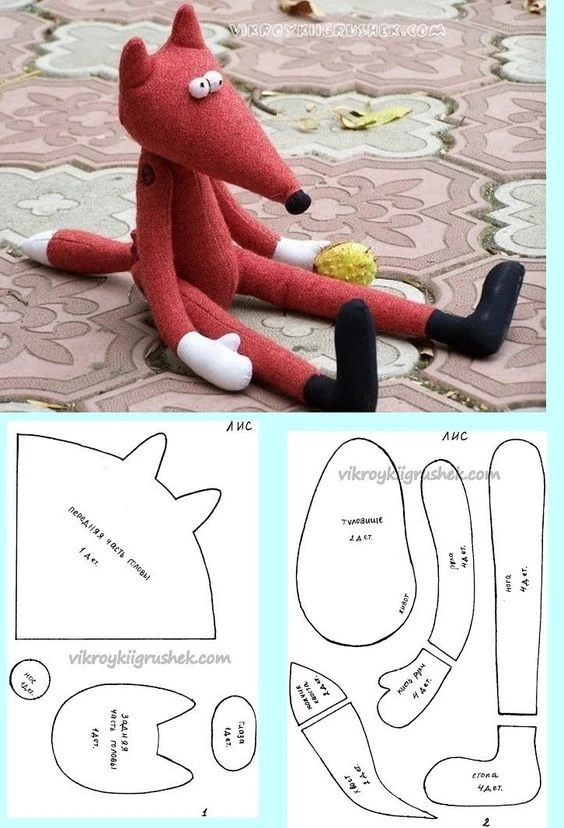
Measurements
Before getting started, it’s essential to know the measurements for your plush fox:
Height of the Fox: Approximately 30-35 cm (12-14 inches), depending on the stuffing and fabric chosen.
Dimensions of Elements: The pattern includes pieces for the head, body, legs, and adorable details, all proportioned for a harmonious finish.
Materials Needed
To create your plush fox, gather the following materials:
Fabric: Choose soft and cuddly fabric; fleece or cotton works well.
Pattern: You can either sketch one or download a ready-made pattern.
Stuffing: Polyester fiberfill or any soft stuffing material.
Sewing Supplies: Scissors, sewing machine (or needle for hand sewing), pins, and thread.
Step-by-Step Instructions
1. Preparing the Pieces
Print the Pattern: Download the fox pattern and cut out all necessary shapes: head, body, arms, legs, snout, ears, and tail.
Cut the Fabric: Use your choice of fabric to cut the pieces. For a traditional look, opt for orange for the body, black for the paws, and white for the ends of the paws and tip of the tail.
2. Assemble the Head
Sew the Head Pieces: Start by stitching the pieces of the head together. Don’t forget to add the ears where indicated in the pattern.
Attach the Snout: Secure the snout to the front and embroider small details for the eyes and nose to give your fox a friendly expression.
3. Sew the Legs and Tail
Assemble Legs and Tail: Stitch the leg and tail pieces together, right sides facing. Turn them inside out and lightly stuff to add volume.
Add Contrasting Tips: You can attach contrasting colored fabric (black or white) to the ends of the legs and tail for that extra touch.
4. Construct the Body
Sew Body Pieces Together: With the two body pieces, sew them together, leaving openings for the head, arms, and tail.
Attach the Legs and Tail: Insert the legs and tail into their respective openings and secure them with stitching to ensure they won’t detach.
5. Final Stuffing and Assembly
Turn Right Side Out: Turn your fox the right way out and fill it generously with stuffing for a cuddly shape.
Close the Opening: Use an invisible stitch to neatly close the body.
Add Articulated Arms (Optional): For fun, you can attach buttons for articulated arms, allowing your fox to take various poses.
Personalization Tips
Fabric Choice: Use fleece for a soft and warm feel, or cotton for a classic look.
Embellishments: Embroider little details like eyebrows or rosy cheeks for added expression.
Safety Considerations: If making the fox for a young child, consider skipping buttons for safety and embroider eyes instead.
Conclusion
Creating your handmade plush fox is not only a delightful sewing project but also a perfect way to share a little joy. Once finished, you can gift it to someone special, decorate your home, or cuddle up with it yourself! So, grab your fabric, follow the steps, and let your creativity run wild. Happy sewing! 🧵✨