Are you looking for a stylish and functional accessory to elevate your outfits? This sewing tutorial will guide you through creating a trendy hip bag featuring a vibrant floral pattern. Not only is it a practical choice for keeping your essentials close at hand, but it’s also a fun project for both beginners and experienced sewists alike.
Why a Hip Bag?
Hip bags, also known as fanny packs or waist bags, have made a comeback as a fashionable accessory. They are perfect for casual outings, festivals, or any situation where you want to keep your hands free. With a simple and colorful design, you can personalize your hip bag to reflect your unique style. Let’s get started!
Materials Needed
Before you begin your sewing adventure, gather the following materials:
Main fabric with a vibrant floral pattern
Lining fabric that complements your main fabric- A 20 cm zipper
- An adjustable strap (approximately 1 meter)
Buckles and attachments for the strap
Matching thread
Step-by-Step Instructions
Step 1: Cut Your Fabric Pieces
Using the measurements below, carefully cut the following pieces from your main fabric and lining fabric:
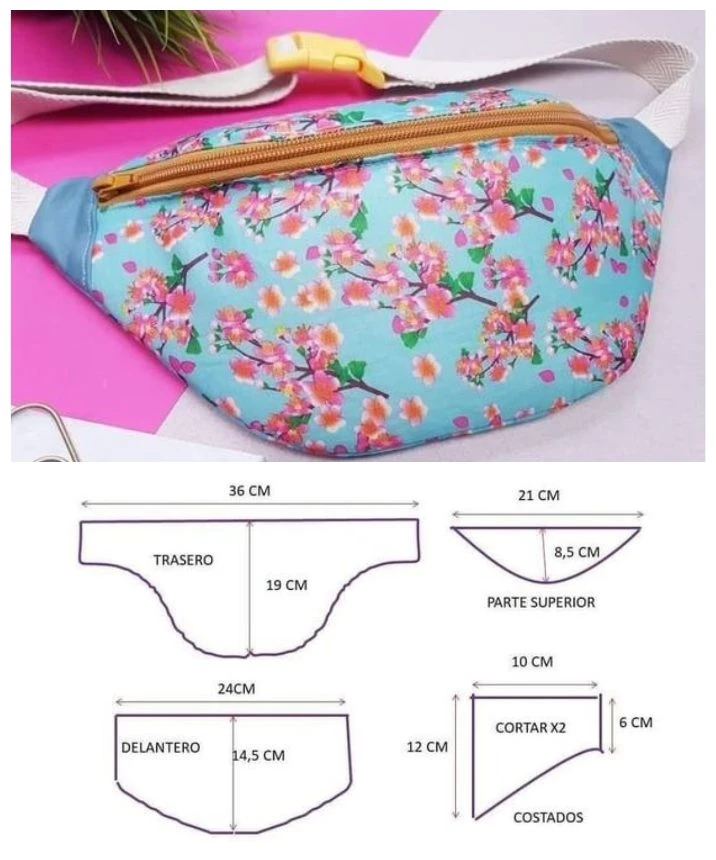
Back Piece: 36 cm wide, 19 cm high
Top Piece: 21 cm wide, 8.5 cm high
Front Piece: 24 cm wide, 14.5 cm high
Side Pieces: 12 cm high, 10 cm wide at the base, 6 cm wide at the top (cut 2 pieces for added durability)
Step 2: Attach the Zipper
Place the zipper between the top piece and the front piece. Use pins to hold it in place and sew slowly to ensure a neat finish. Make sure to secure the zipper well, as it is an essential part of the bag’s functionality.
Step 3: Assemble the Pieces
Start by sewing the side pieces to the front piece, and then attach the back piece to the top piece. Align the seams carefully to achieve a clean, professional look.
Step 4: Add the Strap
Attach the adjustable strap securely to the sides of the hip bag using the buckles. Make sure to check the length and adjust it according to your preference. This will ensure comfort while wearing your new accessory.
Step 5: Insert the Lining and Finish
Now, place the lining fabric inside the hip bag. Sew the edges of the lining to the bag for a polished finish. Ensure all seams are secure to guarantee the durability of your handmade creation.
Tips for Success
Choose Durable Fabric: Opt for a sturdy fabric to enhance the longevity of your hip bag.
Strong Zipper: Select a high-quality zipper to avoid any mishaps with your bag’s closure.
Quality Strap: Invest in a strong adjustable strap to ensure comfortable wear.
Conclusion
With these easy steps, you can craft a personalized, stylish, and practical hip bag! Once completed, you can proudly showcase your sewing skills and enjoy a trendy accessory that complements your everyday outfits.
Happy sewing!