Are you ready to embark on a delightful sewing adventure? In this article, we’ll walk you through creating a charming plush giraffe that can be a fantastic companion for your little ones or even a lovely decorative piece for your home. Follow these simple instructions and get ready to unleash your creativity!
Materials You Will Need
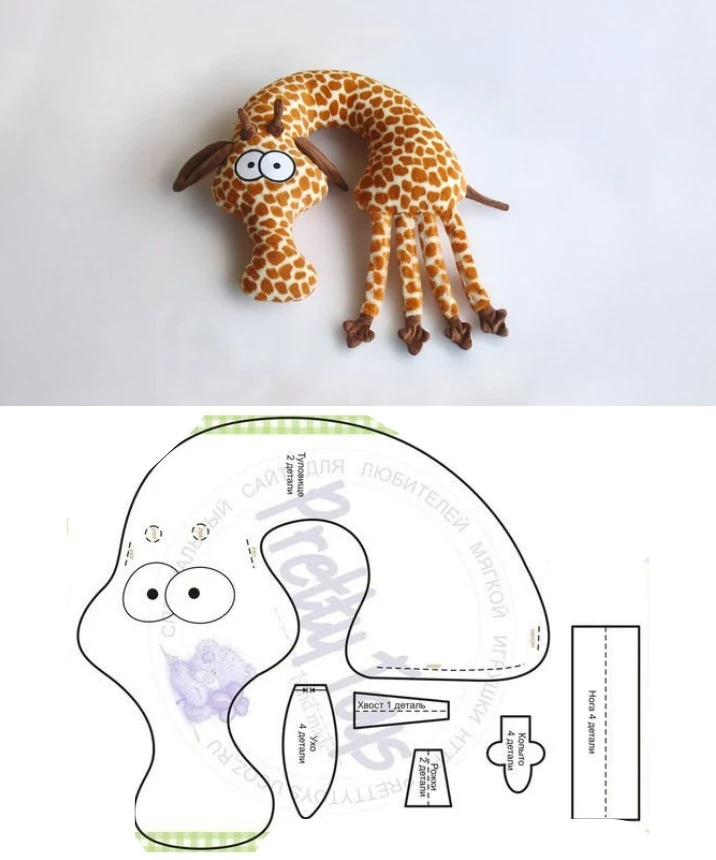
Before you start, gather the following materials:
Giraffe-Printed Fabric: You can use cotton, velour, or plush fabric to give your giraffe that soft and cuddly feel.
Matching Thread: Make sure it complements your fabric choice.
Stuffing Fiber: Synthetic fiber is ideal for achieving that huggable quality.
Needles, Pins, and Scissors: Basic sewing supplies to help you assemble your giraffe.
Printed Pattern: You’ll need a pattern to trace and cut out the different pieces for your plush giraffe.
Step-by-Step Instructions
Step 1: Prepare the Pieces
Start by cutting out all the pieces according to the pattern printed on your fabric. You’ll need to prepare:
- Two pieces for the body
- Four pieces for the legs
- Two pieces for the ears
- One piece for the tail
- Two small circles for the eyes
Step 2: Assemble the Legs and Tail
Take the four leg pieces and sew them together, leaving the bottom open. Once sewn, turn them inside out and fill them with stuffing fiber. Do the same for the tail, ensuring it’s plump and ready to attach later.
Step 3: Assemble the Body
Next, lay out the two body pieces flat. Pin the legs and tail between the two body pieces, ensuring that the legs are at the bottom and the tail is at the back. Sew all around the edges while leaving a small opening on one side to turn the body right-side out.
Step 4: Stuff and Close the Body
After turning the body right-side out, fill it with stuffing fiber until it reaches your desired level of softness. Once you’ve achieved that perfect plushness, close the opening using an invisible stitch to keep everything snug inside.
Step 5: Final Touches
Let’s give your giraffe some personality! Attach the ears on both sides of the head, sew on the eyes using buttons or felt for added security, especially if it’s for a baby. Feel free to get creative with additional embellishments!
Tips for Success
- Choose a soft and colorful fabric; it makes the finished giraffe even more appealing to children.
- Consider safety by using buttons or stitching the eyes if the plushie is intended for a little one.
Conclusion
Creating this adorable plush giraffe is not only a fun and enjoyable project, but it also provides a wonderful opportunity to express your creativity and craftsmanship. Whether you choose to make it as a gift, a playmate for your child, or a decoration, this sweet giraffe is sure to bring joy and warmth to any home!
Now that you have all the steps handy, gather your materials and embark on this sewing adventure. Happy stitching! 🦒💖