Are you ready to dive into a fun sewing project that is both practical and stylish? Making your own utility bag can be a rewarding experience, and it’s a fantastic way to enhance your sewing skills. In this article, we’ll walk you through the process of creating a robust utility bag that you can use for shopping, outings, or organizing your daily essentials. Let’s get started!
Materials Needed
Before you start sewing, gather the following materials:
Fabric: Choose a heavy-duty fabric such as canvas or denim for durability. A lighter fabric like cotton is great for the lining.
Thread: Match your thread color to your fabric.
Sewing machine: For quick and efficient sewing.
Scissors or rotary cutter: For cutting your fabric pieces.
Measuring tape: To ensure accurate measurements.
Pins or clips: To hold your fabric pieces in place while sewing.
Iron: For pressing seams and giving your bag a polished look.
Measurements
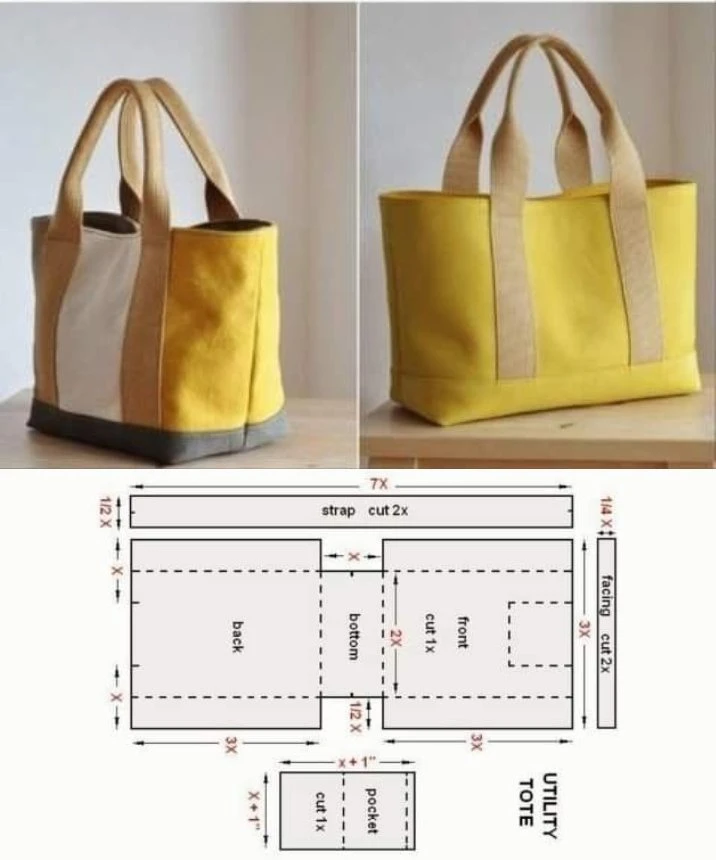
To create your utility bag, you’ll need to make the following measurements:
Back and Front Pieces: 3 times the width x 2 times the height
Bag Bottom: 2 times the width x 1.5 times the height
Front Pocket: Width + 1 inch x 1 inch height
Handles: 7 times the length, cut twice
Pocket Reinforcements: Cut twice
Top Border: 14 times the length x 3 times the height, cut twice
Step-by-Step Instructions
1. Cut Your Pieces
Start by cutting all the fabric pieces according to the measurements provided. Make sure to cut the front and back pieces, bag bottom, pocket, and handles accurately. Don’t forget to cut reinforcement pieces for the top of the pocket!
2. Prepare the Front Pocket
Sew the reinforcement to the top of the front pocket first, then attach the pocket to the front piece of the bag. Make sure it’s centered and aligned properly.
3. Assemble the Bag Body
Next, sew the front and back pieces to the bottom of the bag. Be careful to align the angles correctly to ensure a neat finish. This step brings the main structure of your bag together!
4. Attach the Handles and Reinforcements
Attach the handles to the sides of the bag, ensuring they’re securely aligned. For added strength, sew the reinforcement pieces at the top of the bag where the handles meet. This will give your bag extra durability for carrying heavier items.
5. Finishing Touches
If your design includes a lining, sew the lining pieces together and install them inside the bag. Turn the bag right side out and do a final check on all seams to ensure they’re secure and neat. A good press with the iron will help shape your bag nicely.
Tips for Choosing Fabrics
Main Fabric: Opt for a thick and sturdy fabric like canvas or denim that can stand up to wear and tear and hold its shape well.
Lining: A lighter fabric like cotton makes for a nice interior that’s easy to clean.
Handles: Consider using a robust material like leather or durable webbing for the handles to ensure they withstand daily use.
Final Thoughts
This practical utility bag is perfect for errands, day trips, or even as a convenient storage solution at home! Not only will you enjoy the satisfaction of making your own bag, but you’ll also have a functional item that showcases your creativity. So, grab your materials and start sewing—you’ll love the end result!
Happy Sewing!