Are you looking for a fun and charming DIY sewing project? Look no further! This adorable felt snail is a perfect craft for sewing enthusiasts of all levels, especially those who enjoy a touch of whimsy in their creations. Not only is it easy to make, but it also adds a delightful accent to your home decor or serves as a heartfelt handmade gift for loved ones.
Why Choose This Project?
This felt snail project is not just about sewing; it’s about bringing a little joy and creativity into your life. Here are some compelling reasons to give it a try:
Easy and Fun: The steps are straightforward, making it ideal for beginners or those looking for a relaxing sewing activity.
Customizable: You can choose vibrant colors and add personal touches, like unique facial features or decorative elements, making your snail truly one-of-a-kind.
Perfect for Any Occasion: Whether for a child’s room, as a whimsical decoration, or a thoughtful gift, this snail can brighten anyone’s day!
Materials You Will Need
Before you start stitching away, gather the following materials:
Felt of Various Colors: Think of browns, pinks, and beiges to bring your snail to life.
Wooden Buttons for the Wheels: You will need four pieces.
Matching Thread for sewing.
Sewing Needle.
Fabric Scissors for cutting your pieces.
Cotton or Polyester Stuffing to give your snail some adorable volume.
Pencil or Fabric Chalk to mark your pattern.
Plastic Eyes (optional) for added charm.
Step-by-Step Instructions
Here’s a simple guide to creating your own felt snail:
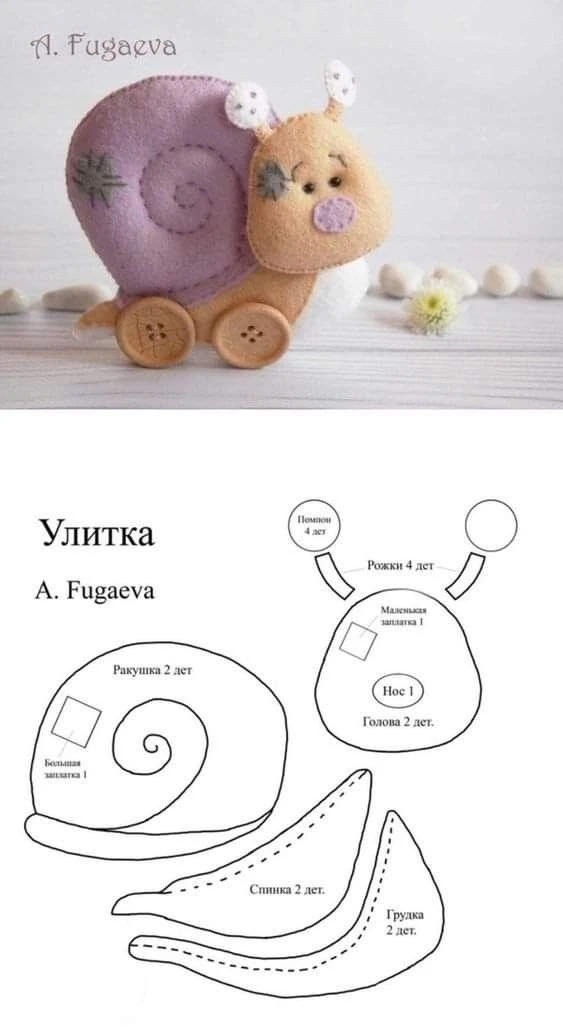
1. Prepare Your Pieces
- Trace and cut out the pieces of felt according to the pattern. Remember to cut each piece in double (for both sides of the snail).
2. Assemble the Shell
- Layer the two pieces for the shell and sew them together, leaving a small opening to insert the stuffing. Once stuffed, close the seam securely.
3. Build the Body
- Stitch together the parts for the body (you’ll have segments, known as spinka and грузка) and fill them with stuffing. Secure the edges with a neat stitch.
4. Attach the Head and Antennas
- Sew the head pieces together, adding some stuffing for dimension. Attach antennas on either side of the head for a fun look!
5. Final Assembly
- Connect the shell to the back of the body using a sturdy thread. Sew on the wooden buttons to serve as the snail’s wheels and finish by adding facial features with plastic eyes or embroidery.
Pro Tips for a Unique Snail
Use Bright Colors: Making your snail colorful will enhance its playful nature!
Add Embroidery: Stitch little designs on the shell for an added personal touch.
Experiment with Sizes: Create snails of various sizes for an adorable family display!
Conclusion
This felt snail project serves as an excellent introduction to sewing, offering both simplicity and joy. Whether you plan to use it as decor or share it as a gift, this charming creation is bound to bring smiles. So why wait? Gather your materials and start stitching your very own felt snail today!
Happy sewing! 🧵💚