Creating a delightful and practical accessory for your little one is a rewarding experience, and this Elephant Bib and Pacifier Holder pattern is the perfect project to get started! With its adorable design and functionality, it’s sure to become a staple in any baby’s wardrobe. Let’s dive into the materials needed, as well as the step-by-step tutorial to create this charming creation.
Necessary Materials
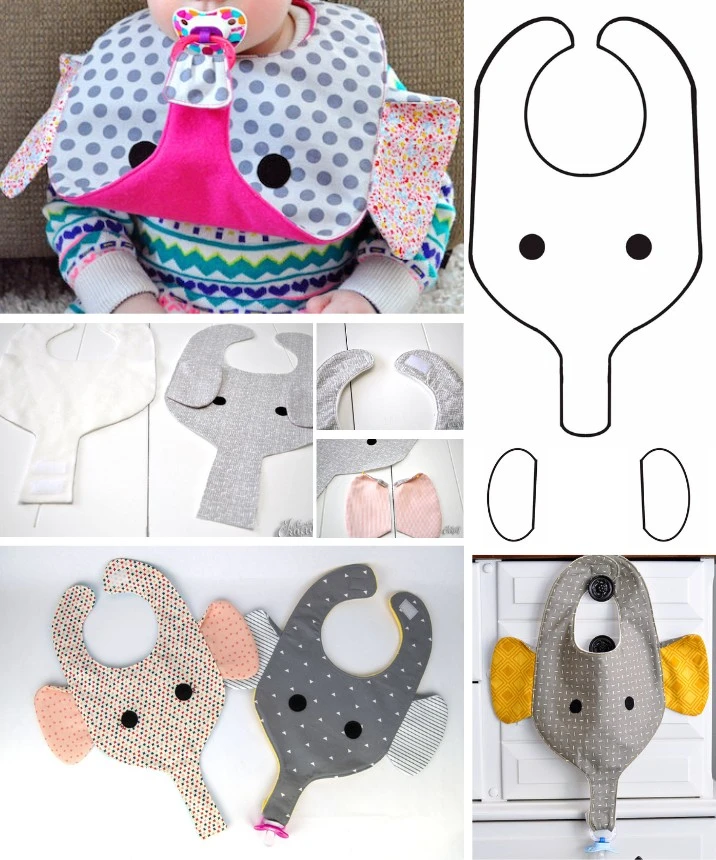
To make your very own Elephant Bib and Pacifier Holder, you’ll need the following materials:
Elephant bib pattern (available for download in PDF format)
One fat quarter of gray fabric for the body
Small scraps of pink fabric for the ears
Black felt scraps for the eyes
Velcro for fastening
Back fabric (consider using minkee, terry cloth, or fleece for softness)
Medium fusible interfacing (optional for added stability)
Steps to Create Your Elephant Bib
1. Preparing the Pieces
Begin by assembling the three pages of your bib pattern, ensuring that they align along the dotted lines. Once aligned, carefully cut out the main piece of the bib, as well as the smaller pieces for the ears and eyes.
2. Fabric Cutting
Iron all your fabrics to smooth out any wrinkles. If using fusible interfacing, adhere it to the back of your gray fabric. Trace the main bib piece onto your gray fabric along with two mirrored ear pieces. Don’t forget to mark the spots for the eyes and ears! Cut out everything, including a back piece of fabric and two eyes from the black felt.
3. Assembling the Eyes
Start by working with the main bib body. Position the eyes on the marked spots and sew them in place firmly. This will give your elephant its cute expression!
4. Making the Ears
For the ears, take your pink fabric scraps and place them against the gray fabric, right sides together. Sew along the rounded edges, ensuring to leave the straight edge open. Turn the ears right side out and press them flat.
5. Finishing the Ears
With the ears turned right side out, fold down the top by about 6 mm to show the gray fabric. Secure them in place – these will be the charming additions to your bib!
6. Positioning the Ears
Take the main bib piece and fold the ears down towards the eyes. Align the edges of the ears with the marked ear spots on the pattern so that they are positioned correctly. Pin them securely.
7. Attaching the Velcro
Cut a 4 cm piece from the soft side of the Velcro and another from the rough side. For the back fabric, measure up 1.3 cm from the bottom of the trunk on the right side and place the soft Velcro piece there. Sew it in place. Then, measure 2 cm up from the top of the soft Velcro and place the rough side, ensuring there’s enough space for your pacifier!
8. Assembling the Bib
Lay the main bib down with the right side facing up, keeping the ears pinned in place. Place the lining fabric on top, ensuring the right sides are together. The Velcro should be sandwiched inside. Pin everything down tightly.
9. Sewing the Bib
Sew across the entire top, leaving an approximately 6 cm gap on one of the straps for turning. Make sure to secure the ends with backstitching.
10. Finishing Touches
Turn the bib right side out and give it a good press. Tuck in the raw edges of the gap you left for turning and pin in place. Top stitch around the entire bib for a finished look.
11. Attaching Velcro on Straps
Finally, attach a 2.5 cm length of Velcro on each strap (or use snaps if you prefer). And there you have it – a charming elephant bib ready for your little one!
Conclusion
With just a little fabric and a few simple steps, you can create a cute and practical bib that even features a handy pacifier holder. It’s a wonderful sewing project for both beginners and seasoned stitchers alike. Plus, it makes for an adorable gift or keepsake!
Happy sewing! If you’re ready to take on this delightful project, be sure to download the PDF pattern and gather your materials. Your little one will love the comfort and cuteness of their new elephant bib! 🐘💖