Are you ready to embark on a fun sewing adventure? Crafting your very own sling bag not only allows you to express your creativity but also equips you with a stylish accessory for everyday use. Whether you’re heading to the market, meeting friends, or going on a casual outing, this DIY sling bag is practical, fashionable, and customizable to suit your style. Let’s dive into this complete tutorial!
Materials Needed
To get started, gather the following materials:
Main Fabric: Approximately ½ meter (choose a durable fabric like denim, canvas, or cotton)
Lining Fabric: Approximately ½ meter (this can be a contrasting color or pattern)
Vlieseline or batting (optional): For added cushioning and structure
Matching Thread
Scissors
Sewing Machine
Pins
Buttons or closure (optional): For a finished look and extra security
Step-by-Step Instructions
1. Cutting the Pieces
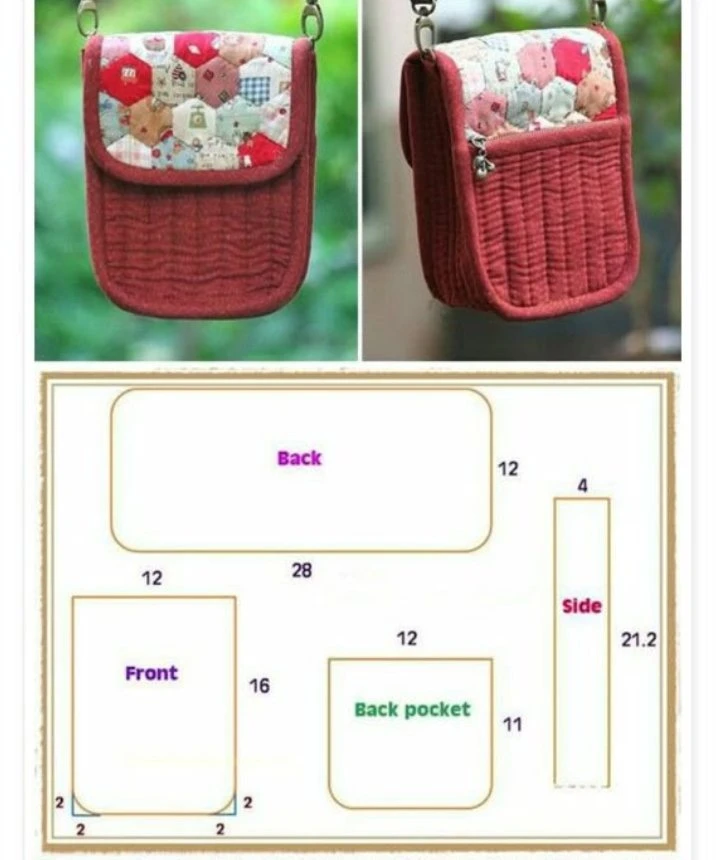
Start by cutting out the following fabric pieces:
Back Piece: 1 piece measuring 12 cm x 28 cm
Front Piece: 1 piece measuring 16 cm x 12 cm
Back Pocket: 1 piece measuring 11 cm x 12 cm
Side Pieces: 2 pieces measuring 4 cm x 21.2 cm
Remember to leave about 1 cm seam allowance around each piece for sewing.
2. Assembling the Pieces
Attaching the Pocket:
- Take the back pocket piece and sew it onto the front piece at your desired location. Pin it in place, sew around the edges, and then turn it right side out.
Joining the Front and Back:
- With right sides together, sew the front and back pieces together along the sides, leaving the top open for the flap.
3. Creating the Sides
- Attach the side pieces to the edges of the front and back pieces. Make sure to line up the edges carefully to maintain a neat finish.
4. Adding the Lining
If you choose to include a lining:
- Repeat the previous steps to create a matching lining but omit the back pocket. Once finished, insert the lining inside the outer bag and pin the top edges together.
5. Finishing the Flap
- If you have a flap, sew it to the top of the bag. Ensure it’s securely attached to give your bag a polished look.
6. Attaching the Sling
- Now, you’re ready to add the sling or straps! You can use either matching fabric or a ready-made strap for convenience. Securely sew it to the appropriate places on your bag.
7. Final Touches
- Finish your bag by ironing it to give it a crisp appearance. If you like, sew on buttons or add any closures at the top for added functionality and style.
Choosing Your Fabrics
When selecting your fabrics, consider the following:
Durability: Opt for strong fabrics like denim or canvas to ensure your bag lasts.
Patterns: Fun colors or patterns can make your sling bag a unique expression of your personality.
Conclusion
Congratulations, you’ve just created a beautiful DIY sling bag that’s perfect for any occasion! With a little bit of fabric and some simple sewing, you now have a stylish and functional accessory that you can call your own.
Happy sewing, and don’t forget to share your creations! If you have any questions or would like to share your finished bags, feel free to drop a comment below!