Introduction: Looking for a charming DIY project? Learn how to make an adorable fabric hedgehog toy with our free sewing pattern and step-by-step tutorial. This cuddly hedgehog doubles as a cute pincushion, making it both practical and delightful to create.
Materials Needed:
- Fabric scraps (choose your favorite colors and patterns)
- Sewing machine
- Scissors
- Thread
- Needle
- Cotton padding
- Beads (for eyes and nose)
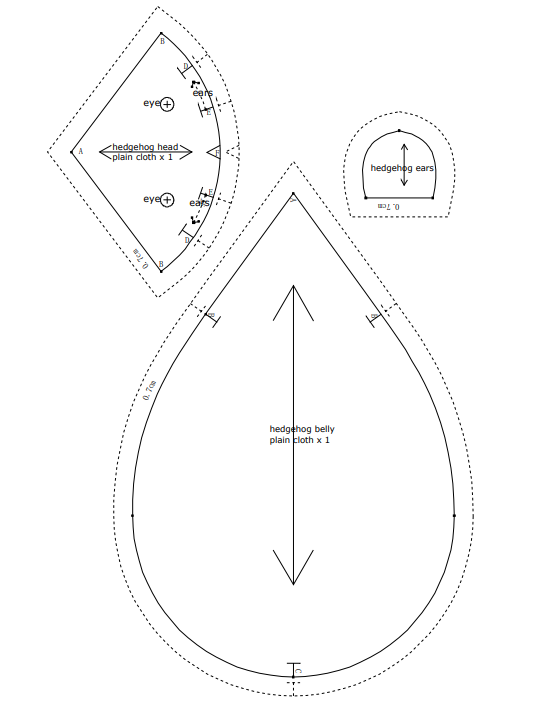
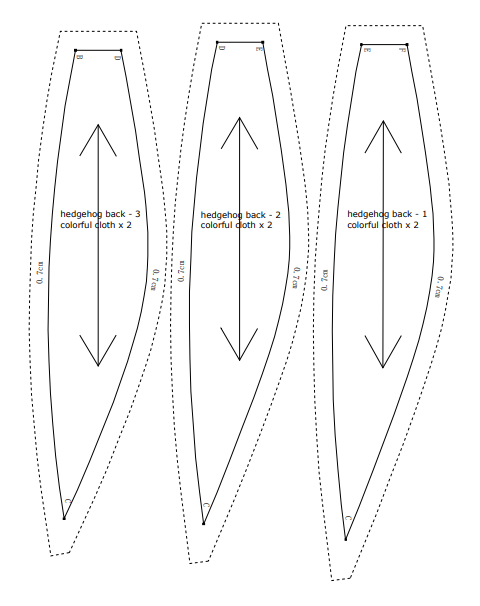
Step 1: Download the Hedgehog Paper Pattern [Include a link to download the pattern]
Step 2: Cut Out Fabric Pieces Using the downloaded pattern, cut out the following pieces from your fabric:
- Body (2 pieces)
- Ears (4 pieces)
- Back sections (6 pieces)
- Nose (1 piece)
Step 3: Sew the Ears Take two ear pieces and sew them together along the curved edge, leaving the straight edge open. Repeat with the other two ear pieces. Turn the ears right side out and press flat.
Step 4: Sew the Back Sections Assemble the back of the hedgehog by sewing the back sections together according to the markings on the pattern. Start by sewing two “Back-1” pieces together, then add two “Back-2” pieces to each side, and finally sew on two “Back-3” pieces to complete the hemispherical shape.
Step 5: Attach the Head to the Back Position the head piece onto the assembled back piece, aligning the markings. Sew around the edge to attach them together, leaving a small opening for stuffing.
Step 6: Stuff the Hedgehog Stuff the hedgehog with cotton padding through the opening left in the previous step. Make sure to fill it evenly for a plump and cuddly finish.
Step 7: Close the Opening Once the hedgehog is adequately stuffed, sew up the opening to secure the stuffing inside.
Step 8: Add the Nose Attach the fabric nose to the front of the hedgehog using a needle and thread. Make sure it’s securely in place.
Step 9: Embellish with Eyes Using small beads, sew two eyes onto the hedgehog’s face to bring it to life. Be creative with the placement to give your hedgehog its own unique expression.
Step 10: Finishing Touches Your fabric hedgehog toy is now complete! Give it a final once-over to ensure all the seams are secure and any loose threads are trimmed.
Conclusion: Congratulations on creating your very own fabric hedgehog toy! Whether you use it as a decorative accent or a handy pincushion, this charming creature is sure to bring joy wherever it goes. Experiment with different fabrics and colors to customize your hedgehog to your liking. Happy sewing!