Are you ready to enhance your sewing skills while creating a stylish and functional accessory? This elegant tote bag is not only a delight to make but also an ideal solution for your everyday needs—perfect for shopping, outings, or as a thoughtful gift for a loved one. Let’s dive into the details of this exciting project!
Materials Needed
To get started, gather the following materials:
Main Fabric: 1 meter (choose thick cotton, canvas, or upholstery fabric for durability)
Lining Fabric: 0.5 meter (something complementary to your main fabric)
Interfacing: 0.5 meter of fusible interfacing for added structure
Zipper: 35 cm
Thread: Coordinating color
Sewing Scissors
Pins
Sewing Machine
Measuring Tape and Ruler
Dimensions
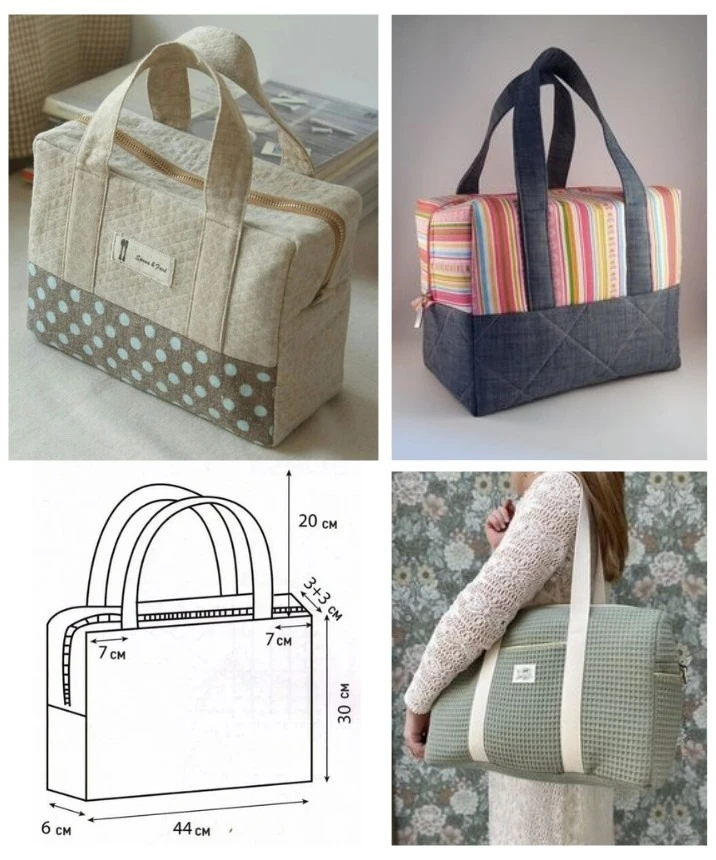
Before you begin, it’s essential to know the dimensions for cutting your fabric pieces:
Bag Body:
- Width: 44 cm
- Height: 30 cm
- Depth: 14 cm (7 cm on each side)
Handles:
- Total Length: 73 cm
- Height (from the bag): 20 cm
Bag Bottom:
- Height: 6 cm
- Width: 44 cm
Step-by-Step Instructions
1. Cutting the Pieces
Begin by cutting your fabric according to the dimensions provided:
- Main fabric for the bag body and bottom
- Lining fabric for the inside of the bag
- Fabric strips for handles (ensure you cut these long enough to fold and sew)
- Interfacing for added support
2. Assembling the Handles
- Fold each fabric strip for the handles in half lengthwise.
- Sew along the long edges, then flip them right side out and press with an iron for a neat finish.
3. Constructing the Bag
- Adhere the fusible interfacing to the wrong side of the main fabric by following the manufacturer’s instructions.
- Sew the bag body pieces together, leaving the 7 cm sides open to create the depth.
- Attach the bag bottom by sewing it to the sewn sides, ensuring to secure the edges.
4. Inserting the Zipper
- Pin the zipper onto the top opening of the bag, ensuring it’s centered.
- Sew the zipper in place, making sure to secure it well on either side.
5. Adding the Lining
- Assemble the lining fabric pieces in the same way you did for the main body.
- Insert the lining into the bag and sew it to the zipper for a seamless look.
6. Attaching the Handles
- Position the handles symmetrically on either side of the bag.
- Secure them with stitching, ensuring they are firmly attached.
7. Final Touches
- Double-check all seams for strength and clean any loose threads.
- Turn the bag right side out, and voila! You’ve created a stunning tote bag!
Conclusion
With this elegant and practical tote bag, you not only showcase your sewing skills but also have a beautiful accessory for all your outings. Whether you’re hitting the shops or heading out for a weekend getaway, this bag will be a reliable companion. Happy sewing!
Feel free to share your finished creations and any tips you discover along the way. Let’s inspire each other to unleash our creativity!