Are you ready to dive into a delightful DIY sewing project? Creating a cozy cat cushion is a wonderful way to express your creativity while bringing warmth and charm to your home. Whether it’s for decoration or as a special gift for someone you love, this adorable cushion is sure to bring smiles. Let’s get started!
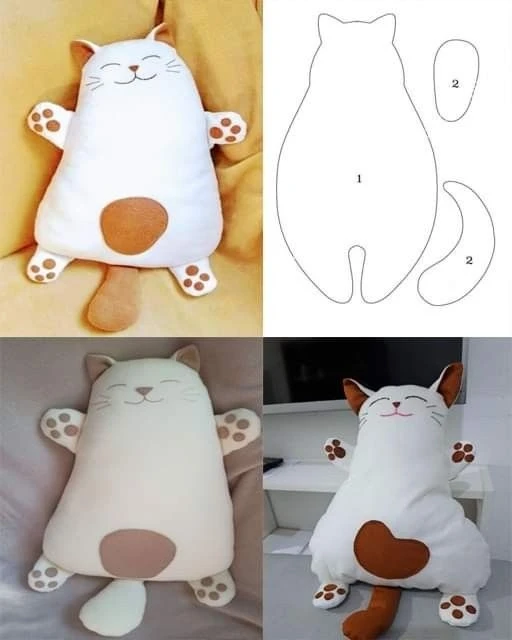
Measurements
Cat Body (Piece 1):
- Length: 40 cm
- Width: 25 cm
Legs and Tail (Piece 2):
- Length of Legs: 12 cm
- Length of Tail: 15 cm
Materials Needed
Before you jump into sewing, gather the following materials:
Fabric: Choose a soft fabric like fleece or cotton for the cat’s body. It’s perfect for cuddling!
Contrast Fabric: Use different colors for the legs and tail to add an eye-catching element.
Stuffing Material: Lightweight and soft stuffing to fill the cushion for maximum comfort.
Felt: For fun details such as eyes, nose, and paw prints.
Thread: In colors that match or complement your fabric choices.
Step-by-Step Instructions
Step 1: Prepare Your Materials
Start by prepping your fabrics. Decide on your color scheme and cut out the necessary pieces. Make sure to have:
- Two pieces for the main body (Piece 1)
- Four pieces for the legs (Piece 2)
- One piece for the tail (Piece 2)
- Small shapes from felt for facial features and decorations.
Step 2: Cutting the Pieces
Using your templates, carefully cut your fabric pieces. You should have:
- Two main body pieces (for the front and back)
- Four leg pieces (two for each leg)
- One tail piece
- And the felt shapes for decoration.
Step 3: Assemble the Legs and Tail
Sew each leg piece together, leaving a small opening at the top so you can turn it inside out and fill it with stuffing. Repeat this for the tail as well, ensuring both are only lightly filled to maintain a cuddly shape.
Step 4: Assemble the Body
With the body pieces, place them right sides together. Insert the legs at the desired locations, ensuring they point inward. Sew around the edge, leaving the bottom open so you can turn it inside out later.
Step 5: Finishing Touches
After turning the body right side out, stuff it with filling until it reaches your desired level of plushiness. Carefully sew the opening closed, using a hidden stitch for a clean finish.
Step 6: Decoration
This is where your creativity truly shines! Attach the felt shapes for the eyes, nose, and paw prints using fabric glue or by sewing them on. You can even add a cute little embroidered smile for added charm.
Tips for Choosing Fabrics
Softness: Opt for cozy fabrics like fleece or jersey cotton to make your cushion inviting.
Colors: Pastel shades provide a soothing look, while vibrant colors can add a playful touch.
Quality Stuffing: Use high-quality stuffing to ensure your cat cushion maintains its shape over time.
Conclusion
With this easy and fun tutorial, you can create a unique and cozy cat cushion that’s perfect for any room. This project is not just for seasoned sewists; it’s ideal for beginners and experts alike! So, gather your materials, unleash your creativity, and have a blast sewing your very own cuddly companion!
Happy sewing! 🧵💖