Welcome to the wonderful world of sewing! If you’re looking to create something sweet and charming, these adorable fabric bunnies are perfect for you. Not only are they a delightful addition to any home, but they also make fantastic gifts for children or decorative pieces for festive occasions like Easter. Let’s dive into the project!
Materials Needed
Before we get started, make sure you have the following materials on hand:
White Cotton Fabric (for the body): approximately 0.5 meters
Colored or Patterned Fabric (for clothing and ears): 0.5 meters
Stuffing: polyester fiberfill or foam
Matching Thread
Scissors
Pins
Needle or Sewing Machine
Accessories: ribbons, buttons, artificial flowers
Fabric Paint or Markers: for facial features
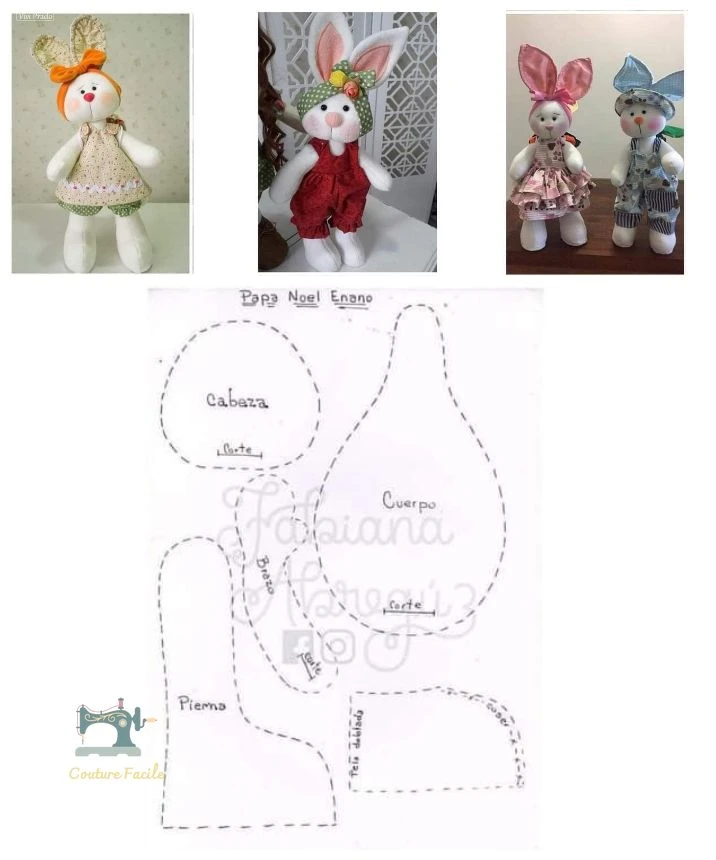
Measurements and Patterns
To create your fabric bunnies, you’ll need to use the following pattern measurements:
Head: Round shape
Body: Drop shape
Arms and Legs: Elegantly curved
Ears: Long and tapered
Clothing: Dress or overalls that can be customized
Step-by-Step Instructions
1. Cutting the Pieces
Start by using your patterns to cut out the fabric. You will need:
- Two pieces for each body part: head, body, arms, legs, and ears.
- Remember to allow for a 1 cm seam allowance!
2. Assembling the Body
Sewing: Place the fabric pieces right sides together and sew along the edges, leaving an opening to fill the bunny with stuffing later.
Turning and Filling: Turn the body inside out, then fill it with the stuffing until it achieves a nice, plump shape. Finally, sew the opening closed.
3. Attaching the Limbs
Now it’s time to assemble the bunny’s limbs.
- Follow the same sewing and filling process for the arms and legs.
- Attach them to the body securely with strong stitches.
4. Creating the Head and Ears
Head Assembly: Sew the pieces for the head together and fill it similarly.
Ears: Attach the ears to the top of the head before securing it to the body.
5. Designing the Clothing
Now comes the fun part—dressing up your bunny!
- Sew a cute dress or overalls according to the measurements given.
- Feel free to add details like ribbons, buttons, or other embellishments to personalize your bunny’s outfit.
6. Finishing Touches
To make your bunny truly unique, it’s time to add facial features!
- Use fabric paint or markers to draw on the eyes, nose, and mouth.
- Add any final decorative accessories for that special touch!
Tips for Success
- Choose soft, cozy fabric for a huggable bunny.
- Mix and match prints and colors to create a variety of bunnies—each one can have its own personality!
- These fabric bunnies are an excellent project for beginners and will definitely spark joy in both the maker and the recipient.
Wrap Up
These adorable fabric bunnies will bring a smile to anyone’s face and can easily become cherished keepsakes. Whether you’re making them for yourself, as gifts, or for decorating your home, this sewing project is sure to be a hit!
Happy sewing, and enjoy bringing your fabric bunnies to life! 🐇✨