Spring is here, and what better way to embrace the season than with a charming sewing project? Today, we’re diving into a delightful tutorial that will help you create an adorable bunny-shaped fabric bag. This project is not only fun and easy to sew, but it’s also a practical accessory perfect for storing small items or gifting to loved ones. Let’s hop into the details!
Why You’ll Love This Project
Simple and Fun: This sewing project is beginner-friendly! With straightforward steps and minimal materials, you can easily create a cute bag that showcases your sewing skills.
Versatile Use: Whether you use it to store toys, craft supplies, or delicious Easter treats, this bunny bag is versatile and practical.
Perfect for Gifting: Handmade gifts carry a special charm. Imagine the joy on someone’s face when they receive a cute bunny bag filled with goodies!
Customizable: You can personalize the bag by choosing different fabrics and patterns. From florals to polka dots, the design options are endless!
Materials Needed
To get started, gather the following materials:
- Various fabrics (cotton or linen for durability)
- Coordinating thread
- Scissors
- Pins
- Sewing machine (or needle for hand sewing)
- Ribbon or cord for the drawstring
- Buttons (for the bunny’s eyes, if desired)
- Embroidery thread (for the bunny’s mouth)
Step-by-Step Instructions
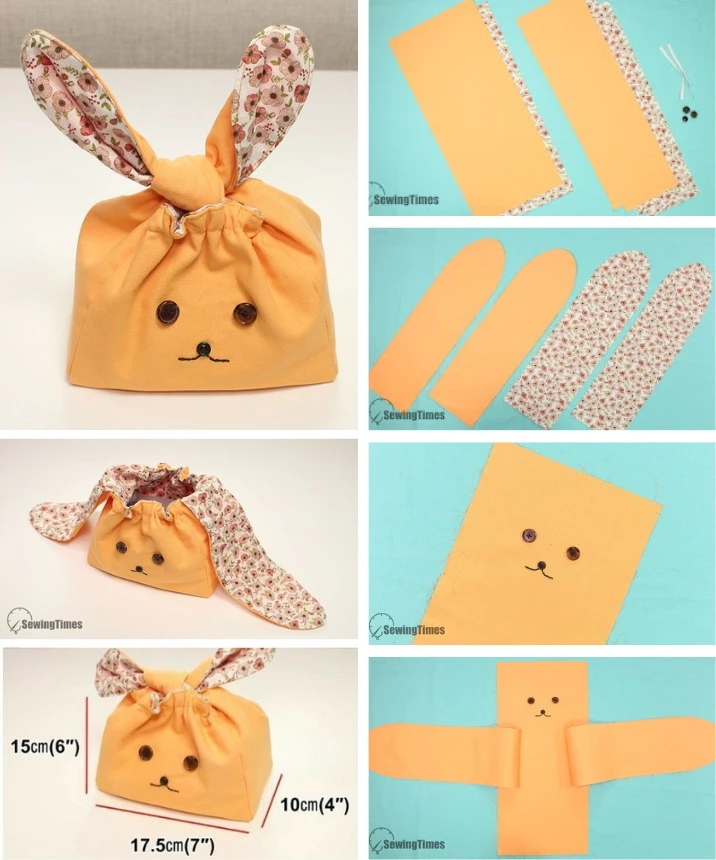
Step 1: Cut the Fabric
Begin by preparing your fabric. You’ll need two rectangular pieces for the outer and inner parts of the bunny ears and additional pieces for the body of the bag. Make sure to choose fabrics that complement each other!
Step 2: Sew the Ears
- Place the outer and inner pieces of the ear fabric right sides together.
- Sew along the edges, leaving the bottom open.
- Turn the ears right side out and set them aside.
Step 3: Assemble the Bag
- Take one of the body fabric pieces and sew on the bunny’s face by attaching buttons as eyes and using embroidery for the mouth.
- Attach the ears to the top edge of the fabric piece.
- Fold the fabric to create the body of the bag, sewing the sides together and forming the base.
Step 4: Create the Drawstring Tunnel
- Fold over the top edge of the bag to create a tunnel for the drawstring.
- Sew along the edge, leaving an opening for the drawstring.
Step 5: Insert the Drawstring
Finally, take your ribbon or cord and thread it through the tunnel. Pull it to close the bag securely. Now, your adorable bunny bag is complete!
Tips for Choosing Fabrics
Outer Fabric: Use sturdy cotton or linen. Opt for solid colors or cute prints that showcase your personality.
Inner Fabric: Choose a contrasting print or a soft fabric that adds a lovely surprise when the bag is opened.
Ears: Let your creativity shine by choosing bright or floral patterns that will make the bunny’s ears pop!
Conclusion
This adorable bunny bag project combines functionality with cuteness, making it the ideal spring sewing activity. Now that you’ve guided your way through the steps, it’s time to unleash your creativity and start sewing!
Do you have someone special in mind to gift this charming bag to? Share your thoughts in the comments, and happy sewing! 🥰✨