Are you looking for a fun and heartwarming sewing project? Look no further than the delightful Brebis Charlotte! This adorable sheep plushie is perfect for crafters of all skill levels, whether you’re a seasoned sewer or a curious beginner. In this article, we will walk you through the process of creating your very own Brebis Charlotte, along with a materials list and step-by-step instructions.
Materials You’ll Need
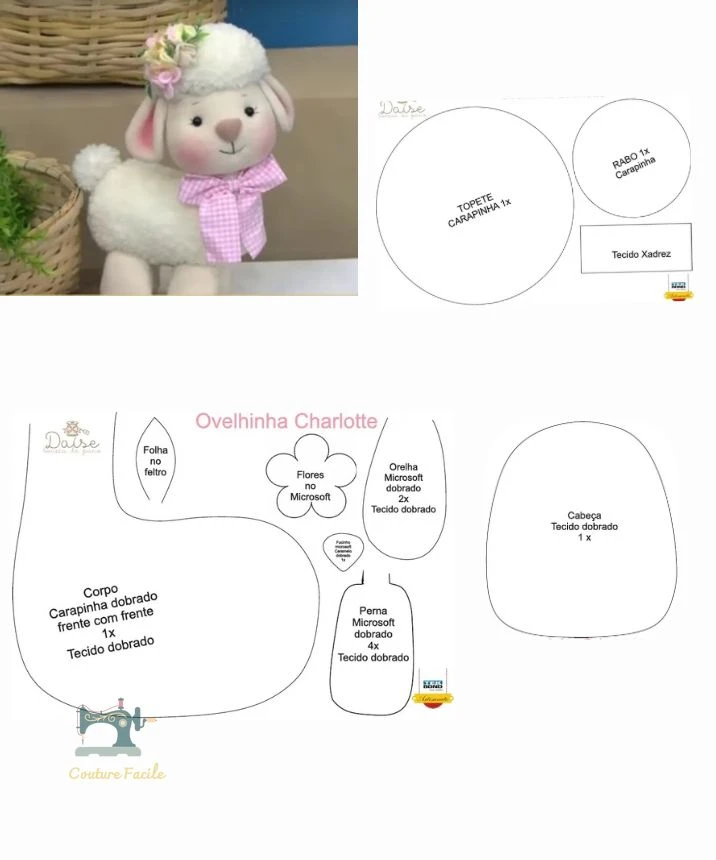
Before you dive into the sewing process, gather the following materials:
Sheep Fabric (Carapinha): This textured fabric will form the body and head of your sheep. Choose a soft and cuddly option for the best feel.
Soft Fabric (Microfiber): This will be used for the ears and paws. A smooth fabric feels great and adds a lovely contrast.
Felt for Decorations: Use felt for creating decorative leaves or any other embellishments you wish to add.
Polyester Stuffing: This will give your sheep its cuddly shape. Don’t overstuff; you want a soft and flexible plushie.
Matching Thread: Ensure your thread matches your fabric to keep those seams invisible.
Ribbon or Bow: Add a touch of flair with a decorative ribbon.
Artificial or Fabric Flowers: These will add an adorable finishing detail to your creation.
Basic Sewing Supplies: Scissors, needles, and pins will also be necessary for the sewing process.
Step-by-Step Instructions
1. Prepare the Pieces
Start by cutting out your fabric following the provided pattern. Make sure to fold the fabric as indicated on the pattern before cutting to ensure all pieces are equal.
2. Assemble the Head
- Sew the two pieces of the head together, ensuring the right sides are facing each other.
- Leave an opening for stuffing, then turn the head inside out.
- Stuff it gently and close the opening using an invisible stitch.
- Embroider or attach felt pieces for the eyes and nose, so your sheep has a charming face!
3. Create the Ears
- Take the two ear pieces, sew them together, right sides facing.
- Turn them inside out and press them flat.
- Secure the ears to the top of the head with stitches.
4. Construct the Body
- Sew the front and back pieces of the body together, also right sides facing.
- Leave an opening for stuffing, turn it inside out, and lightly stuff it before closing.
5. Attach the Legs and Tail
- Assemble the leg pieces two by two, sew, turn, and stuff them.
- Fix the legs to the bottom of the body with sturdy stitches.
- For the tail, take the circular piece, sew and stuff, then attach it at the back of the body.
6. Final Assembly
- Join the head to the body using discreet stitches.
- Add a top tuft of fabric to mimic wool on top of the head.
- Decorate your Brebis Charlotte with flowers and a cute bow for an extra special touch!
Tips for Success
- When choosing your fabric, go for textures that feel nice to touch. A plush fabric for the body and a smooth one for the details work well together.
- Be careful not to overstuff your plushie. It should be soft and huggable!
- Don’t hesitate to play with colors and patterns for the ribbons and flowers to make each Brebis unique!
Now that you have all the materials and steps lined up, it’s time to get sewing! Brebis Charlotte is not only a delightful project but also a lovely gift for loved ones or a comforting companion for yourself. Happy sewing! 🌟🐑