Are you ready to take on a delightful sewing project that combines functionality with flair? The Japanese knot handbag is not only trendy but also beginner-friendly, making it the perfect addition to your DIY repertoire. With a few simple materials and straightforward steps, you will be able to create a unique accessory that reflects your personal style.
Dimensions of the Bag
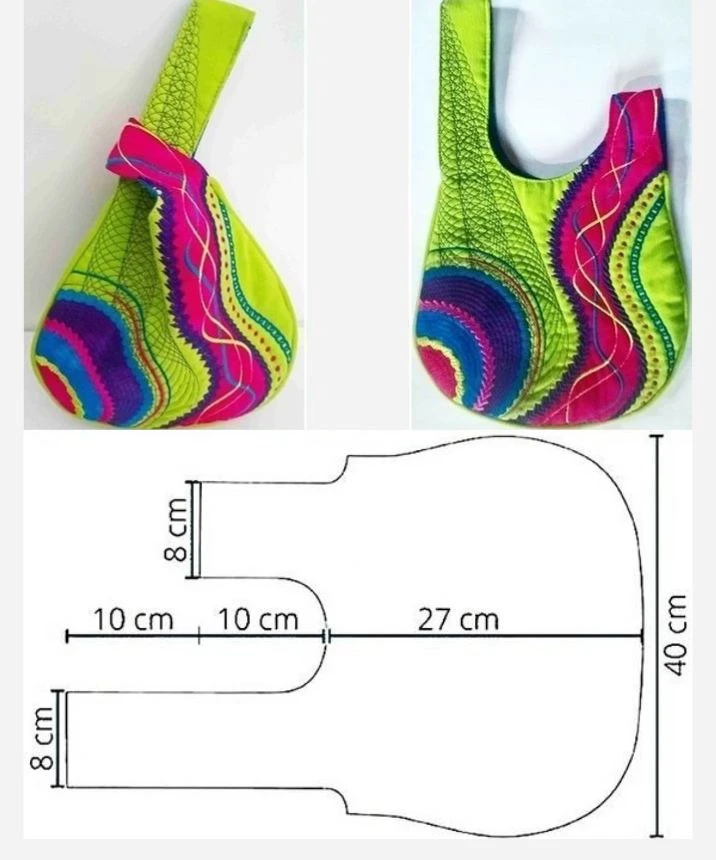
Before starting, let’s go over the dimensions of your Japanese knot handbag:
Total Height of the Bag: 40 cm
Width (widest section): 27 cm
Length of the Handles: 8 cm each, with a 10 cm space between them
Depth (base of the bag): 8 cm
These dimensions provide a practical size that is perfect for carrying everyday essentials!
Materials Needed
To make your Japanese knot handbag, you will need the following materials:
Fabric: Choose your favorite fabric, preferably cotton, linen, or quilted fabric for more structure.
Sewing Machine: If you have one, it will make the sewing process faster and easier.
Thread: Pick a color that complements your fabric.
Scissors: For precise cutting.
Pattern: You may create your own or find a downloadable template.
Iron: To press your seams for a polished finish.
Step-by-Step Instructions
1. Prepare the Fabric
Start by selecting your fabric. For a sturdy yet stylish bag, thicker materials like linen or denim work wonderfully. Cut out two pieces using the dimensions provided above for the front and back of the bag.
2. Assemble the Pieces
Once you have your fabric pieces cut, it’s time to start sewing! Place the two main pieces of the fabric with the right sides facing each other. Sew along the sides and the base, following the curves to achieve a seamless look.
3. Add the Handles
Now, let’s sew the handles! Make a straight seam along the fabric where you want to attach the handles. Ensure they are securely sewn on to hold the weight of your belongings.
4. Finishing Touches
After sewing, turn the bag right side out. Iron the seams to flatten them and give your bag a crisp appearance. Create a clean hem around the handles to prevent fraying.
5. Create the Knot Closure
To add a unique touch to your handbag, turn one handle through the other to form a knot. This closure method is not only practical but also adds an artistic flair.
Choosing the Right Fabric
The choice of fabric can greatly influence the final look of your handbag:
Recommended Fabrics: For a more structured look, opt for slightly stiff fabrics like thick linen, denim, or quilted material.
Printed Fabrics: These can provide a fun, unique style to your bag, while solid colors can offer a more elegant and minimalistic appeal.
Conclusion
This stylish Japanese knot handbag is ideal for beginners and anyone looking to create something special! It’s a fantastic project for casual outings, grocery shopping, or as a thoughtful handmade gift for a friend. So what are you waiting for? Dust off that sewing machine, choose your fabric, and get started on your new favorite accessory!