Are you ready to add a splash of creativity to your crafting routine? Making fabric fish is a delightful project that combines sewing skills with colorful fun! Not only are these fabric fishes adorable, but they also make fantastic decorations or gifts, especially for children. In this article, we’ll guide you through a simple step-by-step tutorial to create your very own fabric fish.
Materials You’ll Need:
Fabric: Choose vibrant cotton fabric in your favorite colors and patterns.
Stuffing Material: You can use cotton, polyester filling, or even small beads.
Sewing Kit: This includes scissors, pins, needles, and thread.
Paper and Pen: For sketching and creating your patterns.
Measurements:
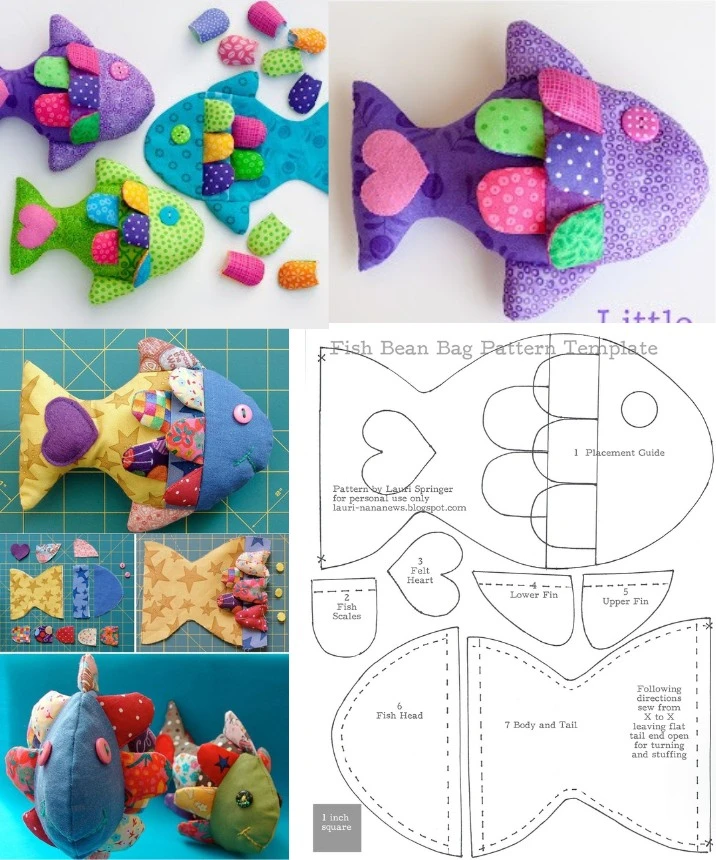
Before you start, it’s essential to determine the size of your fish. Here are some basic measurements:
Body Length: About 15 cm (this can be adjusted based on your preference).
Scales: Approximately 2.5 cm wide.
Fins: Roughly 5 cm long.
Head: Adjusted to fit the overall shape of the fish.
Step-by-Step Instructions:
1. Cut the Pieces
Using your paper and pen, sketch out your fish pattern. Once satisfied, cut out the pieces from your fabric. You’ll need to cut:
- Two pieces for the body
- Scales and fins
- One piece for the head
2. Assemble the Fish Body
Place the two body pieces together with the right sides facing each other. Sew along the edges, leaving a small opening for stuffing. It’s crucial to keep your stitches tight to ensure stability.
3. Attach Scales and Fins
Before closing up the body, this is the perfect time to attach the scales and fins. Sew them onto the body securely. This ensures they will stay in place and adds a decorative touch to your fish.
4. Add the Head
Now, it’s time to sew on the head! Carefully attach it to the body, following your pattern guide. Make sure it aligns perfectly for a finished look.
5. Fill the Fish
Once the body is sewn together, turn it right side out through the opening. Then, fill your fish with stuffing or beads until it reaches your desired softness.
6. Close the Opening
Using invisible stitching, close the opening you left for stuffing. Make sure to secure it well so the stuffing stays intact.
7. Personalize Your Fish
Let your creativity shine! You can add embroidered eyes, sequins, or other embellishments to give your fish character and personality. Don’t be afraid to experiment with different designs!
Safety Tips
If your fish is intended for young children, avoid using small parts like buttons that could be a choking hazard. Always make sure the materials you’re using are child-friendly.
Conclusion
Fabric fish are more than just cute decorations; they’re a creative way to express yourself and make personalized gifts for loved ones. Whether you hang them as cheerful decor or give them as toys, these adorable creations are sure to bring joy.
So, gather your materials, follow these simple steps, and dive into the fun world of fabric sewing! Happy crafting!