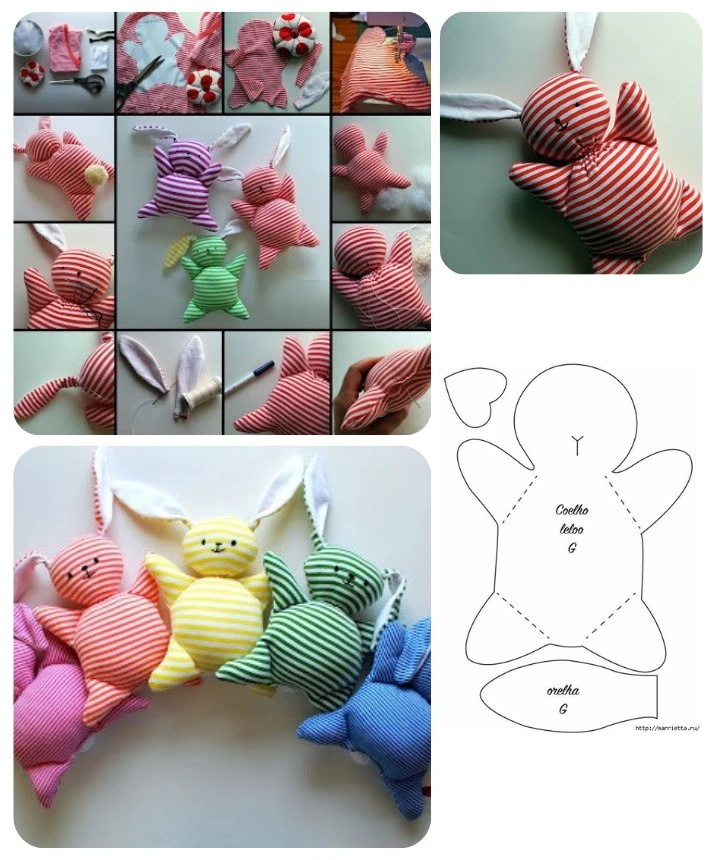
Are you looking for a delightful DIY project that will warm hearts and bring smiles to young ones? Creating an adorable striped fabric bunny is the perfect solution! This charming plush toy makes a wonderful gift for children, and it’s a joy to sew. Whether for a birthday or a special occasion, a handmade bunny will always be cherished. Let’s dive into the materials you’ll need and the steps to bring this cuddly creation to life!
Materials Needed
To get started, gather the following materials:
Striped Fabric (cotton or jersey): 40 cm x 30 cm
White Fabric (for the ears): 10 cm x 10 cm
Matching Thread
Stuffing (polyester fiberfill or similar)
Needle and Thread (for embroidering eyes and nose)
Scissors
Pins
Fabric Marker or Chalk (for tracing)
Dimensions of Pieces
Body: Approximately 20 cm high and 15 cm wide (use the provided pattern)
Ears: Length of 10 cm
Heart (optional): Diameter of 3 cm for a decorative touch
Step-by-Step Instructions
1. Preparing the Pieces
- Start by printing or drawing the bunny pattern on paper.
- Cut out two pieces of the striped fabric according to the bunny body outline.
- Cut two pieces for each ear—one from the striped fabric and one from the white fabric.
2. Assembling the Ears
- Place the two pieces for each ear right sides together (striped and white).
- Sew around the sides, leaving the base open.
- Turn the ears inside out and press them flat.
3. Body Assembly
- Pin the ears to the top of one of the body pieces, making sure they’re oriented downwards.
- Place the second body piece on top, right sides together, and sew around the edges, leaving a 5 cm opening at the bottom to turn the bunny inside out later.
4. Stuffing and Closing
- Carefully turn the bunny right side out through the opening.
- Stuff the body with polyester filling until it is firm and huggable.
- Close the opening with an invisible stitch to secure the stuffing inside.
5. Embroidering Features
- Using black thread, embroider the eyes and nose to give your bunny personality.
- Feel free to add decorative touches, such as a little stitched heart on the tummy, for extra charm!
Tips for Customization
Varied Fabrics: Use different colored fabrics for a unique twist on your bunny.
Hypoallergenic Stuffing: If the plushie is intended for younger children, consider using hypoallergenic stuffing.
Washable Materials: Choose machine-washable fabrics for easy cleaning, ensuring the bunny remains a cherished toy for years to come.
Conclusion
With this step-by-step tutorial, you’ll create a lovable striped fabric bunny that will undoubtedly become a favorite companion for any child. It’s a heartwarming gift that showcases your creativity, and the joy of making something by hand is unparalleled! Enjoy your sewing adventure, and watch as your little bunny comes to life!
Happy sewing! 🐇💖