Looking for a delightful sewing project that combines creativity with cuddly comfort? Making a handmade fabric lion could be just what you need! This charming soft toy is perfect for little ones and serves as a thoughtful gift that will surely warm their hearts. Let’s dive into the dimensions, materials needed, and steps to create this adorable companion!
Dimensions
Height: 30 cm
Width: 15 cm
Mane Length: 5 cm around the face
Materials Needed
To create your fabric lion, gather the following materials:
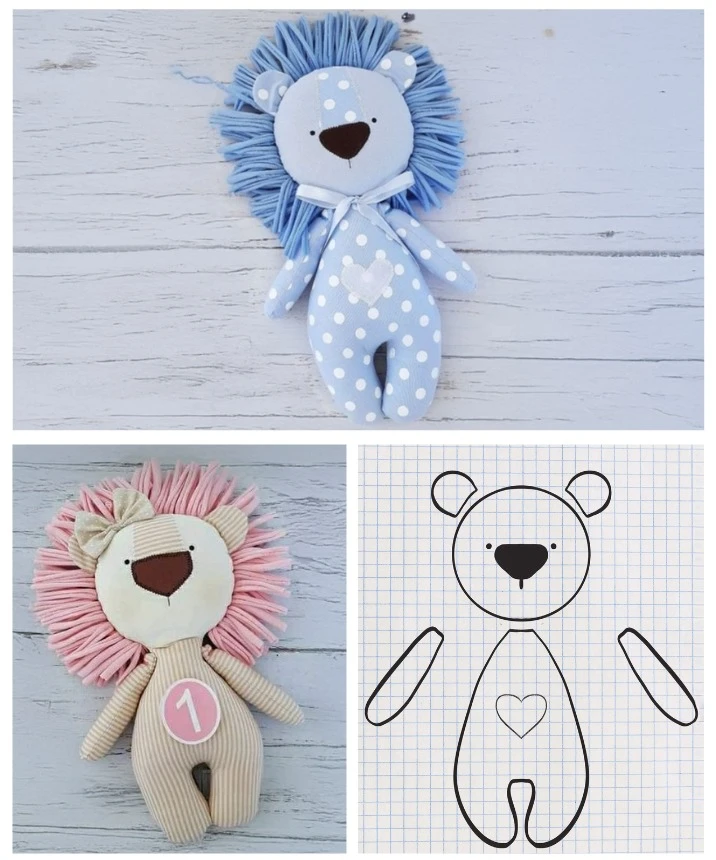
Cotton Fabric: Choose a fabric with a fun pattern or color—polka dots work wonderfully!
Matching Thread: Pick blue and white thread to match your fabric.
Stuffing: Polyester fiberfill or another child-safe stuffing material.
Felt: Black felt for the nose and eyes, and white felt for a cute decorative heart.
Black Embroidery Thread: For stitching on the lion’s mouth.
Blue Yarn or Felt: To make the mane.
White Ribbon: For a lovely bow around the lion’s neck.
Sewing Tools: Scissors, needle, pins, and a sewing machine (optional).
Step-by-Step Instructions
1. Prepare the Pieces
Draw the Pattern: Create a pattern for the lion’s body, head, arms, and legs on paper.
Cut the Fabric: Transfer the pattern to your chosen polka dot fabric and cut out two pieces for each part (front and back).
2. Create the Mane
Cut the Mane Material: Slice the blue yarn or felt into thin strips, about 5 cm long.
Pin the Mane: Arrange these strips around the head piece to form a fringe, and pin them in place.
3. Assemble the Body
Sew the Head: Place the two head pieces right sides together and pin. Insert the mane in between the pieces before sewing, leaving an opening for turning and stuffing.
Turn and Stuff: After sewing, turn the fabric right side out, stuff it with the polyester fill, and close the opening securely.
Attach the Limbs: Assemble the arms and legs in the same manner, then sew them onto the body.
4. Finish and Add Details
Decorate the Belly: Cut a small heart from the white felt and sew it onto the lion’s belly for a sweet touch.
Add the Face: Attach the black felt pieces for the eyes and nose, and use the black embroidery thread to stitch the mouth.
Tie on a Bow: Complete your lion’s look by tying a white ribbon around its neck.
Practical Tips
Safety First: Ensure that all small elements like the eyes and nose are securely attached to prevent any choking hazards.
Choose Soft Fabrics: Opt for hypoallergenic, child-friendly fabrics, especially if the lion is intended for babies.
Personalization: Feel free to experiment with different colors and patterns to create a unique collection of fabric lions.
Easy Care: Using machine-washable fabrics will ensure that your cuddly companion is easy to clean and lasts for many years of snuggly adventures!
Conclusion
This adorable fabric lion will quickly become your child’s favorite companion, providing comfort and joy in their everyday life. Plus, crafting this lovely toy is a fantastic way to hone your sewing skills while creating something special. So gather your materials and get ready to sew a magical friend!
Happy crafting! 🦁💖