Are you ready to embark on a delightful sewing journey? This project will guide you through creating a charming plush mouse that can be a perfect companion for kids or a cute decoration for your home! With just a few materials and some basic sewing skills, you can make this cuddly little friend in no time.
Materials You’ll Need
Before you start stitching, gather the following materials:
Faux Fur Fabric: A small piece (approximately 20×30 cm)
Felt: For making the ears and other decorative details
Matching Thread: To blend seamlessly with your fabric
Polyester Stuffing: To give your mouse that huggable feel
Embroidery Thread: For creating adorable whiskers
Buttons or Beads: To serve as the mouse’s eyes
Sewing Needle and Pins: Essential for the stitching process
Scissors: To cut your fabric
Sewing Machine (optional): While hand sewing works perfectly, a sewing machine can make the process quicker
Size and Measurement
The finished plush mouse will be approximately 15 cm tall, making it a perfect miniature companion!
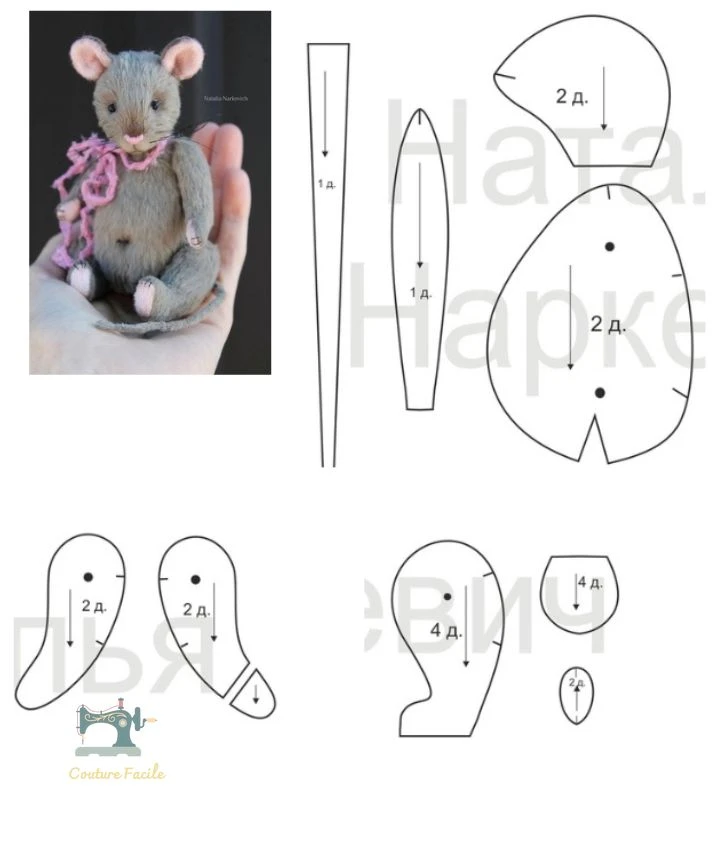
Cutting the Pieces
Here’s how to get started with your plush mouse:
Print and Cut the Pattern: Begin by printing out the mouse pattern. Cut out the pieces you’ll need.
Trace the Pieces: Lay the cut pattern pieces on the backside of your faux fur fabric and trace around them, adding a 5mm seam allowance.
Cut Out the Pieces: Carefully cut out the fabric pieces that you will sew together. Be gentle with the faux fur to avoid any unnecessary fraying.
Assembling the Body
Now that you have all your pieces cut out, it’s time to assemble your mouse!
Sew the Body: Place the two body pieces together, right sides facing each other. Sew along the edges, leaving an opening at the bottom for stuffing.
Turn Inside Out: Gently turn your sewn fabric right side out, revealing that lovely faux fur!
Stuff Your Mouse: Fill the body with polyester stuffing until it’s plush and inviting.
Creating the Limbs and Tail
Next, let’s bring your mouse to life with little legs and a tail!
Sew the Legs: Take two leg pieces, place them right sides together, and sew the edges, leaving an opening. Turn them inside out and stuff them lightly. Repeat this step for all four legs.
Create the Tail: Fold the tail piece in half lengthwise, sew along the edge, and turn it inside out.
Adding the Details
This is the fun part where you can give your mouse personality!
Attach the Limbs: Secure the legs to the bottom of the body using strong stitches.
Add the Ears: Sew the felt ears onto the top of the head. You can add a felt circle inside the ears for extra detail.
Embellish the Face: Sew or glue on the buttons or beads as eyes and stitch on the whiskers using embroidery thread.
Personal Touch: To make your mouse even more special, consider adding a ribbon or a tiny scarf around its neck.
Final Touches
Close the Opening: Carefully close the opening at the bottom of the body with an invisible stitch.
Snip Any Excess Threads: Take a moment to tidy up your creation by trimming away any loose threads.
Conclusion
Congratulations! You’ve just crafted your very own adorable plush mouse. This fun sewing project not only enhances your sewing skills but also results in a unique, handmade companion that you can cherish or gift to someone special.
So, what are you waiting for? Gather your materials and start sewing today! Happy crafting! 🧵✨