Are you looking to add a delightful touch to your crafting collection? This adorable mouse pouch not only serves a practical purpose but also showcases your sewing personality! Whether you’re a beginner or have some experience, this project is perfect for anyone wanting to create something unique and fun.
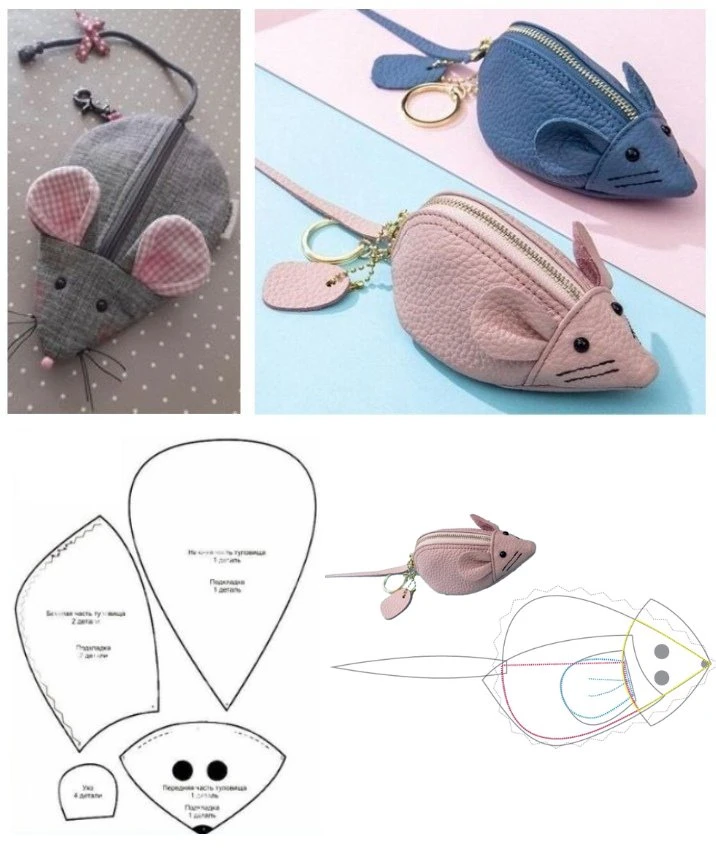
Dimensions and Pattern Pieces
Before you start sewing, let’s gather all necessary pieces for the mouse pouch. The dimensions below will guide you through the cutting process:
Mouse Body:
Top Piece: 1 piece, 12 cm long, 8 cm wide.
Bottom Piece: 1 piece, 12 cm long, 8 cm wide.
Sides: 2 pieces, 7 cm long, 5 cm wide.
Ears: 4 pieces, 5 cm in diameter each.
Zipper:
Length: 10 cm for the main opening.
Additional Elements:
Tail: 1 piece, 15 cm long.
Eyes: 2 buttons, 0.5 cm in diameter (or buttons for a cuter effect).
Nose: 1 small bead or button, 0.5 cm in diameter.
Step-by-Step Instructions
Step 1: Download the Pattern
Begin by downloading the full-size pattern. To ensure accuracy, print a test page that includes a 2.54 cm square for measurement verification.
Step 2: Prepare Materials
Choose a lovely cotton or linen fabric for a soft and elegant finish. You’ll need approximately 0.3 meters for the outer pouch and about 0.2 meters for a lightweight lining. Don’t forget a 10 cm zipper for the main opening!
Step 3: Cut the Pieces
Using the downloaded pattern, cut out all the necessary pieces from both the main fabric and the lining. Remember to cut symmetrical pieces in pairs for the sides and ears.
Step 4: Assemble the Ears
Sew two ear pieces together, right sides facing. After sewing, turn them inside out and press for a neat finish. Repeat this for the other pair and attach them to the sides of the top body piece.
Step 5: Assemble the Body
Attach the zipper between the top and bottom parts of the body. Make sure to sew it neatly to allow for easy opening and closing. Your next step is to attach the sides at the base of the upper body, starting with the zipper.
Step 6: Attach the Tail
Sew the tail piece to the back of the pouch to complete the mouse look!
Step 7: Add Eyes and Nose
Finally, sew the buttons or beads for the eyes and nose on the front of the pouch to give your mouse its charming face.
Step 8: Finishing Touches
Test your pouch for adjustments. Make any necessary tweaks for a better fit and consider adding decorative elements like embroidery to personalize your creation further!
Tips for Sewing
Fabric Choice: Use a standard needle to prevent damage to the cotton or linen.
Zipper Installation: Ensure the zipper is securely attached for a smooth operation.
Seams: Keep your seams strong and neat to ensure the durability of your pouch.
Conclusion
Now that you have this guide, you’re ready to embark on creating your very own adorable mouse pouch! It’s a fun and easy project that adds a personal touch to your accessories.
Happy sewing! 🎉