Are you looking for a stylish yet functional way to keep your crafting supplies organized? Look no further! This easy compartment bag is perfect for anyone, from beginners to seasoned crafters. Not only will it help you organize your tools, but it also makes for a delightful DIY project that you can be proud of. In this article, we’ll walk you through the materials needed and the simple steps to create your very own compartment bag.
Materials Needed
To get started, gather the following materials:
Exterior Fabric:
- 1 piece measuring 47 cm x 29 cm
- 2 pieces measuring 38 cm x 8 cm
- 3 pieces measuring 19 cm x 27.5 cm
- 2 pieces measuring 8 cm x 38 cm
- 3 pieces measuring 6 cm x 6 cm
Lining Fabric:
- 1 piece measuring 47 cm x 20 cm
- 2 pieces measuring 38 cm x 8 cm
- 3 pieces measuring 19 cm x 27.5 cm
Zipper:
- 1 zipper measuring 35 cm
Steps to Create Your Compartment Bag
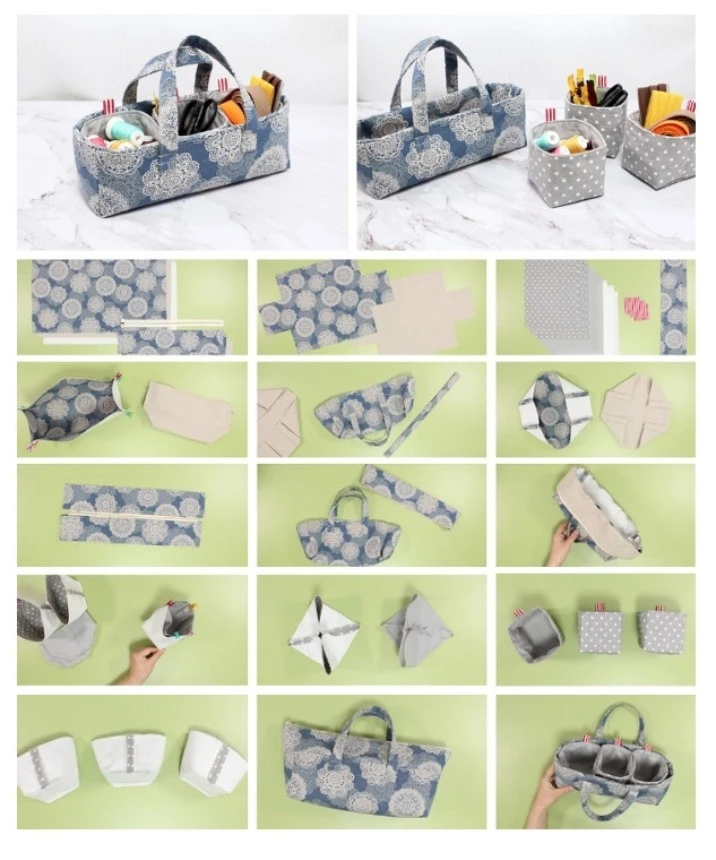
Step 1: Cut Your Pieces
Begin by cutting all the fabric pieces according to the dimensions listed above. Make sure to mark the positions for the zipper and the sides of the bag clearly, as this will help you during assembly.
Step 2: Prepare the Inner Compartments
Next, assemble the three small square pockets that will serve as compartments within your bag. Sew the sides together, leaving the top open. Once sewn, turn them right side out, press them flat, and insert them into your main lining fabric.
Step 3: Assemble the Sides and Base
Now it’s time to construct the body of your bag. Attach the side pieces to the bottom piece, ensuring that the edges align properly. Pin them in place and sew to secure.
Step 4: Add the Zipper
Take your 35 cm zipper and sew it onto the top piece of your bag. Take extra care to match the edges and test the zipper to ensure it functions smoothly before securing it entirely.
Step 5: Final Assembly and Finishing Touches
Combine the exterior fabric with the lining, leaving a small opening for turning the bag inside out. Once turned, sew the opening closed with an invisible stitch. To finish, make a topstitch around the bag to enhance its durability and appearance.
Tips and Tricks
Stabilization: Consider using interfacing to give your bag more structure.
Handles: Add some straps if you’d like to carry your bag easily.
Customization: Feel free to add extra pockets to store smaller tools and supplies for even more organization!
Conclusion
This compartment bag is not only a practical addition to your crafting space but also versatile enough for various uses. Whether you’re a passionate crafter or just looking to tidy up your workspace, this DIY project offers a fun way to express your creativity while building something useful.
So, grab your materials and let’s get sewing! Happy crafting!