Are you looking for a delightful and easy DIY project? These adorable fabric mice are perfect as children’s toys or charming decorative items for your home. With just a little fabric and basic sewing skills, you can bring these cute critters to life!
Why Sew Fabric Mice?
Creating your own fabric mice offers a variety of benefits:
Easy and Quick: This project is beginner-friendly and can be completed in a short amount of time.
Customization: You can choose the fabric, colors, and patterns that best match your style or the recipient’s preferences.
Thoughtful Gift: Handmade items carry a personal touch, making them wonderful gifts for friends and family.
Creative Fun: This project is a great way to unleash your creativity and enjoy some relaxing sewing time.
Materials Needed
Before you get started, gather the following materials:
Fabric: Choose a soft cotton or linen for a pleasant touch.
Stuffing: Polyfill or synthetic cotton to fill your mice.
Ribbons: Optional, for adding a cute bow around the mouse’s neck.
Matching Thread: To sew your fabric pieces together.
Sewing Essentials: Needles, pins, scissors, and a fabric marker for tracing patterns.
Step-by-Step Instructions
Follow these simple steps to create your very own fabric mice:
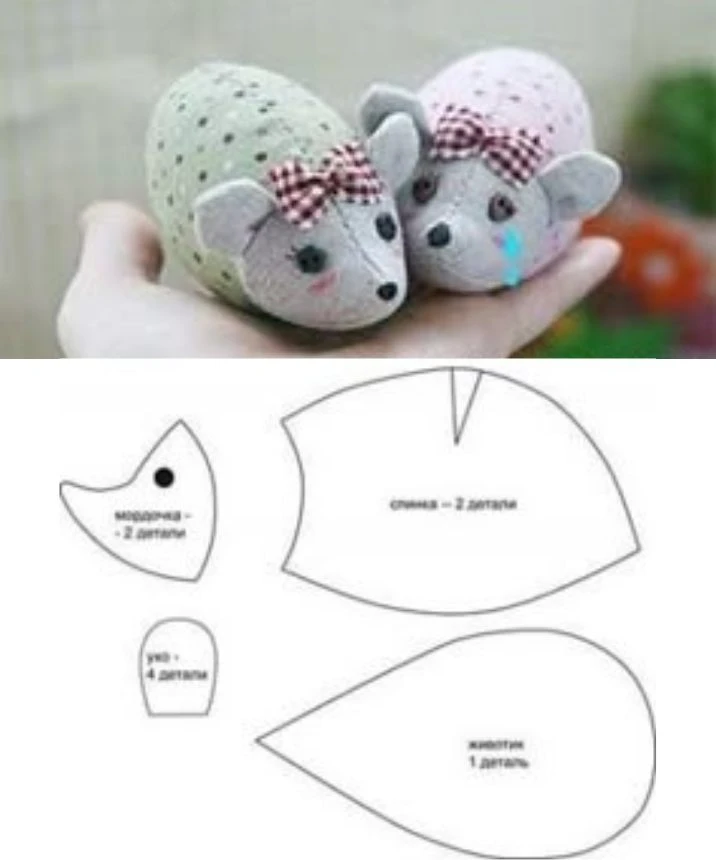
Cut Your Pieces: Use the provided template to cut 2 pieces for the back, 1 piece for the tummy, 4 small pieces for the ears, and 2 pieces for the snout.
Sew the Ears: Assemble the two pieces for each ear, right sides together. Stitch around the edge, leaving the bottom open. Turn them inside out and press flat.
Assemble the Back: Sew the two back pieces together, leaving a small opening to insert the ears later.
Insert the Ears: Position the ears in the opening at the back and sew them securely.
Attach the Tummy: Sew the tummy piece to the sides of the back, leaving an opening at the bottom for stuffing.
Stuff the Mouse: Fill your fabric mouse with stuffing until it reaches your desired plumpness, and then close the opening with an invisible stitch.
Add the Details: For a finishing touch, use a small ribbon to create a bow around the mouse’s neck. You can also embroider eyes, a nose, and a mouth to add character to your new companion.
Tips for Fabric Selection
Cotton or Linen: For a soft and natural look, lightweight cotton or linen fabrics are ideal. Patterns like polka dots or florals will add an extra dash of charm.
Pastel Colors: Opt for gentle pastel shades to give your mice a sweet and whimsical vibe.
Scrap Fabric: Use remnants from other projects to promote sustainability and creativity while reducing waste.
Final Thoughts
These fabric mice are not only lovely gifts but also a wonderful way to add a touch of warmth and charm to your space. Whether for a child’s playroom, as a thoughtful present, or simply for your enjoyment, crafting these cuddly companions is a rewarding experience. So gather your materials, enjoy the process, and watch your adorable mice come to life! 🌸🧸
Happy sewing!