Are you looking to add a magical touch to your child’s bedroom? Crafting enchanting pillows in the shapes of clouds, stars, and raindrops is a fun and creative DIY project that will delight both kids and parents alike! Not only do these whimsical pillows serve as adorable decor, but they can also become treasured companions for your little ones. Let’s dive into this charming sewing project!
Pillow Measurements
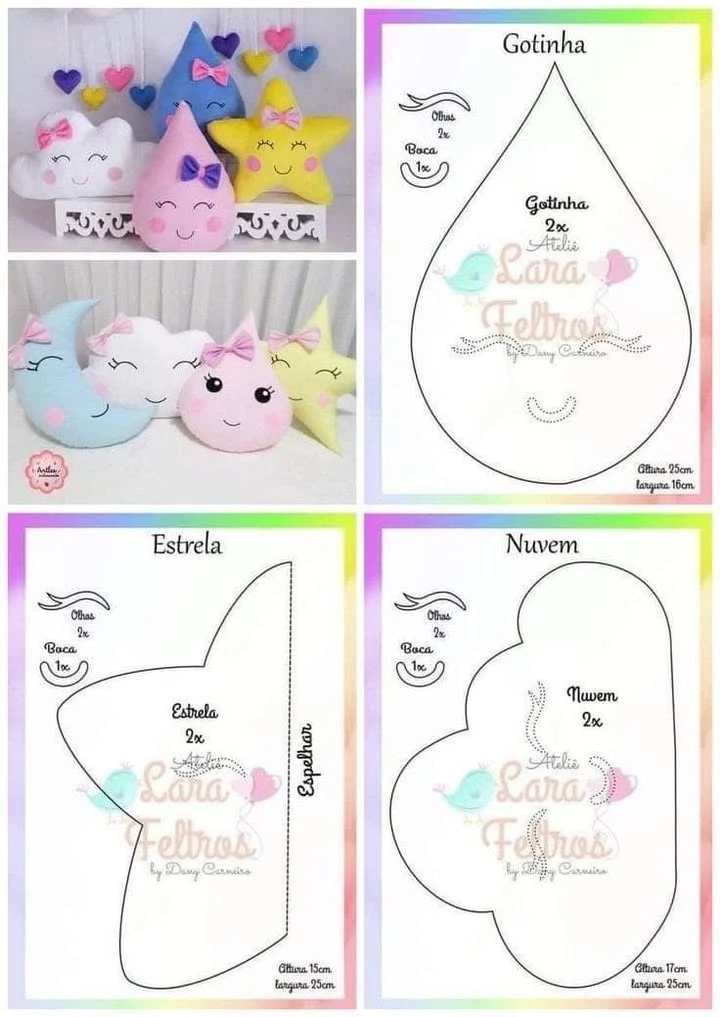
To help you get started, here are the dimensions for each of the pillows:
Raindrop (Gotinha): Height 25 cm, Width 16 cm
Star (Estrela): Height 15 cm, Width 25 cm
Cloud (Nuvem): Height 17 cm, Width 25 cm
Materials Needed
Before you begin sewing, gather the following materials:
Fabric: Choose soft and comfy fabrics like felt or cotton in colors that will light up the room.
Thread: Opt for contrasting thread to make the facial features pop.
Stuffing: Use polyester fiberfill or any washable filling.
Sewing Tools: You’ll need scissors, pins, a sewing machine (or needle and thread for hand sewing), and fabric markers for detailing.
Step-by-Step Instructions
1. Prepare the Pillow Pieces
Start by cutting out two identical shapes for each pillow. Use a template for the raindrop, star, and cloud to ensure consistency. Don’t forget to draw or trace the eyes and mouth on each piece for later decoration.
2. Add Some Character
Next, it’s time for some fun! Embroider or sew the eyes and mouth onto the front of each pillow using contrasting thread. You can also add extra embellishments like little bows to make them even more charming.
3. Sew the Pillows Together
Lay the two pieces of fabric for each shape with the right sides facing each other. Pin them in place, then sew around the edges, leaving a small opening (about 5 cm) for turning and stuffing. Ensure your seams are neat and secure for durability.
4. Stuff and Finish
Turn each pillow right side out through the opening you left. Now it’s time to stuff them! Fill them generously with fiberfill to make them soft and squishy. After stuffing, close the opening with an invisible stitch for a polished look.
Tips for Success
Fabric Choice: Using soft felt not only adds a lovely tactile quality but can also make it easier to sew the decorative motifs.
Personalization: Get creative! You can add pink cheeks by sewing on little pieces of pink fabric or using fabric paint.
Safety First: If these pillows are meant for young children, reinforce your seams well and avoid using small embellishments that could pose a choking hazard.
Care Instructions: Choose a washable stuffing and ensure your fabric is easy to clean, making it practical for everyday use.
Conclusion
These enchanted pillows in the shapes of clouds, stars, and raindrops will surely brighten up your child’s room, adding both whimsy and comfort. The best part? This project is simple enough for beginner sewers and provides room for creativity, allowing you to personalize the pillows in whichever way you choose!
So why wait? Gather your materials, unleash your imagination, and create these delightful treasures that your children will cherish for years to come! Happy sewing! 🌟💖